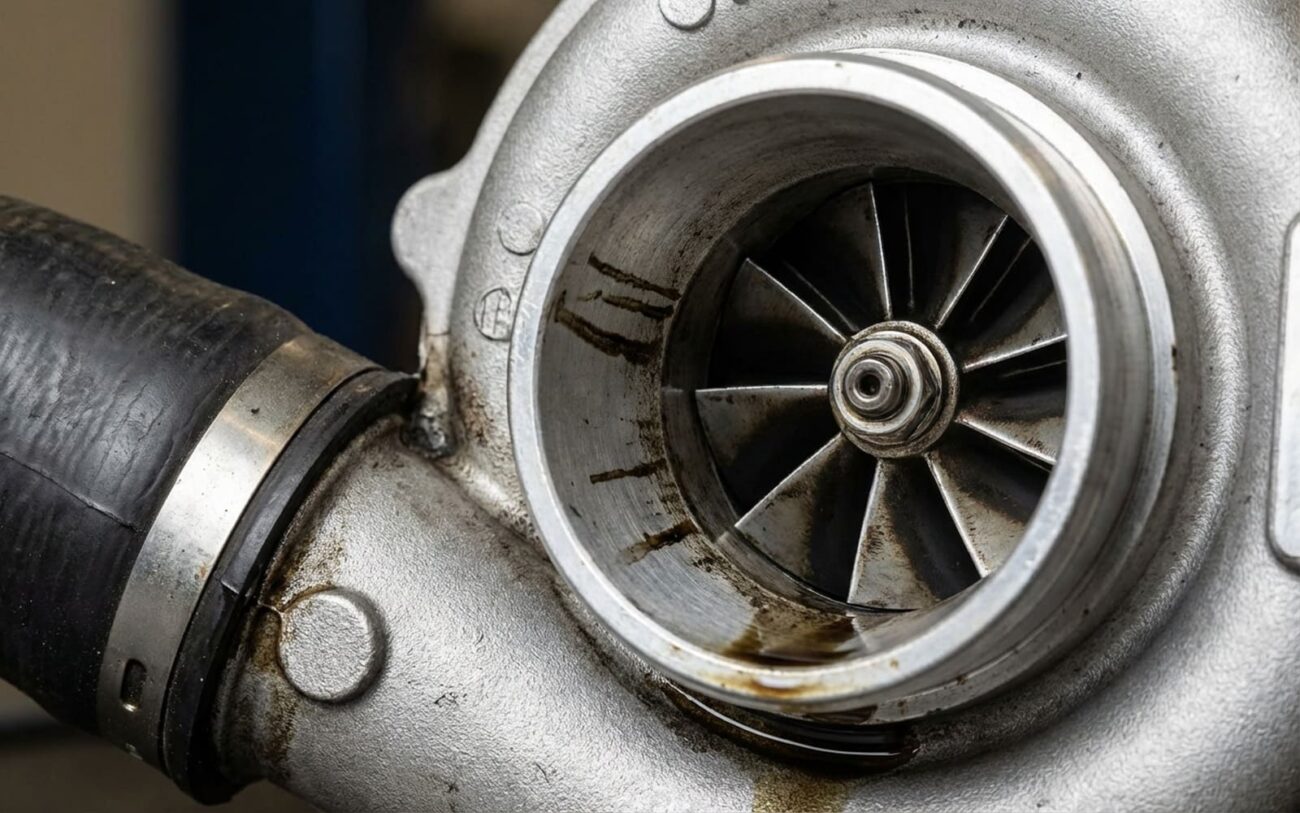
Alright, let’s talk turbo oil leaks. In my 25+ years spinning wrenches, I’ve seen a lot of folks jump to conclusions when they spot blue smoke or oil in the intake. But here’s the deal: a turbo leak isn’t always the turbo’s fault, and the symptoms can fool you. This isn’t just about replacing a part; it’s about figuring out why it failed so you don’t do the job twice.
What You’ll See, Hear, and Smell
When a turbo starts letting oil past its seals, the signs can be pretty subtle at first. But trust me, they’ll get worse if you ignore them. The most common giveaway is that telltale blue or gray smoke puffing out the exhaust. You’ll usually spot it when you’re coasting downhill, or after you’ve been idling at a stoplight and then hit the gas. That smoke isn’t fuel or coolant; it’s engine oil getting sucked through the turbo’s compressor side, burned in the cylinders, and then pushed out. It’s got a sharp, acrid smell, totally different from the sweet smell of burning coolant.
Another big clue is finding actual oil inside the intake pipes. If you unhook the hose between the turbo and the intercooler, or the one from the intercooler to the throttle body, and see a good amount of pooling oil or a thick, greasy film, then yeah, the turbo’s compressor seal is probably shot. That spinning compressor wheel just flings the oil right through the intake system.
I also see a lot of high oil consumption without any visible leaks on the driveway or coolant contamination. If you’re adding a quart of oil every few hundred miles, and there’s no puddle under the car, that oil is going somewhere internal. It could be worn piston rings or valve guides, sure, but a failing turbo is a huge suspect. I’ve seen this misdiagnosed countless times; folks assume it’s an engine rebuild, but it turns out to be a leaking turbo seal.
Sometimes you’ll also hear a high-pitched whistling or whooshing noise when you accelerate. If you combine that with oily residue around hose clamps or intercooler connections, you’re likely looking at a boost leak that’s also letting oil seep out from a compromised seal.
First: a sudden, dense cloud of blue smoke under acceleration. This usually means the turbo’s internal oil seals have completely given up the ghost. In a gas engine, that oil can wash down cylinder walls, mess with the fuel mixture, cause detonation, and even destroy pistons. In a diesel, it’s even worse – you can get “dieseling” or runaway, where the engine runs uncontrollably on its own engine oil as fuel. That’s how engines explode.
Second: any grinding, shrieking, or metallic scraping noise coming from the turbo housing. That’s a sign of catastrophic bearing failure. If that turbo spins itself apart, metal fragments can get sucked straight into your engine and take out pistons or valves. Don’t risk it.
Don’t Guess, Test: Isolating the Real Problem
Here’s the cold, hard truth: many of these symptoms overlap with other engine problems. Blue smoke on deceleration? Yeah, that’s classic worn valve stem seals, just as much as it is failed turbo seals. Oil in the intercooler? Could easily be too much crankcase pressure from a clogged PCV system. Jumping to conclusions here is a quick way to waste money on parts you don’t need. You’ve got to test, not guess. I’ve seen too many good turbos replaced when the real issue was elsewhere.
I’ve developed a few field-proven methods over the years to pinpoint where that oil is really coming from. These aren’t just theoretical; they’re what I use in my shop every week.
My go-to here is the “hot shutdown” test. Get the engine up to full operating temperature, then shut it off. Immediately pull the turbo inlet pipe. If you see oil dripping from the compressor wheel hub right away, you’ve got failed turbo seals. If it’s dry, then you’re probably looking at valve stem seals or something else.
You need to check crankcase pressure. Hook up a manometer (a simple water manometer works fine for this, or a dedicated pressure gauge) to the dipstick tube or another crankcase vent. Cap off the PCV port on the intake manifold. Run the engine at about 2500 RPM. If that pressure goes above 1.0 inch of water (inH2O), you’ve got engine-related issues, like a clogged PCV valve, a restricted PCV hose, or even worn rings. That pressure will force oil into the intake, mimicking a turbo leak.
This one can be tricky. I often use an exhaust gas analyzer. Monitor unburned hydrocarbons (HC) while driving, especially when the turbo is under boost. A significant spike in HC during boost conditions strongly suggests oil is being burned due to a turbo seal failure. If it’s consistent across all RPMs and loads, it leans more towards piston rings or valve guides.
First, clean everything thoroughly. Then, with the engine off, use a regulated smoke machine on the crankcase. If you see smoke coming out of the turbo’s oil drain line, or even from the compressor housing, then the turbo is your source. This test helps differentiate between a turbo seal leak and external engine leaks that might be getting blown around.
Why Your Turbo Failed (The Real Story)
Once you’ve confirmed that the turbo is indeed the source of the oil leak, the next step is figuring out why it gave up. Most turbo failures I see come down to oil problems, contamination, or just plain old mechanical wear. And most of that is preventable with good maintenance.
The biggest killer, hands down, is oil coking on the turbine side. Think about it: you’ve been driving hard, the turbo is glowing red hot, sometimes over 1000°F in a performance car. You pull over and shut the engine off instantly. What happens? The oil flow stops, but that housing stays screaming hot. The residual heat bakes the oil film in the center housing into hard carbon deposits. These deposits then score the shaft, chew up the seal surfaces, and can even block the oil drain passage. When that drain gets blocked, oil backs up, pools, and eventually gets forced past the compressor seal. Using cheap oil or stretching your oil change intervals is a fast track to this problem. Full-synthetic oils with high thermal stability resist coking much, much better.
Another common culprit is bearing and shaft wear. Every turbo has a tiny bit of shaft play, but when it goes beyond spec – usually because of dirty oil, low oil pressure, or just old age – that rotating assembly gets unstable. This imbalance destroys the effectiveness of the dynamic oil seals. In the worst cases, the shaft starts rubbing against the housing, and then you’ve got instant, catastrophic failure.
Foreign object damage (FOD) is also a real threat. A torn air filter, or even one that’s just poorly sealed, can let dirt and debris get sucked into the compressor housing. That aluminum compressor wheel spins at well over 100,000 RPM, so even a tiny impact can throw it out of balance, putting huge stress on the bearings and seals. I’ve seen a pebble the size of a pea destroy a turbo in seconds.
And then there are the rare cases: the center housing itself cracks. This is usually due to extreme thermal cycling or sometimes a casting flaw. If the housing cracks, no seal in the world is going to hold that oil in. That’s a structural failure, not a wear issue, and it means replacement.
But—and this is absolutely critical—not every turbo leak is the turbo’s fault.
A kinked, collapsed, or clogged oil drain line is a huge one. It prevents oil from getting back to the sump, causing it to back up and force its way past the seals. I’ve seen guys replace turbos only to have the new one leak in a week because they didn’t check the drain. Same goes for a restricted oil feed line or a failing oil pump; they reduce lubrication, leading to premature wear. And like I mentioned earlier, a faulty PCV system creating excessive crankcase pressure can push oil into the intake, making it look exactly like a turbo seal leak.
Fixing the turbo without addressing these underlying root causes is just throwing money away. For more on engine-related fluid issues, we cover head gasket symptoms in detail here: Symptoms of a Blown Head Gasket Caused by a Cracked Engine Block, and what to do if you’ve already replaced a gasket but still have problems here: What to Do if You Still Have Coolant in Oil After a Head Gasket Replacement.
Getting It Fixed: Your Repair Options
Precision and Safety First
Your repair path really depends on where and how the failure happened. Not every oil leak means you need a whole new turbo. But, if you’re going inside the turbo, remember that internal repairs demand precision balancing and specialized tools for it to last.
External Line Repair [DIY-FEASIBLE]
Internal Seal & CHRA Rebuild [PROFESSIONAL-ONLY]
Full Unit Replacement [NON-REPAIRABLE → REPLACE]
Temporary Additives [TEMPORARY / LAST-RESORT]
After the Fix: Post-Repair Validation
Never, ever assume the repair worked just because the car runs. You need to verify it. For any oil leak repair, the primary check is visual. After about 500 miles of normal driving, get under there and inspect the lower intercooler pipe and the rest of the intake tract. A little dry film from crankcase vapors is normal, but new oil accumulation, pooling, or dripping is not. If you see that, something’s still wrong.
If you replaced or rebuilt the turbo, two additional checks are non-negotiable. First, monitor boost pressure using an OBD2 scan tool with live data. Find a safe place (like an on-ramp) and do a full-throttle pull in a suitable gear (usually 3rd). The boost should reach and maintain OEM specifications without any drops, spikes, or erratic behavior. Second, listen carefully. There should be no grinding, excessive whistling, or metallic scraping noises across the entire RPM range. A smooth, consistent spool-up sound indicates healthy bearing operation.
And if your initial diagnosis pointed to excessive crankcase pressure, you’ve got to retest after fixing the PCV system. With everything connected, run the engine at 2500 RPM and measure that pressure again. It absolutely needs to stay below 1.0 inH2O. A diagnostic smoke machine with a pressure gauge or a simple manometer will confirm this for you.
The Bottom Line: Cost, Risk, and Making the Right Call
Repair costs can swing wildly depending on the fix and your local labor rates. This table gives you a realistic range, but always get local quotes for your specific vehicle.
| Repair Type | DIY Cost (Parts) | Shop Cost | Success Rate (5-yr) | Secondary Risk if Failed |
|---|---|---|---|---|
| Oil Line Seals Replacement | $20–$50 | $200–$400 | 95% if drain line is clear (critical!) | Continued oil consumption, leading to turbo bearing failure and potentially engine damage. |
| Complete Turbo Replacement (OEM) | $800–$2500 | $1500–$4000 | 80–90% (assuming root cause addressed) | Improper installation (like not priming oil lines) can cause immediate failure or engine damage from debris. |
| Turbo CHRA Rebuild (Pro) | $300–$800 (core + kit) | $800–$1500 | 70–80% (depends heavily on rebuilder skill) | Imbalance, contamination, or improper assembly may lead to rapid re-failure. |
This isn’t just about the turbo; it’s about the whole vehicle’s health and your wallet. Here’s a rule I’ve always used: if the total repair cost (that’s the turbo plus any related engine damage you might uncover) goes over 50% of what the car’s real-world value is to you – what you’d actually get selling it privately – then it’s time to seriously reconsider. Putting $3000 into a car worth $4000, especially one with other aging components, rarely makes good financial sense in the long run.
Keeping Your Turbo Healthy (Prevention is Key)
The best turbo repair is always the one you never have to do. Turbo longevity, in my experience, boils down to three simple things: clean oil, proper cooling, and clean air.
Maintenance Essentials
-
First, oil quality is non-negotiable. Use only the full-synthetic oil specified by your manufacturer, with the correct viscosity and any turbo-specific approvals. Don’t skimp here.
-
Second, manage that heat. Make it a habit to idle for 30–60 seconds after hard driving before shutting off the engine. This lets oil circulate and cool those hot bearings down, preventing coking. Think of it as a built-in “turbo timer.”
-
Third, protect the compressor wheel. Change your air filter on schedule, and make sure it’s installed correctly. A torn or dirty filter lets in abrasive particles that will erode those delicate compressor blades, throwing the whole thing out of balance.
For early detection, I recommend checking your intake system monthly. Just remove the turbo inlet hose and peek inside for oil. A light, dry film from crankcase vapors is normal, but anything wet or dripping is a definite warning sign. And always track your oil level between changes – if you’re topping off more than a quart every 1000 miles, something is absolutely wrong, even if you can’t see it.
Proactive Monitoring
For insight into other noise-related issues, check: Engine Vibration at High RPM: Crankshaft or Harmonic Balancer?. Addressing small changes in turbo spool sound early can save the entire unit. Don’t wait for it to get loud.
