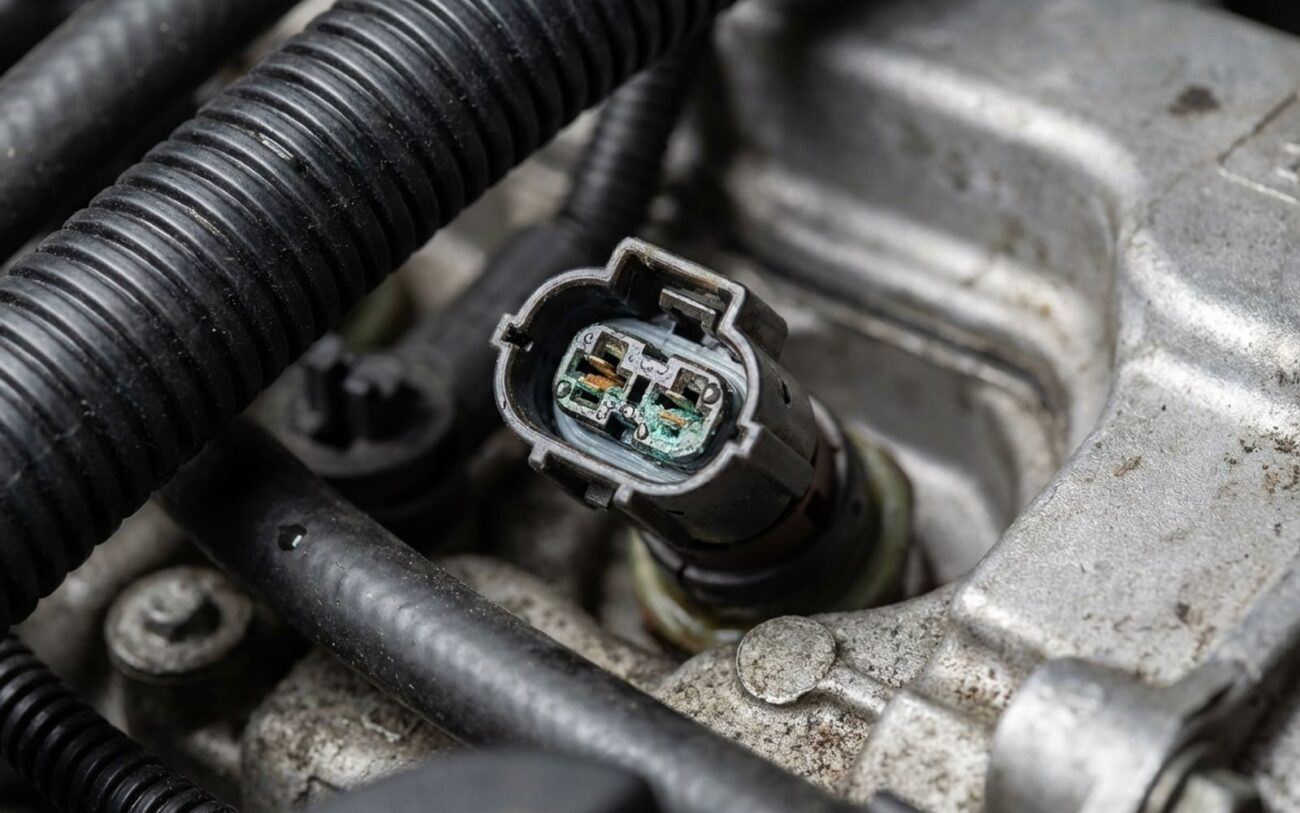
Alright, let’s talk about one of those head-scratchers that’s actually pretty common: your engine running like garbage right after it gets wet. I’ve seen this play out countless times over my 25+ years in the shop. Someone washes their car, power-washes the engine bay (please, don’t do that!), or just hits a big puddle, and suddenly the engine’s sputtering, shaking, and the check engine light is flashing like a disco ball.
The Symptoms & What They Mean
When you get that immediate correlation between moisture exposure and a rough-running engine, your radar should scream water intrusion into the sensitive electronics. We’re talking about a choppy idle, a noticeable loss of power, and that dreaded check engine light, which might be steady or, more alarmingly, flashing.
A flashing check engine light means the problem is severe enough that it could be actively damaging components, like your catalytic converter. Don’t ignore it.
Code: P0301
Your car’s computer, the ECU, is pretty smart. It’ll throw misfire codes – usually a P0300 for a random misfire, or a specific P0301 through P0308 if it can pinpoint a cylinder. These aren’t guesses; they’re the ECU telling you, “Hey, combustion failed right here.” Most often, water gets into a fuel injector connector, messes with the electrical signal, and that injector either doesn’t fire at all or fires inconsistently. The misfire might even clear up as the engine warms and dries out a bit, but don’t let that fool you. “Intermittent” doesn’t mean “fixed.”
Why These Connectors Fail: The Root Cause
It’s rarely the fuel injector itself that’s failed; it’s almost always the electrical connector. These connectors have three main weak points where water can get in and wreak havoc: the rubber seal, the plastic housing, and the metal terminals.
Over time, engine heat, constant vibration, and even exposure to harsh cleaning chemicals (another reason to avoid power-washing your engine) degrade that little rubber O-ring inside the connector. It hardens, shrinks, and eventually cracks. Once that seal is compromised, water’s got an open invitation.
The plastic housing itself can also crack. I’ve seen this a lot when someone’s been in there before and tried to pry the connector off instead of properly pressing the release tab. And once moisture gets past the seal or through a crack, it starts corroding the copper terminals. That corrosion builds resistance, interrupts the signal, and eventually, you get an open circuit. If you let it go, that corrosion can even creep up into the main wiring harness, turning a simple fix into a much bigger, more expensive headache.
My Take: Known Vulnerability
This isn’t just a random issue. Manufacturers know about it. For example, there are specific service bulletins for certain Ford EcoBoost engines (like the 1.5L and 2.0L) where misfires after a car wash are directly linked to water getting into the injector connectors. It’s a design vulnerability in some of those high-pressure fuel rail setups where the connectors are just too exposed.
How I Diagnose It: Isolating the True Source
Water doesn’t care what it shorts out, so while the fuel injector connector is a prime suspect, other components can absolutely mimic these symptoms. I’ve seen too many technicians (and DIYers) jump straight to replacing coils or injectors without actually confirming where the moisture is. That’s just throwing money at the problem.
Scenario 1: Misfire Code(s) for Specific Cylinder(s) After Water
This is your most common scenario. Your scanner throws a P0301, P0303, etc. – telling you exactly which cylinder is misfiring. My first move is to visually inspect that injector connector. Look for any signs of moisture, corrosion, or damage to the plastic housing or wires. If it looks suspect, here’s my definitive test:
With the engine running, gently mist water (from a spray bottle, not a hose!) directly onto the suspect injector connector. If the misfire immediately worsens or becomes constant, you’ve found your culprit.
Keep in mind, other things can cause this: water in an ignition coil connector, moisture down in the spark plug well, or even a cracked ignition coil. But the water mist test on the injector is pretty conclusive for that specific component.
Scenario 2: Engine Runs Rough, But No Active Misfire Codes
This one’s trickier. The engine feels rough, but the ECU isn’t logging a hard misfire code. This often points to minor moisture or high resistance in the injector circuit, just enough to disrupt the signal without completely stopping combustion. It’s like a weak signal, not a dead one.
I’ll perform a dynamic fuel injector balance test if my scan tool supports it. Otherwise, I’ll disconnect the battery, then unplug the injector connector and check the resistance of the injector itself. It should be between 11–16 ohms (check your specific vehicle’s specs). While monitoring resistance, I’ll gently wiggle the connector and wires. Any fluctuation points to a poor connection.
This kind of issue can also be mimicked by moisture on the MAF sensor, throttle body contacts, or even corroded engine ground connections, so keep an open mind.
Scenario 3: Misfire Moves or Affects Multiple Cylinders Randomly
If the misfire isn’t staying on one cylinder, or it’s hitting several randomly, it’s less likely to be an isolated injector connector. Now we’re looking at something broader, like water getting into the main engine control module (ECM) or a completely saturated air intake system allowing water into the throttle body.
I’ll visually inspect the ECM’s location (often under the hood, sometimes in the fender well) for any signs of water intrusion. I’ll also check the air intake system for standing water or excessive condensation, and pull apart multi-pin plugs in that area to check for moisture.
One more thing: if you’re working on a hybrid, be careful not to confuse an engine misfire with a hybrid system fault. A rough idle can sometimes come from torque delivery issues in the electric drive system, not just combustion. It’s a different animal, and you’ll want to use a specific diagnostic approach for that. (You can usually find good guides on how to tell if it’s an engine problem or a hybrid system issue, and a good understanding of common OBD2 codes helps too.)
The Fix: From Simple Cleaning to Serious Repair
Once you’ve pinpointed the problem, the repair depends on how bad the damage is. Here’s how I approach it, from easiest to most involved:
Minor Moisture or Corrosion DIY FEASIBLE
This is the best-case scenario. First, disconnect your battery – safety first! Then, carefully unplug the injector connector. Spray both sides liberally with a good electrical contact cleaner. Use a small terminal cleaning tool or even a fine pick to gently scrub any visible corrosion off the metal pins. Dry everything thoroughly with compressed air.
Before reconnecting, apply a thin layer of dielectric grease to the rubber seal and the terminals. This stuff is your best friend for preventing future water intrusion. Finally, plug it back in firmly. While you’re there, it’s a good idea to verify the injector’s resistance (again, 11–16 ohms is typical, but check your manual).
Failed Connector Seal or Housing ADVANCED DIY
If the rubber seal is visibly cracked or hardened, or the plastic housing is broken, cleaning alone won’t cut it. You’ll need an OEM connector repair kit. These kits usually come with a new housing and sometimes new terminals. You’ll need a terminal release tool (don’t try to force them out!) to depin the wires from the old housing and transfer them to the new one.
If the wires themselves are damaged or corroded near the connector, you’ll need to splice in a new section. Use high-quality crimp connectors and adhesive-lined heat shrink tubing for a durable, waterproof repair. Just be super careful here; improper pin seating or a bad splice can cause intermittent faults that are a nightmare to track down later.
Severe Harness Corrosion (Professional Only)
This is where it gets serious. If that corrosion has crept up into the main wiring harness, you’re beyond a simple connector swap. The affected section of the harness needs to be replaced. This isn’t a job for electrical tape and cheap crimps. It requires precision soldering, proper wire gauge matching, and meticulous sealing to maintain waterproof integrity and prevent future issues. A botched repair here can lead to high resistance, overheating, short circuits, or even fry your ECU. Take it to a pro.
Temporary Fix STOPGAP ONLY
If you’re stranded and desperate, a water-displacing spray like CRC Lectra-Motive might temporarily restore function. It’s designed to push water away from electrical contacts. But understand this: it does absolutely nothing for degraded seals, cracked housings, or existing corrosion. It’s a short-term workaround to get you home or to the shop, not a permanent fix. Don’t rely on it.
Post-Repair Validation: Don’t Just Assume It’s Fixed
You can’t just clear the codes and pat yourself on the back. That’s a rookie mistake. Once you’ve done the repair, here’s my process for making sure it’s actually fixed:
- Clear Codes: Use your scan tool to clear any stored diagnostic trouble codes.
- Road Test: Take the car for a good 20-minute drive. Hit varying speeds, accelerate, decelerate – put the engine under different loads.
- Monitor Live Data: While driving (or with a passenger monitoring), watch the live misfire data on your scan tool. You want to see zero misfire counts across all cylinders. If any counts pop up, you still have a problem.
- Stress Test (The Real Confirmation): Once the engine has cooled down, start it up again. With the engine running and cold, gently spray water (again, a fine mist, not a deluge) directly onto the repaired connector. If your misfire counters stay flat and the engine continues to run smoothly, then you’ve successfully sealed it up. If the misfire returns, you know exactly where to look again.
Cost, Risk & Making the Right Call
Understanding the potential costs and risks helps you make an informed decision. Remember that $30 repair vs. $1,500 cat converter? That’s real money.
| Repair Type | DIY Cost (Parts) | Shop Cost (Parts & Labor) | Secondary Risk if Failed |
|---|---|---|---|
| Cleaning & Grease | $10–$30 | $100–$200 | If not properly sealed, ongoing corrosion will damage terminals or potentially overload the ECU’s injector driver circuit, leading to a much more expensive ECU replacement. |
| Housing Replacement | $20–$50 | $150–$300 | Improper terminal seating during the transfer can cause intermittent connection issues, hard starts, or recurring misfires that are difficult to diagnose. |
| Harness Repair | $100–$500+ | $500–$1,500+ | Poor splices introduce high resistance, which can lead to overheating, short circuits, or even damage the ECU. This is a critical repair that needs to be done right. |
These are rough estimates, of course. Shop rates vary wildly, and some vehicles are just a pain to work on, driving up labor costs.
Prevention: Keep the Water Out!
-
Inspect Connectors Regularly: Make checking the condition of your electrical connectors, especially those exposed to the elements, part of your routine maintenance. Are the seals soft and pliable, or hard and cracked?
-
Avoid Pressure Washers: I can’t stress this enough. A garden hose with a gentle spray and a soft brush is all you need for cleaning your engine bay. Pressure washers force water into places it should never go.
-
Consider a Splash Shield: If you live in a particularly wet climate or frequently drive through standing water, an engine splash shield can offer an extra layer of protection. Just make sure it doesn’t block critical airflow for cooling.
My Golden Rule: Dielectric Grease
This stuff is cheap, lasts for years, and prevents a huge number of moisture-related electrical issues. Every single time I disconnect an electrical plug, whether it’s an injector, a coil, or a sensor, I apply a thin layer of dielectric grease to the terminals and the seal before reconnecting it. It ensures that metal-to-metal contact stays clean and dry, acting as a barrier against water and corrosion.
