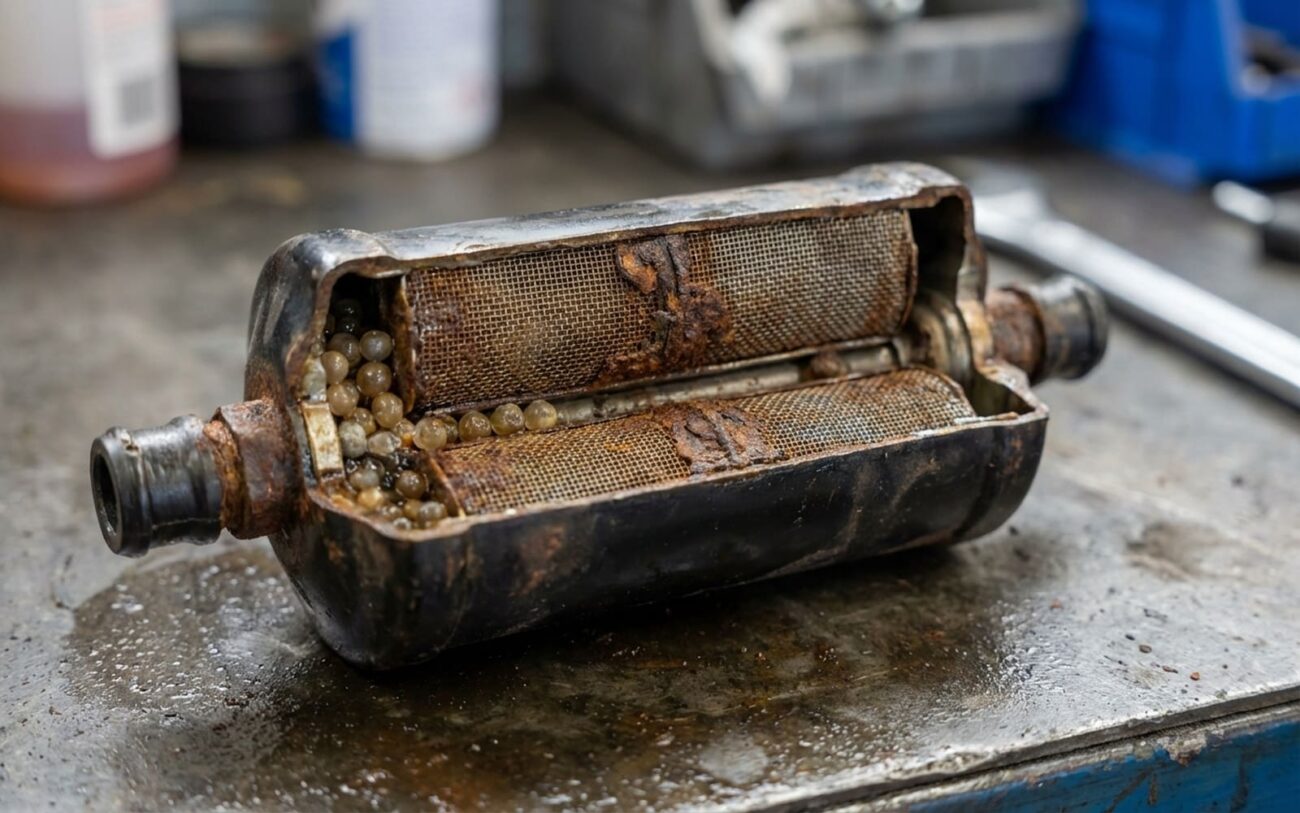
Alright, let’s talk AC. You know the drill: customer comes in, says the air isn’t blowing cold enough, maybe it’s just “not like it used to be.” Most folks think it’s just low refrigerant, but after 25 years under the hood, I can tell you it’s rarely that simple. One of the quiet killers in an AC system, the one that causes a whole lot of headaches without much drama, is the receiver-drier.
What a Failing Receiver-Drier Actually Feels Like
This little can doesn’t usually throw up a big red flag. Instead, it starts a chain reaction, mimicking other common problems. What I typically see on the gauges, after I’ve confirmed the refrigerant charge is correct, are erratic pressure readings. The high-side pressure might spike unpredictably, then drop, while the low-side gauge just dances around. That’s usually my first clue that the expansion valve (TXV) or orifice tube is getting partially blocked, often by fine desiccant dust breaking loose from a deteriorating drier.
If your car has a sight glass in the liquid line – not all of them do, especially newer ones – take a close look after the system’s been running for a few minutes. If you see tiny beads or a milky haze moving through the refrigerant, that’s a dead giveaway. Those are silica gel particles, the guts of the desiccant bag, making their way through your system. And trust me, you don’t want those circulating.
But even without a sight glass, there’s another test that rarely lies: vacuum decay. When I’m evacuating a system, a good drier will help pull moisture out. But if that micron gauge drops below 500 microns and then starts climbing steadily after I shut off the pump, it’s telling me something important. That’s moisture boiling out of a saturated desiccant bag, like steam from a wet sponge in a hot oven. This moisture is bad news, seriously bad. It mixes with the R134a refrigerant and PAG oil to form corrosive acids. These acids attack everything: compressor bearings, aluminum components like the evaporator and condenser, and they destroy the lubrication. Left unchecked, this doesn’t just reduce cooling; it leads straight to a dead compressor. And that’s a repair nobody wants.
Cutting Through the Noise: How I Pinpoint a Bad Drier
Look, it’s easy to jump to conclusions when the AC acts up. But blaming the receiver-drier without proper verification is a quick way to misdiagnose and waste money. A lot of other problems can produce similar symptoms. You’ve got to isolate the real cause, and that means proper testing with the right tools. Here’s my process:
1. Inspecting the Metering Device for Desiccant Debris
When I see those persistent high-side pressure spikes, my first thought goes to a clogged metering device. This could be a faulty thermostatic expansion valve (TXV) or a restricted orifice tube. But is it the drier’s fault, or something else like an overcharge or a blocked condenser? The definitive test is to recover the refrigerant, then pull out that TXV or orifice tube. Inspect the inlet screen closely. If it’s packed with fine, uniform beads – like tiny sand – that’s desiccant, no doubt about it. That tells me the drier’s internal bag has ruptured and is shedding its guts. In that case, you’re not just replacing the drier; you’re replacing the TXV too. If I don’t find any debris, then I start looking at external causes like airflow issues across the condenser or an overcharge.
2. Analyzing Sight Glass Particles and Oil Samples
If you’re lucky enough to have a sight glass and you’re seeing particles, the next step is to figure out what they are. Are they desiccant beads, or something worse, like compressor wear debris? To confirm, I’ll extract an oil sample from the compressor – sometimes I’ll drain a bit from the condenser if it’s accessible – and examine it under magnification. Desiccant beads are smooth, round spheres, usually white or clear. Compressor debris, on the other hand, is jagged, irregular, and metallic. Big difference, and it points to totally different repairs.
3. The Vacuum Decay Test: Unmasking Hidden Moisture
A failed vacuum decay test is a strong indicator of a saturated drier. But it can also mimic a small system leak. Here’s how I differentiate: First, evacuate the system down to under 500 microns. Then, I close the valves on my manifold gauge set, isolating my equipment from the vehicle’s AC system. I monitor the vacuum on my micron gauge for at least 30 minutes. If it holds steady, then my tools and hoses aren’t leaking. Next, I reopen the valves to the vehicle. If that micron count immediately starts to climb steadily, that’s moisture boiling out from inside the system – almost certainly from a fully saturated drier. If it holds, then I start leak testing the system with nitrogen and a sniffer, looking for external leaks in hoses, fittings, or the evaporator core.
This isn’t optional, folks. Accurate diagnosis demands a digital manifold gauge set with micron monitoring, a certified refrigerant recovery machine, and ideally, a microscope for debris analysis. Guessing here leads to comebacks and expensive repeat repairs. I’ve seen it too many times.
What Actually Goes Wrong Inside That Little Can
The receiver-drier isn’t just a simple metal can; it’s a critical filter and moisture absorber. Its whole job is to protect the rest of the system, but it can only do that until its internal components give up the ghost. There are three main ways I see these things fail:
- Desiccant Saturation: The silica gel bag inside is designed to absorb moisture from the refrigerant and oil. Over time, it just gets full. Once it’s saturated, it can’t absorb any more, and that moisture circulates freely. That’s when the acid formation and corrosion really start to kick in.
- Desiccant Bag Rupture: Years of thermal cycling – hot, cold, hot, cold – and constant vibration can cause the fabric bag holding those beads to tear. When that happens, those little beads spill out into the liquid line, and that’s when they start clogging up your expansion valve or orifice tube.
- Internal Filter Breakdown: The drier also has a fine mesh screen inside to catch any larger debris. If the system gets contaminated with acidic oil or just suffers from long-term corrosion, that screen can deteriorate. Once it breaks down, it stops filtering, allowing contaminants to pass right through.
Now, these are internal failures – problems with the drier’s own components. But I’ve seen plenty of cases where a problem gets blamed on a “bad drier” when it’s not actually the drier’s fault. For example, if your drier is full of metal shavings, that’s not a drier failure; that’s evidence that your compressor has failed, and the drier just caught the debris. Same goes for a leaking Schrader valve on a service port – that’s a seal issue, not a drier problem. The core function of the receiver-drier is moisture removal and filtration. When that function breaks down because its internal materials are worn out, that’s when it truly needs replacing.
Fixing It Right: My Approach to AC Repairs
Let’s be clear upfront: AC work isn’t for the DIY weekend warrior. There are two main repair scenarios for a bad drier, and both demand professional tools and strict adherence to EPA and SAE standards. Refrigerant handling is heavily regulated for a reason, and cutting corners risks serious system damage, not to mention environmental harm. You need to know what you’re doing, or you’re just asking for trouble.
Standard Receiver-Drier Replacement Professional Only
This is the simpler scenario, usually performed when you’re replacing the compressor, condenser, or any other component that opens up the refrigerant circuit. The procedure itself is straightforward, but it absolutely has to be precise. Always use a new OEM or high-quality aftermarket drier. And this is critical: always install new O-rings, lubricated with the correct viscosity PAG oil. Don’t over-grease them, just a thin film.
Here are the key steps I follow:
- First, recover all the refrigerant using a certified recovery machine. No venting to atmosphere, ever.
- Then, replace the drier. Torque those fittings to manufacturer specifications – typically 15–20 ft-lbs for aluminum connections, but always check your service manual.
- Next, evacuate the system with a vacuum pump. I pull it down to below 500 microns and let it hold there for at least 30 minutes. This boils out any remaining moisture.
- Finally, recharge the system. And I mean recharge by weight, using an accurate scale, not by pressure. The vehicle-specific amount, down to the gram, is what matters.
- Don’t forget about oil displacement. The new drier will hold some oil, so you need to adjust your total system oil charge accordingly.
Full System Decontamination Professional Only
Now, if desiccant beads or moisture have circulated through the entire system, you’re dealing with full-blown contamination. This job is significantly more complex, and yes, it’s going to be more expensive. It’s not just a parts swap; it’s a full system cleanse. This requires:
- Thoroughly flushing the condenser and evaporator with an approved solvent. I always use a reverse-flow flush gun to get everything out.
- Replacing the receiver-drier, the expansion valve (or orifice tube), and in most cases, the compressor. If the compressor is shedding debris or has been exposed to acid, it’s a goner.
- Installing an in-line filter downstream of the new compressor. I use this as a temporary safeguard to catch any tiny bits I might have missed during the flush.
- After flushing, blowing all components dry with nitrogen. This is crucial to remove any residual solvent and, more importantly, any remaining moisture.
I’ll be direct: there is no workaround for a known-bad receiver-drier, especially if it’s contaminated the system. Running it risks catastrophic compressor failure, which is the most expensive component in the whole setup. If contamination is confirmed, that full flush and component replacement isn’t optional – it’s absolutely mandatory for any hope of long-term reliability. Skip it, and you’ll be doing the whole job again in a few weeks or months.
Proving the Repair: My Post-Service Checklist
Just installing a new drier isn’t the end of the job – it’s just the beginning of proving the repair. You need to verify, without a shadow of a doubt, that the system is clean, dry, and functioning exactly as designed. This is where a lot of DIYers, and even some less experienced shops, fall short.
- Verify Vacuum Integrity: After evacuation, that system absolutely must hold below 500 microns for 30 minutes. I allow for a rise of no more than 100 microns over that time. Any significant climb tells me there’s still residual moisture boiling out, or I’ve got a leak somewhere.
- Check Refrigerant Charge by Weight: I can’t stress this enough: charge by weight using an accurate scale. Pressure-based charging is a guessing game and almost always leads to over- or undercharging, which impacts performance and longevity.
- Test Performance Under Load: Once charged, I run the system and use my digital manifold gauge set to confirm that the high- and low-side pressures match the OEM performance chart for the current ambient temperature and humidity. I’ll check vent temperatures too, of course.
- Measure Superheat and Subcooling: These values are critical. They confirm that the refrigerant is being properly metered and that the TXV or orifice tube is functioning correctly. If these numbers are off, something’s still not right.
- Test for Moisture: For critical jobs, I’ll use an electronic refrigerant identifier or an in-line moisture indicator. Moisture content needs to be below 50 ppm (parts per million). Anything higher, and you’re just asking for acid formation down the road.
Without this comprehensive verification, you’re just hoping the repair worked. The tools – digital gauges, a micron meter, a precision scale, a good thermometer – they’re not optional. They’re essential for doing the job right and making sure it stays fixed.
The Hard Truth: Costs and Tough Decisions
Repair cost depends heavily on the extent of the damage, plain and simple. Here’s what I typically see in my shop for these kinds of jobs:
Drier Replacement (Standard)
This is usually done as part of other repairs, like a compressor or condenser replacement. The success rate is almost 100% if the evacuation and recharge are done correctly. The main risks are moisture retention from a poor vacuum or an incorrect oil charge.
Full System Decontamination
This is mandatory when you’ve got confirmed contamination – desiccant beads, acid, or excessive moisture. The success rate is good, usually 85-95%, but it’s high risk if the flushing isn’t complete. Leftover debris or acid can destroy a brand new compressor in a matter of weeks. I’ve seen it happen.
These numbers force a real conversation, especially on older vehicles. If your car is over 10 years old and, let’s say, worth less than $3,000, spending $1,500 or more on a full AC restoration might not make financial sense for you. It’s a tough call, and sometimes owners choose to just disable the AC compressor clutch or, honestly, start looking for a different vehicle. It’s not ideal, but it’s a practical decision many people face, and I understand that.
Keeping Your AC Healthy: My Prevention Tips
Preventing receiver-drier failure is always simpler, and far, far cheaper, than having to fix it after the fact. I have one absolute rule in my shop: replace the receiver-drier or accumulator every single time the refrigerant circuit is opened. This isn’t just “best practice” – it’s required by SAE J2788 standards for a very good reason. Even brief exposure to ambient air introduces moisture into the system, and once that drier has been exposed, it can’t be reused. Period. Skipping this step to save a hundred bucks now is a surefire way to invite a two-thousand-dollar repair later. Don’t do it.
More Ways to Prevent Trouble
-
Always replace service port caps. They’re not just for looks or dust; they provide a secondary seal against moisture and slow contamination over years.
-
Perform an annual AC performance check using manifold gauges. Catching early pressure anomalies can signal desiccant saturation before you even notice the cooling isn’t quite right.
-
If your car has a sight glass, monitor it on hot days after the system stabilizes. Persistent bubbles can indicate a restriction or low refrigerant – both worth investigating before they become bigger problems.
And remember: catching a failing drier early can prevent that acid formation, save your compressor from damage, and spare you the headache and expense of a full system flush. It’s one of the best, and cheapest, investments you can make in your AC system’s long-term health.
