The Radiator Cap: Small Part, Big Trouble
After 25 years under the hood, I can tell you this: a radiator cap that can’t hold pressure isn’t just a minor annoyance. It’s a direct threat to your engine, plain and simple. I’ve seen more than my share of overheated engines, warped heads, and blown head gaskets that all started with a cheap, failing radiator cap. People tend to overlook this little guy, but it’s critical for your cooling system to do its job.
When that cap can’t maintain the right pressure, your coolant’s boiling point drops. Think about it: water boils at 212°F at sea level, but under 15 psi of pressure, that jumps to around 250°F. Lose that pressure, and you’re back to boiling at a much lower temperature. That means localized boiling, steam pockets forming around hot spots like the cylinder head, and eventually, serious thermal stress. I wouldn’t drive a car like that around the block, let alone to the grocery store.
What a Bad Cap Looks Like: Symptoms I See
The most obvious sign of a bad cap, and the one I always start with, is when you put a cooling system pressure tester on it and the needle just drops. You pump it up to the cap’s rated pressure—say, 16 psi—and it just bleeds off, even if you don’t see any coolant on the ground. That’s textbook cap failure right there.
But there are other clues, too. I’ve seen cars come in with coolant overflowing from the reservoir after the engine cools down. This usually means the pressure valve in the cap is opening too early, pushing coolant out before it should. Or maybe you’re constantly topping off your coolant, but can’t find a leak anywhere. That’s another red flag.
Another classic symptom is a collapsed upper radiator hose when the engine cools down. This happens because the vacuum valve in the cap, which is supposed to open and let coolant flow back from the overflow tank as the system cools and contracts, is stuck closed. It creates a vacuum in the system, sucking the hose flat. If you see that, the cap’s vacuum valve is almost certainly the problem.
Why These Little Guys Give Up
It’s a simple part, but it lives a hard life. Constant heat cycles, pressure, and exposure to coolant take their toll. Here’s what I typically find when a cap fails:
- Hardened Gaskets: The main rubber gasket, which creates the seal, gets hard and brittle over time. It cracks, loses its elasticity, and just can’t seal properly anymore. Even if the cap looks okay from the outside, that rubber is often shot.
- Fatigued Spring: The pressure relief spring inside the cap is designed to hold a specific pressure. After thousands of heating and cooling cycles, that spring can weaken. A 16 psi cap might start venting at 12 psi, or even less, letting coolant out prematurely.
- Stuck Valves: The small pressure and vacuum valves can get gummed up with mineral deposits or corrosion. If the pressure valve sticks open, you lose pressure. If the vacuum valve sticks closed, you get that collapsed hose.
- Physical Damage: Sometimes it’s just plain abuse. Overtightening can warp the cap or even crack a plastic radiator neck. Dropping it, or using the wrong tool, can bend the lugs or distort the sealing surface.
I’ve seen certain makes, like some older Honda and Toyota models, have recurring cap issues. Sometimes it’s a design thing, or maybe the material choice. Manufacturers often issue service bulletins recommending updated cap part numbers for better durability, so it’s always worth checking for those.
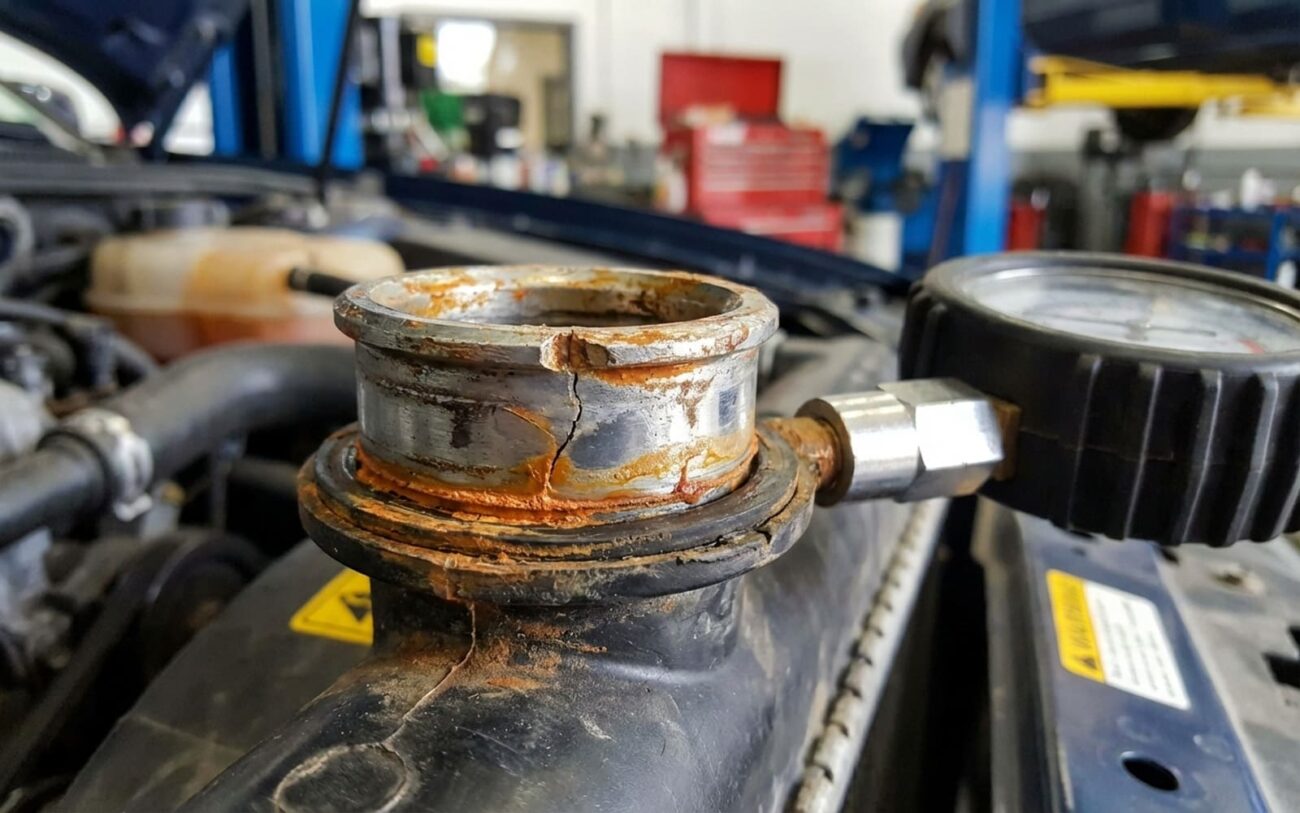
But remember, a cap can only do its job if the radiator filler neck is in good shape. If that neck is corroded, cracked, or warped, you’re not looking at a cap problem anymore; you’ve got bigger fish to fry.
My Diagnostic Process: Is It Really the Cap?
Before you even think about replacing the cap, you’ve got to rule out other problems. A weak cap isn’t the only thing that causes pressure loss. A tiny pinhole in the radiator, a seeping hose connection, a failing water pump seal, or even a leaking heater core can all mimic the symptoms. And here’s a big one: a blown head gasket can force combustion gases into the cooling system, artificially pressurizing it and pushing coolant out the overflow. That looks exactly like a bad cap, but it’s a much more expensive fix.
So, here’s the two-step process I use to isolate the problem:
- Test the System (Without the Cap): Remove the radiator cap. Screw your cooling system pressure tester directly onto the radiator neck using the correct adapter. Pump it up to the cap’s rated pressure (e.g., 16 psi). Watch the gauge for at least 5-10 minutes. If the pressure holds steady, you know the leak isn’t in the radiator, hoses, heater core, or head gasket. That’s a huge step.
- Test the Cap (Separately): If the system holds pressure, now it’s time to test the cap itself. Use the correct adapter for your cap on the pressure tester. Pump it up to its rated pressure. A good cap should hold that pressure for at least two minutes with no more than a 1 psi drop. If it drops more than that, or vents coolant below its rating, the cap is the culprit.
This method stops misdiagnoses cold. I’ve seen too many people throw a new cap on, only to find they still have a leak because they didn’t properly test the system first.
| Symptom | Likely Cap-Related Cause | Common External Mimics |
|---|---|---|
| Pressure loss on tester gauge | Seal failure, weak pressure relief spring | Leaking radiator, hose, heater core, water pump, head gasket |
| Coolant overflow at reservoir | Pressure valve opens below rated pressure | Head gasket leak (combustion gas intrusion), overfilled reservoir |
| Collapsed upper radiator hose | Vacuum valve stuck closed or clogged | Clogged overflow hose, obstructed radiator neck |
The Fix: Replacing the Radiator Cap
Once you’ve confirmed it’s the cap, replacement is the only real fix. This isn’t a complicated job, but it demands attention to detail. And safety, always safety.
WARNING: NEVER remove a radiator cap from a hot engine. Hot coolant is under pressure and can cause severe burns. Wait until the engine is completely cold.
Here’s how I approach it:
- Remove the Old Cap: With the engine cold, slowly turn the cap counterclockwise to the first detent. You might hear a hiss as any residual pressure escapes. Once the hissing stops, push down and continue turning to remove it completely.
- Inspect and Clean the Filler Neck: This is a crucial step that many people skip. Look closely at the radiator filler neck. Is it corroded? Are there any cracks or pits? Clean it thoroughly with a plastic brush and water. I never use metal tools here, as you can scratch or damage the sealing surface, which will ruin the seal of your new cap. Any debris or corrosion will compromise the new cap’s ability to seal.
- Match the New Cap: Always match the new cap exactly to the old one. Check the pressure rating (e.g., 16 psi or 1.1 bar), the physical fit, and if possible, use an OEM part number. Aftermarket caps vary wildly in quality. I usually stick with reputable brands like Stant, Gates, or genuine OEM parts. It’s not worth saving a few bucks on a cheap cap only to have it fail in six months.
- Install the New Cap: Align the lugs on the new cap with the slots on the radiator neck. Press down firmly and turn clockwise until it’s snug. Don’t overtighten it! You can crack a plastic radiator neck or distort the cap housing, creating a new leak.
And about those old-school tricks, like putting a drop of water-based seal conditioner on a dried gasket to swell it temporarily? Don’t even think about it. That might hold for 10 miles, but it’s playing with fire—literally. A sudden failure could dump boiling coolant onto hot engine parts or, worse, onto you. It’s not a repair. Replace the cap. Period.
Confirming the Repair: Don’t Skip This Step
Just because you put a new cap on doesn’t mean the problem is solved. I always test twice: once off the vehicle, once on. It’s cheap insurance.
- Test the New Cap: Even new caps can be defective. Use your pressure tester with the correct adapter and test the new cap by itself. Pump it to its rated pressure (e.g., 16 psi) and watch the gauge for two minutes. If it drops more than 1 psi, you’ve got a bad new cap. It happens more often than you’d think.
- Test the Full System: Reinstall the new, confirmed good cap. Now, pressurize the entire cooling system again. Follow the manufacturer’s procedure for your vehicle—some want you to go to the cap’s rating, others suggest staying slightly below. Hold that pressure for at least 5 minutes, or 20 minutes for a really thorough check. If the pressure holds steady, you’re good to go.
If the pressure still drops after installing a confirmed good cap, you’ve still got a leak somewhere else. Now you’re looking for a hose, radiator seam, thermostat housing, or even an O-ring on a coolant temperature sensor. A solid test gives you the confidence that the system is sealed and ready for the real-world heat cycles it’s about to face.
What This Is Going to Cost You
This is easily one of the most cost-effective preventative repairs you can make on a vehicle. The part is cheap, the labor is minimal, and the risk of skipping it is enormous. I mean, we’re talking about preventing a $1,500+ head gasket job for the price of a decent lunch.
| Repair Type | DIY Cost | Shop Cost | Success Rate | Secondary Risk if Failed |
|---|---|---|---|---|
| Cap Replacement | $15 – $50 (OEM or high-quality aftermarket) | $75 – $150 (includes diagnosis and labor) | Near 100% when correct cap is used and installed properly | Low. If the cap fails, symptoms return, but no immediate engine damage—unless ignored. |
Even on an older, low-value vehicle, this repair makes absolute sense. There’s no gray area here: if the cap isn’t holding pressure, it’s done. Replace it. No second chances.
My Advice: Keeping Trouble Away
Proactive Maintenance Tips
-
Treat it like a wear item. I recommend replacing your radiator cap every 5 years, or with every major coolant flush, whichever comes first. The rubber seal and internal springs degrade over time, even if the cap looks perfectly fine from the outside. Don’t wait for it to fail.
-
Quick visual inspection. While you’re checking your coolant levels, take an extra second to inspect the cap. Look for any visible cracks, hardening of the rubber gasket, or if it looks flattened. Also, peek at the radiator neck itself—it should be clean, smooth, and free of damage or corrosion.
-
Use the right coolant. This might sound basic, but always use the coolant type specified in your owner’s manual. The wrong coolant can accelerate the degradation of rubber seals and promote internal corrosion, not just in the cap, but throughout your entire system.
-
Proactive is key. A few minutes of attention and a small investment now can prevent major headaches, overheating, head gasket issues, and costly repairs down the line. In my shop, we don’t wait for these caps to fail—we replace them proactively. It’s that important.
