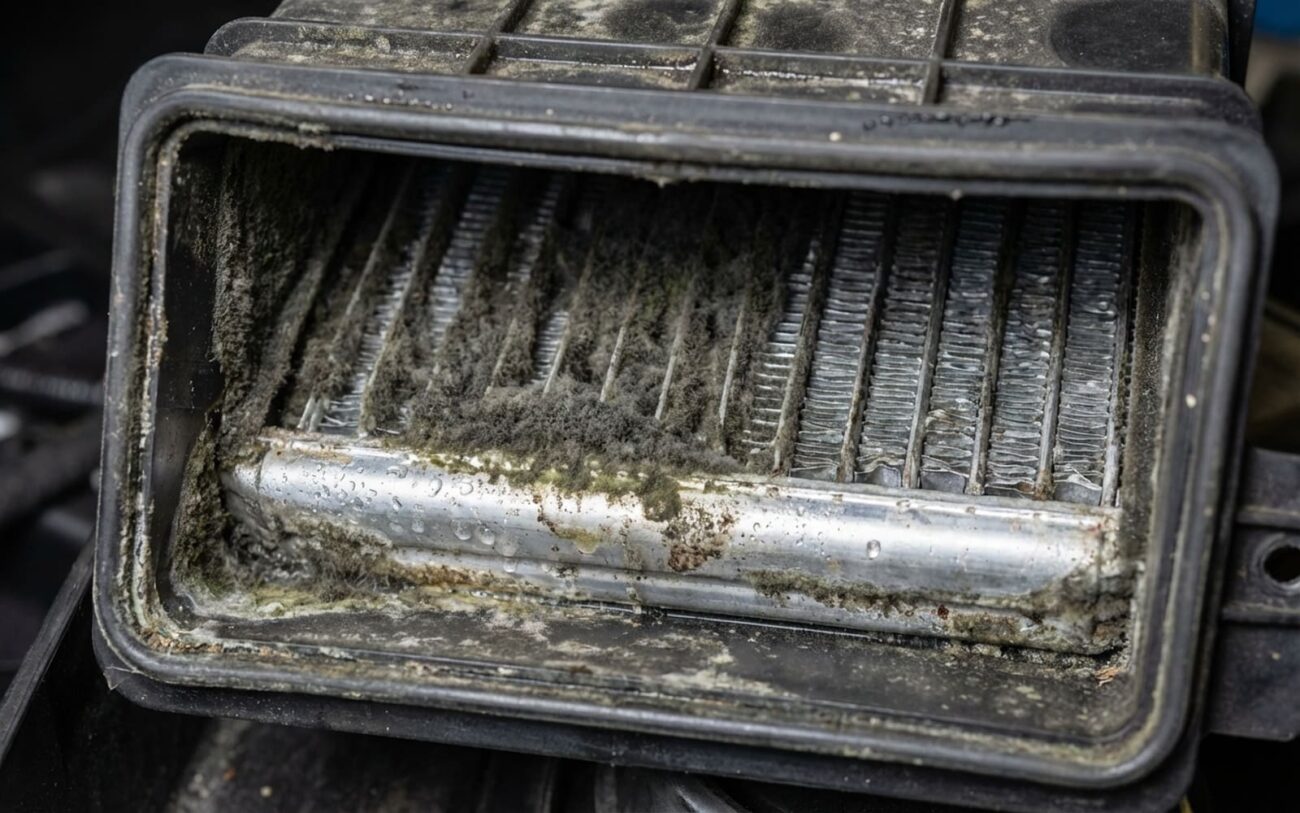
That sour, damp, locker-room smell hitting you when you crank up the AC? Yeah, I know it well. I’ve been turning wrenches for over 25 years, and I’ve smelled that specific funk in countless cars. Most times, it’s the same old story: mold and mildew setting up shop on your evaporator core. It’s a common problem, and it’s one of those things that, once you know what you’re looking for, you can usually tackle it head-on.
The Stink: What It Is & Why It Happens
So, what exactly is the evaporator core? Think of it like a miniature radiator, but for cooling the air. It’s tucked way deep inside your dashboard, part of the HVAC (Heating, Ventilation, and Air Conditioning) system. When your AC is running, refrigerant flows through it, making the fins and tubes super cold. As warm, humid cabin air passes over these cold surfaces, moisture condenses out of the air. That’s how your AC dehumidifies and cools the car.
Under normal conditions, that condensed water—we call it condensate—drains out of a tube, usually dripping onto the ground under your car. But here’s the catch: the evaporator is always cold, often damp, and usually dark. That’s the perfect environment for microbial growth, like mold and mildew, to thrive. They form a slimy layer, a biofilm, right on those cooling fins. And that biofilm? That’s what stinks.
It’s important to understand this isn’t usually a mechanical failure of the evaporator itself. The core is just doing its job, condensing moisture. The problem is the organic growth on its surface. True evaporator failure, like a refrigerant leak, is a whole different beast. That usually means no cooling at all, not just a bad smell.
Tracking It Down: My Diagnostic Approach
You can’t fix what you haven’t properly diagnosed. I’ve seen too many people just spray air freshener into the vents, which is about as effective as putting a band-aid on a broken leg. The real work is figuring out if it’s truly the evaporator or something else mimicking that musty smell.
First Clue: When Does It Stink?
The timing of the odor is your first big clue. If that musty smell only kicks in when the AC compressor is running and the evaporator is cold and wet, that’s a strong indicator the evaporator core is the culprit. The cold, wet surface activates those microbial volatiles, and you get a whiff.
But if the smell is there all the time, even with just the fan or heater running, then you need to look elsewhere. It could be a saturated cabin air filter, water leaking into the footwells and soaking the carpet, or even debris in the HVAC intake under the hood.
Common Mimics & How I Rule Them Out
Here’s how I methodically narrow down the source, because other issues can smell almost identical to a moldy evaporator:
1. The Clogged Drain Tube
This is a big one. If the evaporator drain tube gets clogged, all that condensate has nowhere to go. It just sits in the HVAC housing, creating a swampy environment that smells exactly like a moldy evaporator. Sometimes it even backs up into the cabin, soaking the carpet.
My Test: I pour about 16 ounces of clean water into the HVAC cowl intake (usually at the base of the windshield). Then I look under the car to see if it drains quickly. If it’s slow or nothing comes out, that drain is blocked. Clear it out, usually with compressed air or a flexible wire, and re-test.
2. Contaminated Cabin Air Filter
A neglected cabin air filter can harbor its own colonies of mold, dust, and general nastiness. It’s designed to filter the air, but if it’s too dirty, it becomes a breeding ground.
My Test: Pull the cabin air filter out and give it a good sniff. If it smells bad, replace it. It’s a quick, cheap fix, and something I recommend every 12,000 to 15,000 miles anyway.
3. Water Leaks & Wet Carpet
Water intrusion from a leaky windshield, door seal, or even a sunroof drain can soak the carpet or insulation in the footwells. That dampness will lead to a persistent musty odor that gets pulled into the HVAC system.
My Test: I use a moisture meter on the floor mats and carpet padding. I also visually inspect for water stains or dampness. If I find water, I trace it back to the source—sometimes it’s obvious, sometimes it’s a real hunt.
4. Reduced AC Cooling Performance
If the biofilm on the evaporator fins gets really thick, it can actually insulate the core. This means the AC can’t transfer heat as efficiently, leading to weak cooling performance along with the smell. This is a clear sign the evaporator is heavily contaminated.
My Test: I hook up my manifold gauges to check the high- and low-side pressures. If the pressures are good (within OEM specs) but the vent temperature is still weak (I’m looking for 35-45°F cooler than ambient at the center vents), then I know the system is mechanically sound, but the evaporator isn’t doing its job. That points straight to insulation from microbial growth.
My Go-To Tools for Diagnosis
Having the right tools makes all the difference, and you don’t need a full shop for some of this:
- Borescope: A smartphone-compatible borescope (you can find decent ones for under $30) is a game-changer. It lets you snake a camera into the evaporator drain or through the blower motor opening to actually see the biofilm on the evaporator fins without tearing the whole dash apart. This is often the definitive test for evaporator contamination.
- Moisture Meter: Essential for ruling out hidden water intrusion in the carpet or insulation.
- Manifold Gauges: If cooling performance is suspect, these are non-negotiable. They tell you if you have a refrigerant issue (low charge, compressor failure) or if the problem is elsewhere, like a blocked evaporator.
Your Options: Getting Rid of the Smell
Once you’ve confirmed that nasty biofilm on the evaporator core is the problem, your repair path depends on how bad it is and how accessible the core is in your particular vehicle.
Antimicrobial Treatment DIY/PRO
Access varies by car. On many modern vehicles, you can get to the evaporator area through the cabin air filter housing or by snaking the applicator hose up the evaporator drain opening. Follow the product instructions carefully. Typically, you apply the treatment with the system off, let it dwell for 10–15 minutes to do its work, then run the blower on high with the AC compressor off to thoroughly dry the core. A borescope inspection before and after can really show you the improvement.
Why I Don’t Recommend In-Duct Foggers or Sprays TEMPORARY
When the Core Really Needs Replacing PROFESSIONAL-ONLY
The repair involves fully recovering the refrigerant, often disassembling a good chunk of the dashboard and the HVAC case, then replacing the core. It demands precision: the system must be evacuated to under 500 microns to remove all moisture, then recharged with the exact amount of PAG oil and refrigerant. O-ring seals need to be lubricated and torqued to spec—typically 8–12 N·m. There’s a high risk of damaging trim, wiring, or creating new leaks if you’re not experienced. A refrigerant leak won’t fix itself; it will only get worse.
Making Sure It’s Fixed
After any repair, you need to validate the fix. Don’t just assume it worked.
For an antimicrobial treatment, success means the smell is gone and stays gone. I tell customers to test it over 3 to 5 days of normal driving, making sure to use the AC. If the odor creeps back within a few weeks, either the treatment didn’t reach all the biofilm, the drain is still partially clogged, or the growth was just too thick to fully eradicate. A follow-up borescope inspection can confirm if the fins are clean.
For a full evaporator replacement, the validation is more rigorous. The system needs to hold a deep vacuum, show no leaks on a refrigerant sniffer, and deliver proper cooling. Use an infrared thermometer to check vent temperature: you should be seeing air 35–45°F cooler than ambient at the center dash vents. Manifold gauge readings should fall squarely within OEM specifications. If cooling is still weak, don’t automatically blame the new core. Other issues, like a stuck-closed thermostat causing the engine to run hot, can indirectly affect AC performance by raising underhood temperatures.
The Hard Truth: Cost vs. Value
Here’s where practicality meets repair decisions. You need to weigh the effectiveness, the cost, and the long-term value of the car.
| Repair Type | DIY Cost | Shop Cost | Success Rate | Secondary Risk if Failed |
|---|---|---|---|---|
| Antimicrobial Treatment | $15 – $40 | $80 – $150 | 70–90% effective for surface biofilm when drain is clear and application is thorough | Odor may return if environment remains damp. Low risk of physical damage. |
| Evaporator Core Replacement | $300–$600 (parts) + $200 (tools/refrigerant) | $800 – $1,800 | Near 100% effective for odor and cooling if biofilm or leak was the sole issue | High risk of refrigerant leaks, moisture contamination, or HVAC damage if installation is incorrect. Major cost exposure on DIY attempts. |
My advice after two decades in the bay: if the repair cost for an evaporator replacement exceeds half the car’s market value—and you’ve already tried a proper antimicrobial treatment for just the odor—reconsider the investment. Pouring $1,500 into a car worth $3,000 might not make sense unless you’re deeply attached or planning to keep it long-term. Sometimes, the smarter move is improved maintenance and odor control, not a major tear-down.
Keeping It Fresh: Prevention is Key
My Best Prevention Tips
Keeping your AC smelling fresh starts with one simple habit, and it’s something I recommend to every customer: For the last 2–3 minutes of your drive, turn off the AC compressor (just hit the AC button, or switch to “vent” mode) but leave the blower fan running on high. This circulates dry air through the evaporator, evaporating any residual moisture and making it a much less hospitable place for mold to grow. It’s low-effort but highly effective.
If you do catch a whiff of mildew early on, act fast. Confirm that evaporator drain is clear by pouring water into the cowl and watching for drainage. Consider a preventive antimicrobial treatment before the smell becomes overwhelming. And be careful at the car wash: those high-pressure sprayers near the base of the windshield can force water and debris into the HVAC intake, basically seeding new microbial growth. Finally, regular cabin air filter changes—every 12,000 to 15,000 miles, or more often if you drive on dusty roads—also help keep contaminants out of the system. A little attention goes a long way in avoiding that recurring AC funk.
