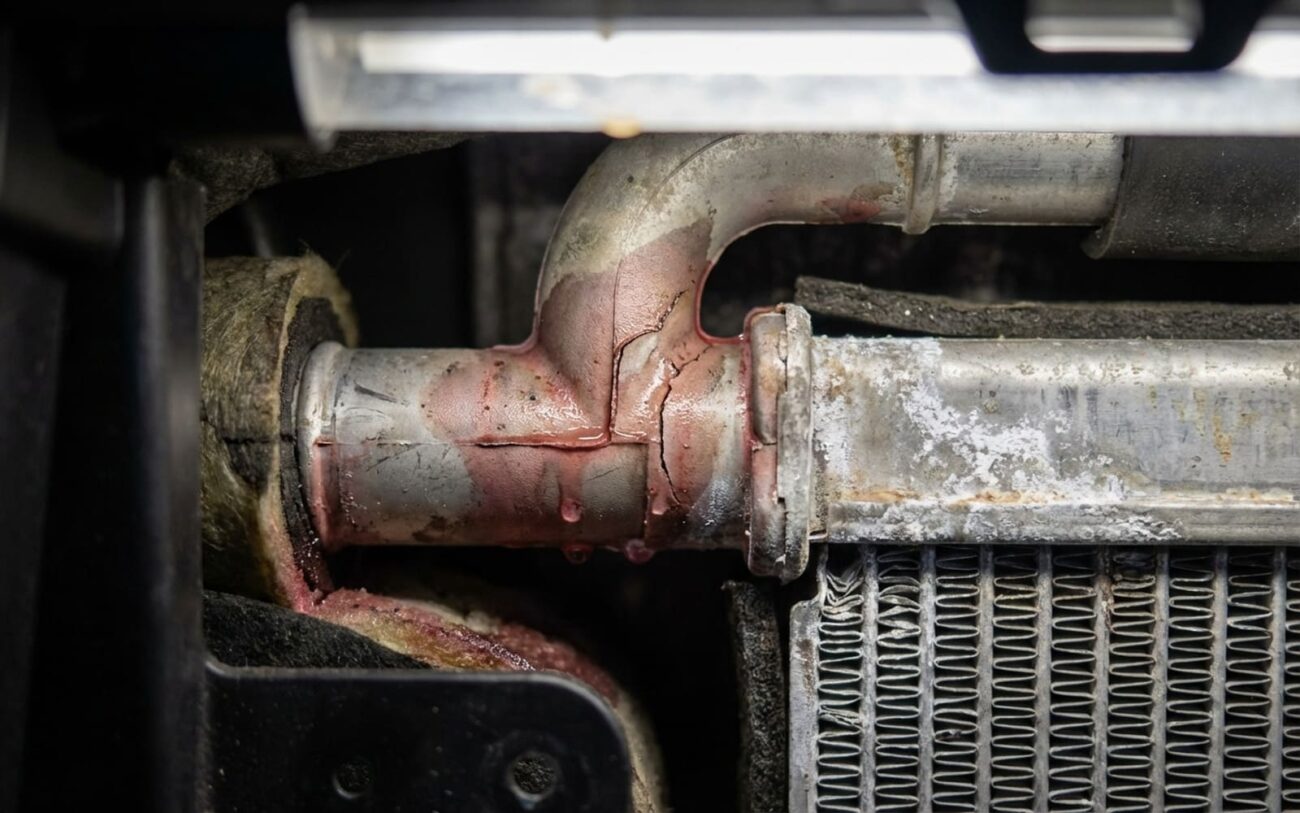
Renault Duster Heater Core Leak: My 25 Years of Fixing It Right
Alright, so you’re seeing coolant on the passenger floor of your Renault Duster, maybe around 50,000 miles. Yeah, I know the drill. It’s a frustrating sight, and frankly, it shouldn’t be happening that early. This isn’t just normal wear and tear; it’s a premature failure, almost always tied back to a material defect or an assembly issue with the heater core itself. I’ve seen this problem more times than I can count, and I can tell you, catching it early and diagnosing it correctly is half the battle. Let’s cut through the guesswork and talk about what’s really going on, how to confirm it’s the heater core, and what your best repair options are – solid diagnostics and practical advice, straight from my shop.
Is It Really the Heater Core? My Diagnostic Approach
Before we even think about tearing into the dash, we need to be absolutely sure it’s the heater core. Plenty of other things can mimic a leak, and you don’t want to replace a major component like this if it’s not the culprit. Here’s how I go about confirming it in my shop:
Symptom 1: Wet Passenger Floorboard
This is the most common sign, right? You see that pink or orange fluid pooling on the passenger side carpet. That’s Renault Type D coolant, and if it’s soaking into the carpet, it’s definitely coming from inside the HVAC system. The heater core sits in a plastic case right behind the dash, and when it lets go, gravity does its job, dripping coolant straight down into the cabin.
But hold on. A wet carpet doesn’t always mean heater core. I’ve seen clogged HVAC evaporator drains, a leaking windshield seal, or even a blocked sunroof drain cause wetness. So, how do we tell the difference?
My Definitive Test for Wet Floorboards:
- First, check the evaporator drain. That’s usually a small rubber tube sticking out of the firewall, under the hood, near the passenger side. If it’s clogged, water from the AC evaporator can back up and spill into the cabin. I usually pour a little water into the evaporator pan (you can often access it from under the hood) and make sure it drains cleanly out the bottom of the car. If it does, that’s probably not it.
- Next, we confirm it’s coolant. I add a little UV dye to the cooling system, run the engine with the heater on full blast for 15-20 minutes, then shut it down. A quick check of the footwell with a black light will show that dye glowing bright if it’s coolant. If it’s just water, it won’t glow.
- If you suspect a windshield or sunroof leak, you’ll need to run a water test directly on those areas and visually inspect for ingress. But if it glows under UV, it’s coolant.
Symptom 2: Sweet Smell from the Vents
This is a classic one. You turn on the heater, and there’s this distinct, sweet, syrupy smell. That’s ethylene glycol vaporizing off the hot heater core. You might not see steam, but the odor is unmistakable once you’ve smelled it a few times. It’s a dead giveaway for an internal coolant leak.
Sometimes, a leaking O-ring or rubber seal at the heater hose connections on the firewall can give off a similar smell, but usually, you’d see external drips there. So, here’s what I do:
My Definitive Test for Sweet Smells:
- I pressure test the cooling system to about 15 psi (that’s roughly 1 bar). With the system under pressure, I carefully inspect the heater lines where they pass through the firewall, both from the engine bay and inside the cabin if possible. If those connections are dry, and you still have that sweet smell, the leak is almost certainly inside the HVAC box, pointing directly to the core.
Symptom 3: Consistently Low Coolant Level with No Visible External Leaks
If you’re constantly topping up the expansion tank but can’t find a single drop of coolant under the hood or on the ground, the leak is probably hidden. And yes, nine times out of ten, it’s hidden inside the dashboard, trapped within the HVAC housing.
Don’t ignore this one!
A persistently low coolant level, even if it’s a slow leak, can lead to serious engine damage. We’re talking overheating, warped cylinder heads, or a blown head gasket – problems that make a heater core replacement look cheap. Plus, all that moisture inside the dash can promote mold growth and corrode wiring harnesses and control modules over time. This isn’t a “wait-and-see” issue; it needs attention.
Of course, low coolant can also mean an internal engine leak (like a head gasket), a faulty radiator cap, or even a leaking heater control valve (though less common on Dusters). Here’s how I narrow it down:
My Definitive Test for Hidden Coolant Loss:
- Again, pressure test the cooling system. If the pressure drops steadily with no visible external leak anywhere, that’s our first clue.
- Next, I’ll use a combustion leak detector (sometimes called a “block tester”) on the coolant reservoir. This tool checks for exhaust gases in the coolant. If the fluid changes color or you see bubbles, you’ve likely got a head gasket issue.
- If the combustion leak test is negative, but the system still loses pressure, and you’ve ruled out the external firewall connections, then it’s almost certainly the heater core. The coolant is simply collecting in the HVAC case.
Why Duster Heater Cores Fail Prematurely
When a heater core goes out at 50,000 miles, that’s not wear and tear in my book; that’s a failure in design or materials. What I typically see are a few common culprits:
- Weak Joints: The most frequent failure point is the connection between the aluminum tubes and the plastic end tanks. These are often brazed or crimped during assembly. If that bond isn’t perfect from the factory, the constant thermal cycling (heating up and cooling down) will eventually stress it until it fails. I’ve seen many cores leak right at that tube-to-tank seam, especially where the inlet and outlet pipes are pressed in.
- Plastic Stress Cracks: The plastic end tanks themselves can develop stress cracks. These aren’t always visible until you’ve got the core out, but they usually start near the hose fittings due to repeated expansion and contraction.
- Wrong Coolant: Corrosion is another factor, but it almost always comes down to using the wrong coolant. Renault Type D is specifically engineered for these aluminum systems. If someone’s topped it up with generic green, orange, or even some universal coolants, you can get an electrolytic reaction. That eats away at the aluminum from the inside, causing pinhole leaks across multiple tubes. It’s a slow killer, and hard to spot until it’s too late.
My Two Cents: Check for TSBs
I’ve heard whispers and seen enough of these Duster heater core failures to know there might be service bulletins (TSBs) out there for certain model years. These often point to specific production batches or material changes. It’s always worth giving your Renault dealer a call with your VIN to see if any goodwill repairs or campaigns apply. You might get lucky.
Just to be clear, a leak at the O-rings where the heater hoses connect to the firewall is not a heater core failure. That’s a much simpler, cheaper fix. My diagnostic steps above should help you pinpoint the difference.
Your Repair Options: From Proper to "Don’t Even Think About It"
Once you’ve confirmed that leak is definitely coming from inside the heater core, you’re looking at a big job. There’s no easy access from underneath; this repair means the dashboard has to come out. Period.
This Is Professional Territory. Seriously.
Let me be blunt: fixing a heater core leak is not a DIY job for the average person. Working on the HVAC system and dashboard involves a lot of specialized tools, knowing where every clip and screw goes, and understanding safety protocols (like dealing with airbags and AC refrigerant). There’s no safe shortcut here. If you’re not a seasoned pro, take it to a shop.
Heater Core Replacement The Only Real Fix
Module-Level Repair (Brazing/Epoxy) Rarely Recommended
Temporary Sealants Emergency Only. Seriously.
After the Repair: How I Validate the Job
Once that new heater core is in and everything’s buttoned back up, you can’t just refill the coolant and send it. You need to validate the repair properly. Here are the three key checks I always perform:
Validation Steps
- Pressure Test: I pressure test the entire cooling system to 15 psi (1 bar) and let it hold for at least 30 minutes. If the pressure drops by more than 0.5 psi, you’ve still got a leak somewhere – maybe a bad seal, a loose hose clamp, or a connection that wasn’t tightened properly.
- Functional Test: With the engine running and fully warmed up, I crank the heater to max heat and max fan speed. The air coming out of the vents should be hot, dry, and absolutely free of that sweet coolant odor. If it’s not hot, or if you smell coolant, there’s either still a leak or an air lock in the system.
- Monitor Over Heat Cycles: Drive the car until it’s fully warmed up, then let it cool completely. Repeat this process 2-3 times. After each cycle, I check the firewall heater line connections and the HVAC drain tube outlet (under the car) for any sign of coolant residue. This helps catch any slow seeps that might not show up immediately.
And don’t forget proper bleeding of the cooling system. Air trapped in the heater core or engine can cause all sorts of headaches – fluctuating temperature gauge readings, poor heater performance, or even localized overheating. It’s a critical step that often gets overlooked.
The Cost and That Tough Decision
Let’s be real: this repair is expensive. There’s no getting around the labor involved. Here’s a breakdown of what you can expect, and some thoughts on making that tough decision:
| Repair Type | DIY Cost | Shop Cost | Success Rate | Secondary Risk if Failed |
|---|---|---|---|---|
| Heater Core Replacement | $200–$400 (for the core and coolant only). But the labor? We’re talking 8–12 hours for a seasoned pro. If you’re not experienced, it could be days, and you risk breaking other things. | $1,200–$1,800 (this covers parts, the extensive labor, and proper AC refrigerant handling if applicable) | Near 100% when done correctly with proper bleeding and validation. | Improper reassembly can lead to new coolant leaks, electrical damage (from loose connections or pinched wires), or even airbag system faults. A poorly sealed HVAC case can also let in odors or moisture again. |
So, you get the quote. Now what? If that repair bill is more than half the current market value of your Duster, you really need to think about the long-term. Is it worth sinking that much money into it? Could that cash be better spent as a down payment on a more reliable vehicle? On the flip side, if the rest of the car is in great shape – solid engine, good transmission, no rust – then fixing it makes a lot of sense, especially if you plan to keep it for years to come. It’s a tough call, and one I’ve seen many customers struggle with.
Always, always check your Duster’s warranty status before authorizing any major repairs. You never know, it might still be covered!
Preventing a Repeat Performance
Once you’ve got a new heater core in there, you want to make sure it lasts. To protect your investment and avoid going through this nightmare again, follow these rules without exception:
-
Only use Renault Type D coolant. I can’t stress this enough. No substitutes, no mixing with other types. This fluid is specifically formulated to prevent galvanic corrosion in aluminum-heavy cooling systems like the Duster’s. Using anything else is just asking for trouble down the road.
-
Replace coolant on schedule. Typically, that’s every 5 years or 150,000 km, whichever comes first. Over time, the protective additives in the coolant break down, and it becomes corrosive. Fresh coolant is cheap insurance.
-
Inspect annually. Make it a habit. When you first turn on the heater each season, sniff the air from the vents. Any hint of that sweet smell means trouble. Also, periodically check the HVAC drain tube outlet (it’s usually a small hose under the car, near the firewall) for any pink or orange residue. That’s a tell-tale sign of a leak, active or past.
Keeping an eye on your coolant level and making sure your cooling system is maintained properly is key. A weak radiator cap, for instance, can sometimes mimic internal leaks by allowing coolant to boil off, so make sure that’s in good shape too. Small preventative steps go a long way in avoiding another major repair.
