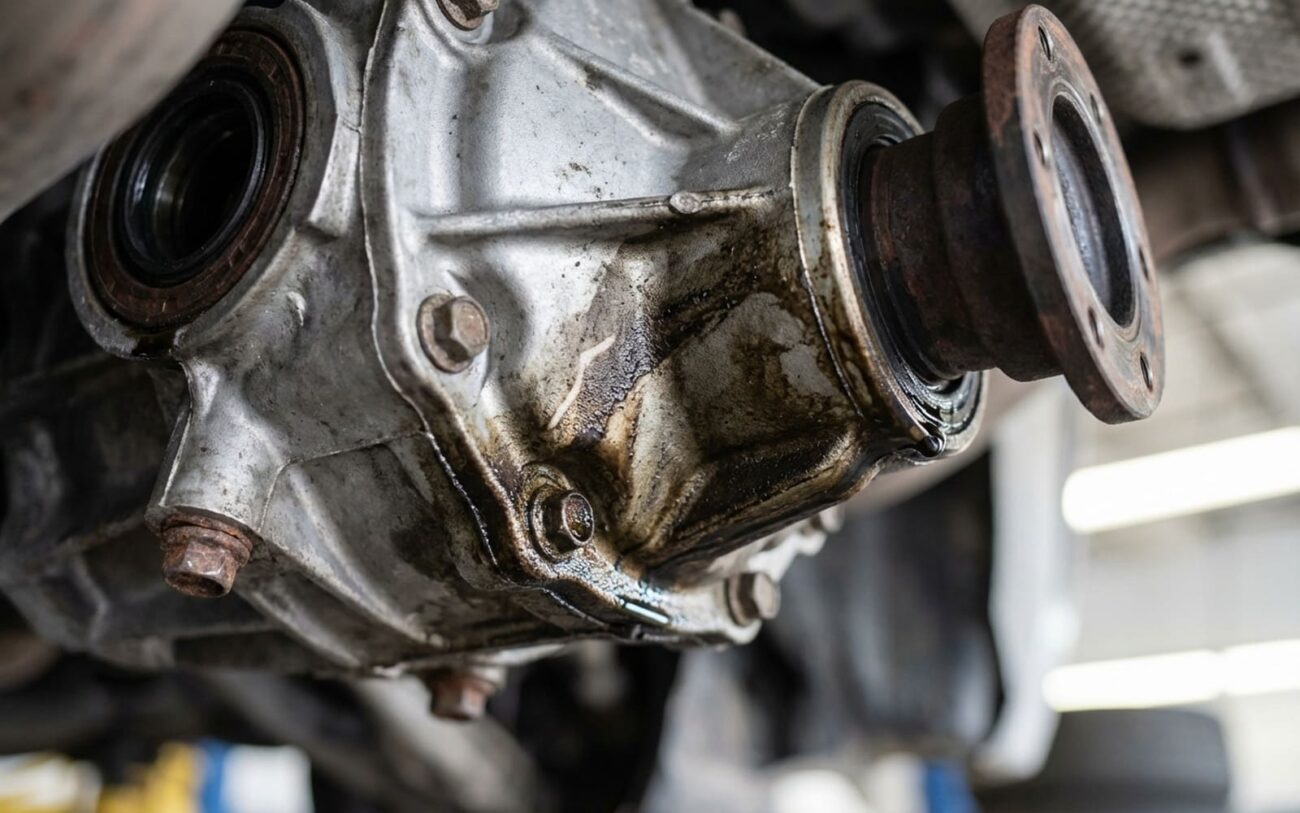
Alright, let’s talk about your E90 or E92 M3’s differential. If you’re finding yourself topping up the fluid every thousand or two miles, and there’s no obvious puddle under the car, you’re not imagining things. That fluid isn’t just evaporating; it’s what we in the shop call “oil burning” – not in the engine, but on hot exhaust components, and it’s a classic M3 diff problem.
I’ve seen this pattern countless times in these cars. It usually starts subtle, maybe a faint whiff of gear oil after a spirited drive, or a tiny weep along the vertical seam where the two aluminum housing halves meet. That’s not a rubber seal giving up; that’s the factory anaerobic sealant failing. And if you let it go, it can quickly turn into a catastrophic drivetrain failure.
How I Pinpoint the Real Leak
Before we even think about pulling the diff, we need to be absolutely sure where that fluid is going. It’s easy to misdiagnose this one. A lot of things can mimic a housing seam leak, so I always start with a thorough inspection.
First, check the obvious stuff. An overfilled differential will push fluid out the breather vent, especially when hot. Pinion seals and output shaft seals can also leak, slinging fluid around the housing and sometimes making it look like the center seam is the culprit. CV boots, too, can tear and spray grease, which can be mistaken for gear oil.
My Go-To Diagnostic Steps:
-
Clean Everything: Get the differential housing, subframe, and surrounding areas spotless. I mean surgically clean. Use a good degreaser and then wipe it all down.
-
The Foot Powder Test: This is an old trick, but it works. Spray aerosol foot powder (yes, the white stuff) liberally along the entire vertical housing seam. Also spray it around the pinion seal, output shaft seals, and any other suspect areas. The white powder will quickly show any fresh fluid weeping through.
-
Short Drive and Re-inspect: Drive the car for about 15-20 minutes, getting it up to operating temperature, including some highway speeds. Then, get it back on the lift and immediately inspect the powdered areas with a bright light. If you see a distinct line of fluid appearing exactly along that center seam, you’ve found your anaerobic sealant failure.
-
UV Dye for Elusive Leaks: If the foot powder doesn’t give a clear answer, or if you’re losing fluid rapidly without any external trace, I’ll add UV dye to the differential fluid. Drive it for a day or two, then inspect with a UV light. This is particularly useful for finding micro-porosity or hairline cracks in the aluminum casting itself, which often don’t leave a visible drip but allow fluid to seep out and burn off on the exhaust.
-
Borescope Inspection: For those really tricky “disappearing oil” cases, especially if there’s no external leak, I’ll use a borescope through the fill plug. I’m looking for signs of oil pooling on top of the housing or subframe, which can indicate a casting flaw on the upper side of the diff that’s burning off before it ever drips.
Why These M3 Diffs Fail
It’s not just a simple seal; the aluminum differential housing on these E9x M3s has a few inherent weaknesses that lead to these leaks. I’ve seen it time and again, and it usually boils down to one or a combination of these factors:
-
Micro-porosity in the Casting: During manufacturing, tiny voids or imperfections can form in the aluminum housing. Under pressure and heat, gear oil can actually be forced through these microscopic holes, seeping out and burning off without ever forming a visible drip.
-
Distorted Mating Surfaces: The differential gets incredibly hot, especially during spirited driving or track use. Over time, this thermal cycling, combined with the stresses on the housing, can cause the aluminum mating surfaces to warp ever so slightly. That tiny distortion is enough to break the seal of the anaerobic sealant, creating a leak path.
-
Hairline Cracks: Sometimes, I find hairline fractures, usually near bolt holes or casting ribs. These can be caused by chassis flex, impact from road debris, or even improper installation/torque during previous service. These cracks are often very hard to spot without a thorough cleaning and inspection.
BMW’s Own Admission: Service Bulletin SI B33 02 09
BMW themselves recognized this issue. They put out a service bulletin highlighting inconsistent factory sealant application and incorrect bolt torque as primary factors. If your M3 was built or serviced before March 2009, or if someone didn’t follow the revised procedure using Loctite 574, you’re definitely at a higher risk. This isn’t just a random failure; it’s a known weak point.
Your Repair Options: Reseal, Replace, or Risk It
This Is Not a DIY Job
Let me be clear: working on a differential is precision work. You’re dealing with critical tolerances, bearing preloads, and backlash settings. You’ll need specialized tools like a differential holding fixture, a dial indicator, and the expertise to use them. One mistake here, and you risk warping the housing, destroying bearings, or even locking up the rear end. Trust me, it’s not worth the risk.
Option 1: Housing Reseal Professional Only
Option 2: Complete Replacement Non-Repairable Housing
Option 3: External Sealant Temporary / Last-Resort
Validating the Repair: How to Know It’s Fixed
Once the repair is done, whether it’s a reseal or a full replacement, you can’t just assume it’s good to go. I always recommend a two-stage validation process:
The Static Test: After refilling the differential with the correct fluid, let the car sit for a full 24 hours. Then, get under there with a bright LED light and an inspection mirror. Check that center seam meticulously. It absolutely must be bone dry. Any sign of weeping, and you’ve got a problem.
The Dynamic Test & Long-Term Monitoring
If the static test passes, take the car for a drive – about 50 miles, making sure to include some highway speeds to get everything thoroughly warmed up. Then, immediately re-inspect it on a lift. Again, look for any signs of fluid. For true peace of mind, I tell my customers to monitor the fluid level using the fill plug method at 500-mile intervals for the next 2,000 miles. Catching an early weep can save you from total gear damage down the road.
What This Repair Will Cost You
Let’s talk money, because this isn’t a cheap fix. These are rough estimates for professional shop labor and parts, but they’ll give you an idea:
Housing Reseal
This covers the labor for removal, disassembly, cleaning, resealing with Loctite 574, reassembly, and reinstallation. When done by a specialist following the TSB, the success rate is over 95%.
Full Replacement
This is for a new, remanufactured, or good used differential assembly, plus the labor to install it. This is the only definitive fix if your housing has porosity or cracks.
Temporary Seal
The cost of a tube of RTV. Don’t expect much. I’ve seen maybe 1 in 5 of these actually hold for any meaningful time, and the risk of sudden failure is high.
Here’s a rule of thumb I often share with my customers: if the cost of a major repair like this starts to creep above 40% of your car’s current market value, it’s usually smarter to consider sourcing a quality used or remanufactured differential. For a high-value M3, especially if it’s track-prepped, a specialist reseal or a new unit is a worthwhile investment to protect the rest of your drivetrain.
Preventing Future M Differential Oil Consumption
Prevention really comes down to disciplined maintenance and using the right fluids. This isn’t just any old differential; it’s a high-performance, clutch-type limited-slip unit. It demands specific care.
Always, and I mean always, use BMW-approved final drive fluid. For these M3s, that’s typically SAF-XJ with the correct friction modifier additive. Generic gear oils just don’t have the necessary characteristics for the M differential’s clutch pack. Using the wrong fluid will lead to chatter, excessive heat, and accelerated wear – which only makes it more prone to leaking.
My Maintenance Checklist:
-
Stick to the Schedule: Follow BMW’s recommended differential oil change interval, which is typically every 30,000 to 50,000 miles. If you track the car, cut that interval in half.
-
Regular Visual Checks: Every time you’re under the car for an oil change or tire rotation, take a clean, white, lint-free cloth and wipe along the entire center seam of the differential. Any fresh residue will show up immediately.
-
Use Your Nose: Get a sniff near the rear axle. If you smell that distinct sulfuric “rotten egg” odor, that’s a clear warning sign of LSD fluid leaking and burning off. Don’t ignore it.
