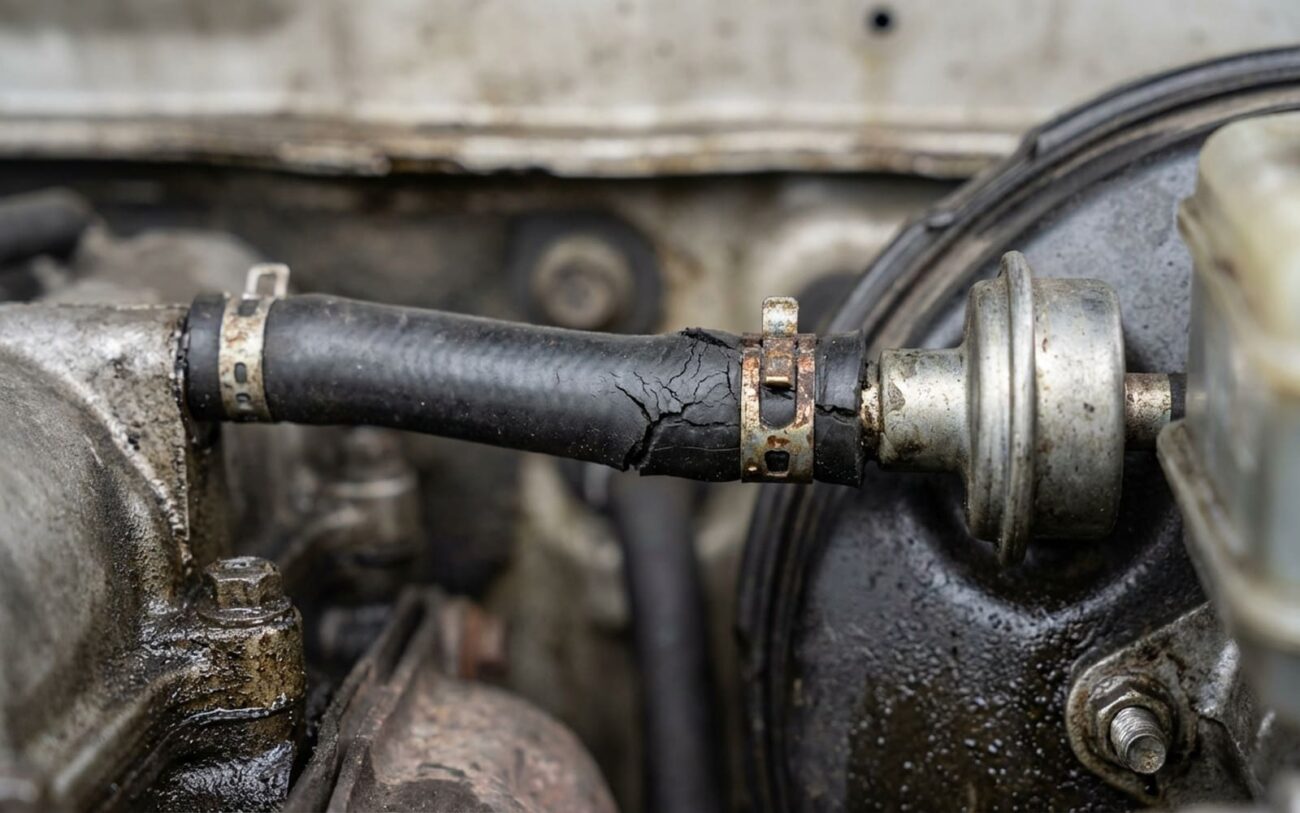
That distinct hiss, like air escaping, every time you press the brake pedal? If you’re hearing that, especially near the firewall, I can tell you right now: your brake booster is likely failing. I’ve been turning wrenches for over 25 years, and this is a classic symptom I’ve seen countless times. It’s not just an annoying noise; it’s a critical safety issue that needs your attention.
See, your brake booster (sometimes called a vacuum servo) is basically a power assist unit. It uses engine vacuum to multiply the force you put on the pedal, making it easy to stop your car. Without it, you’d need a lot more leg strength to slow down. When you hear that hiss, it means you’re losing that vacuum assist. It’s like trying to drink through a straw with a hole in the side—no matter how hard you pull, you just get air instead of the drink. Your pedal will feel much firmer, almost “wooden,” and you’ll really have to lean into it to get the car to stop.
Vacuum: 4 inHg
What That Hiss Is Telling You
Usually, the hiss starts the moment you press the pedal and stops when you let off. That’s a classic sign of an internal leak in the booster’s main diaphragm or its seals. But sometimes, I’ve seen the hiss continue for a few seconds after you lift your foot. If that’s the case, the issue is likely the one-way check valve. This valve is supposed to hold vacuum in the booster even when engine vacuum drops (like at idle or during hard acceleration), so if it’s failing, you’ll gradually lose assist, especially in stop-and-go traffic.
And here’s something many folks overlook: a lot of modern vehicles share engine vacuum with other systems. We’re talking HVAC control flaps, EVAP purge valves, even four-wheel-drive actuators on some trucks. So, a significant vacuum leak from your booster or its supply line can throw those other systems for a loop, leading to confusing secondary symptoms like erratic climate control or unexpected warning lights. That’s why getting a proper diagnosis is key.
How I Pinpoint the Vacuum Leak
Just because you hear a hiss from the firewall doesn’t automatically mean the booster itself is toast. Vacuum hoses, fittings, and the check valve can fail too, and those are often much easier and cheaper to fix. Before you condemn the booster, run through a few simple tests. All you really need is a basic vacuum gauge (any auto parts store has them) and a few minutes.
My Step-by-Step Checks:
-
The Pedal Pump Test (Engine Off/On): With the engine off, pump the brake pedal 5-6 times until it gets hard. This uses up any stored vacuum. Now, hold the pedal down firmly and start the engine. If the pedal drops noticeably as the engine starts, your booster is at least partially working. If it stays rock-hard and you hear a distinct hiss, that’s a strong indicator of an internal booster leak. To be absolutely sure, you can try to isolate the booster by plugging its vacuum supply port (if accessible) and re-testing. If the hiss stops, it’s definitely the booster.
-
Checking Supply Vacuum: Connect your vacuum gauge to the main vacuum supply port on the booster (where the hose from the engine connects). With the engine idling, a healthy gas engine should show between 16–22 inches of mercury (inHg). If it’s significantly lower, your problem might be a weak engine vacuum source or a failing external vacuum pump (common on diesels and many turbocharged engines). Don’t blame the booster if it’s not getting enough vacuum to begin with!
-
Testing the Check Valve: If you suspect the check valve (hissing after releasing the pedal, or gradual loss of assist), you can usually remove it from the booster. It’s a simple little plastic valve. Try to blow air through it from the side that connects to the booster – it should block the air completely. Now, try to suck air from the side that connects to the engine vacuum hose – it should allow air to flow freely. If it fails either of these simple tests, it’s bad. Keep in mind, though, many newer vehicles have the check valve integrated into the booster, so you can’t test it separately.
What Actually Fails Inside That Sealed Unit
If your diagnostic steps point squarely at the booster itself, you’re dealing with an internal problem. The booster is essentially a big metal can with a flexible diaphragm inside, separating a vacuum chamber from an atmospheric chamber. Its core components are that diaphragm, an atmospheric valve, and the one-way check valve we just talked about. When any of these fail, your power assist is compromised.
Watch for Brake Fluid Contamination:
This is a big one. I’ve seen master cylinders develop slow internal leaks, and that brake fluid can seep right past the seals and into the booster. Brake fluid is highly corrosive to rubber, so even a small amount will eventually destroy the booster’s diaphragm and seals. If you’re replacing a booster, always check the back of the master cylinder for signs of leakage. If the master cylinder is leaking, you’ll need to replace both.
Another common failure point is the seal on the atmospheric valve. When you press the brake pedal, this valve opens just a tiny bit to let outside air into one side of the diaphragm, creating the pressure difference that gives you assist. If that seal wears out, corrodes, or gets gummed up, it can leak vacuum instead of sealing properly. The result? That steady hiss and weak assist you’re experiencing.
The Fix: Replacement is the Only Safe Option
⚠ Safety First: No Repair Kits for Boosters
If the brake booster has failed internally, there is no safe repair other than replacing the entire unit. These units are factory-sealed for a reason. Trying to open one up, replace a diaphragm, and reassemble it yourself is asking for trouble. Contamination or improper reassembly could lead to complete brake failure, and that’s a risk no one should take.
Verifying Your Repair: Don’t Skip This Step
Once everything is bolted back together and your brake lines are secure and bled, don’t just take off down the road. You need to verify the repair was successful. Here’s how I do it:
-
Start the engine and press and hold the brake pedal. You should hear absolutely no hissing. The pedal should feel firm but not excessively hard, with smooth travel and strong, consistent assist.
-
If you replaced the booster (or just the check valve), perform the vacuum hold test again: with the engine off, pump the pedal 3–4 times to use up any stored vacuum. Then, hold the pedal down firmly and start the engine. You should feel the pedal drop slightly as vacuum is applied. This confirms your assist is working correctly.
What This Repair Will Cost You
Alright, let’s talk money. This isn’t usually a cheap fix, especially if it’s the booster itself. The parts cost can vary wildly depending on your vehicle – some domestic trucks, for instance, can be on the higher end.
-
Brake Booster Assembly: If you’re tackling this yourself, expect to pay anywhere from $150 to $600 for the part. In my shop, with labor, you’re usually looking at $500 to $1,200. It’s a fairly labor-intensive job, and there’s a real risk if it’s not done right. Improper alignment of the booster rod or incomplete bleeding of the brakes can lead to total brake failure, and that’s not something you want to mess with.
-
Check Valve: If you’re lucky and it’s just a separate check valve, the part is usually $15 to $50. A shop might charge $100 to $250 for the diagnosis and replacement, as it’s a quick job. But be warned: if you only replace the check valve and the booster’s diaphragm is already compromised, you’re just masking an underlying problem. That hiss and hard pedal will eventually come back, and you’ll be doing the booster job anyway.
How to Prevent Future Brake Booster Failures
My Maintenance Best Practices:
-
Regularly inspect vacuum hoses: Look for any cracks, brittleness, or soft spots. A cheap hose can cause a big problem.
-
Monitor your master cylinder: Keep an eye out for any signs of internal leaks where it mates to the booster. Catching fluid migration early can save your booster.
-
Listen for the hiss: Every few months, just sit in a quiet car, press the brake pedal, and listen. Catching that faint hiss early can save you a lot of headache.
-
Check external vacuum pumps: If your vehicle has one (common on diesels, some turbos), make sure it’s providing adequate vacuum. A failing pump will mimic a booster problem.
Pro Tip from the Shop Floor
I’ve seen it time and again: a $20 vacuum hose replaced early can prevent a $600+ booster job down the road. Prevention isn’t just about saving money; it’s about keeping your vehicle safe and reliable. Don’t let small issues fester.
