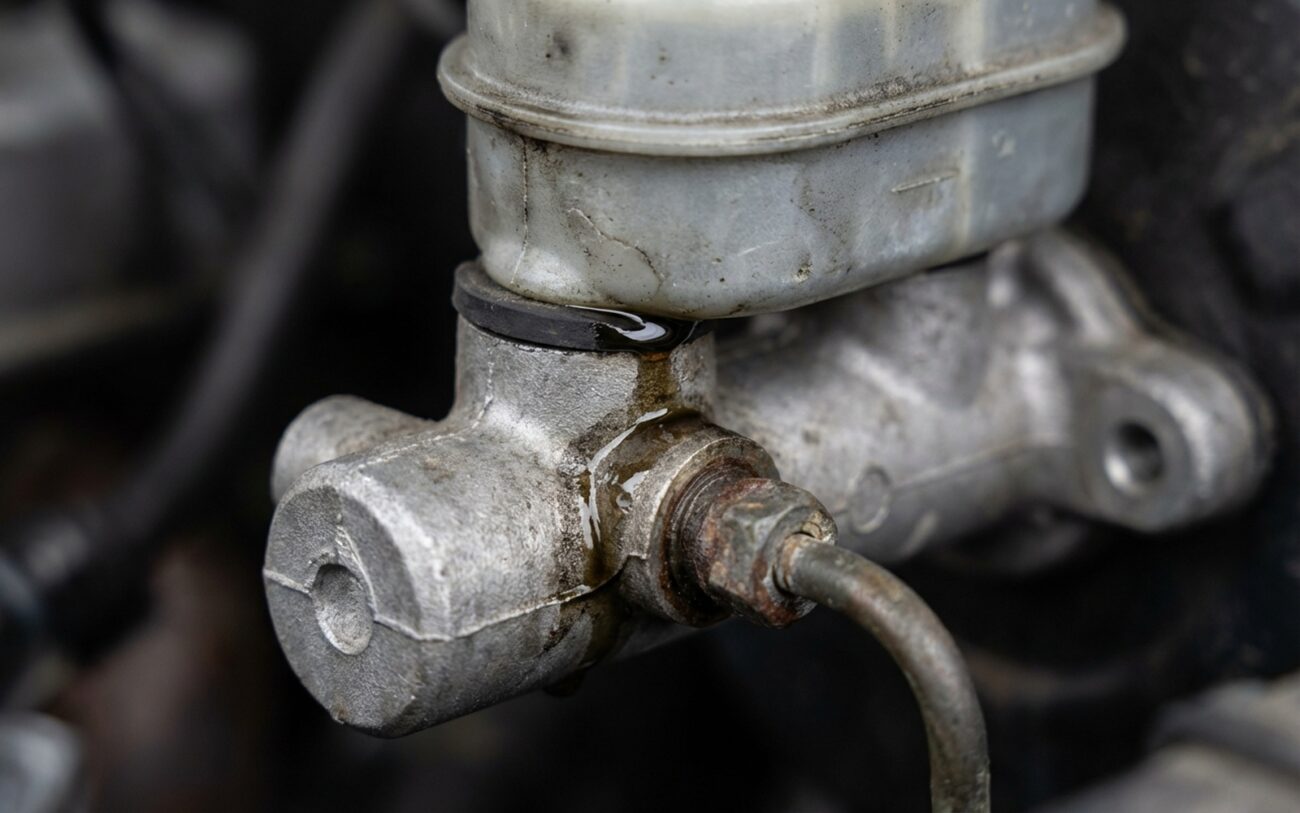
Master Cylinder Body Leaks: Don’t Jump to Conclusions (But Take ‘Em Seriously)
Alright, let’s talk master cylinders. When you spot brake fluid under the hood, especially near the firewall, your mind probably jumps straight to the master cylinder. And yeah, you’re often right. But here’s the thing I’ve learned over 25 years in the shop: most master cylinder failures aren’t actually leaks from the metal body itself. They’re almost always internal seal problems.
That means you’ll feel a soft pedal, a pedal that sinks slowly to the floor, or just generally poor braking performance. You won’t see puddles of fluid on the fender liner. A true leak from the master cylinder’s casting – the aluminum or iron housing – is pretty rare. But when it happens, it’s a big deal. We’re talking about a structural failure in a critical safety component.
Status: LEAK DETECTED
So, what does a real body leak look like? You’ll see fluid seeping directly from the metal housing of the master cylinder, not from a fitting, a hose, or the plastic reservoir. Often, it’s along a casting seam or at a stress point near the rear of the bore, right where it mates to the brake booster. That’s the tell-tale sign of a compromised casting.
Diagnosis: How I Pinpoint the Leak in My Shop
Diagnosing a master cylinder body leak isn’t about wiping things down and hoping for the best. It’s about a systematic approach to rule out the common issues and confirm the rare, serious ones. Here’s the process I use, step by step, to get it right the first time.
| Symptom | Likely Master Cylinder Body Failure | Common External Mimics (Check These First!) | My Go-To Test to Confirm |
|---|---|---|---|
| Fluid on master cylinder exterior (visible weep) | Casting porosity, hairline crack in aluminum/iron housing | Leaking reservoir gasket, worn pushrod seal, loose brake line fitting, cracked plastic reservoir |
Thoroughly clean the entire area. Add UV dye to the brake fluid. Pump the brake pedal 50-100 times to build pressure. Inspect with a UV light. If the glow originates directly from the metal casting itself, you’ve found your body leak. |
| Brake fluid inside the brake booster vacuum hose | Internal bore crack or seal failure allowing fluid into the rear chamber of the MC, then into the booster | Faulty booster diaphragm (very rare for fluid to come from booster), overfilled reservoir (fluid sucked into vacuum line), condensation (easily mistaken for fluid) |
Disconnect the vacuum hose from the brake booster. Insert a clean, dry paper towel or cotton swab deep into the booster-side end of the hose. Apply the brake pedal firmly a few times. If the towel shows any oily residue, it’s brake fluid, and your master cylinder is leaking into the booster. This is a critical safety issue. |
| Gradual fluid loss, no visible external leak (or soft/sinking pedal) | Internal casting defect or bore wall crack (fluid slowly seeping into booster or evaporating) | Internal primary/secondary piston seal failure (this is far more common), worn brake pads (fluid level drops as calipers extend), caliper piston seal leak, ABS module internal leak |
Bench test the master cylinder. Cap off the outlet ports using appropriate plugs. Connect a pressure bleeder (like a Motive Products unit) to the reservoir and pressurize the system to 15–20 psi. Monitor the gauge for 5-10 minutes. A pressure drop, especially if accompanied by a visible weep from the casting (use UV light here too!), confirms a body failure. If pressure drops but there’s no external weep, it’s likely internal seal bypass. |
To run these tests properly, you’ll need a few specialized tools: UV dye, a good UV flashlight, a pressure bleeder (I swear by my Motive Products unit), and a set of master cylinder port plugs. These aren’t luxuries, folks – they’re what separate a real, accurate diagnosis from a costly guess. I see this misdiagnosed a lot. Techs replace the master cylinder because the fluid is low, but the real issue was a dragging caliper, worn pads, or simply contaminated fluid weakening the internal seals. Don’t be that guy.
Tech Tip: Always check the brake fluid’s condition. If it’s dark brown or black, it’s old and full of moisture. That moisture causes internal corrosion and breaks down seals, leading to internal bypass – which feels like a body leak but isn’t. Flush it first, then re-evaluate if the pedal still sinks.
Why Master Cylinder Castings Fail (It’s Not Just Bad Luck)
So, how does a solid piece of metal, like a master cylinder casting, just start leaking? It’s usually not from normal wear and tear. It’s almost always a flaw from the manufacturing process or extreme, prolonged stress. The most common culprit I see is casting porosity: tiny, microscopic air pockets trapped in the aluminum or iron during its creation. Over time, that highly pressurized brake fluid finds its way through these microscopic channels and starts to weep out. It’s not a visible crack, but it acts exactly like one.
Crucial Distinction:
A leaking plastic reservoir, a worn pushrod seal, or a loose fitting is not a body failure. Those are typically replaceable seals or easily fixed external issues. A true body failure means the metal housing itself is compromised, and that changes your repair strategy entirely.
Other causes are less frequent but just as serious. Thermal stress from repeated, heavy braking – think towing heavy loads or track day abuse – can eventually lead to hairline cracks. Internal corrosion is another big one: brake fluid naturally absorbs moisture over time, and that water in the system can literally eat through the bore wall from the inside out, especially in humid climates. And, of course, physical damage from an accident or improper installation (like cross-threading a brake line fitting) can crack the housing instantly. I’ve seen more than one DIYer ruin a new master cylinder by overtightening fittings.
Your Only Real Repair Option (And Why)
Safety First, Always.
Once you’ve definitively confirmed a leak from the master cylinder’s casting, your options are extremely limited. Let me be blunt: sealants are never a permanent, safe fix for a high-pressure hydraulic system like your brakes. The only real, reliable fix is complete unit replacement.
“Diagnostic” Sealant Test (NOT a Repair!)
Complete Unit Replacement Recommended
Don’t Skip Bench Bleeding!
Making Sure the Job is Done Right (And Stays Right)
My Post-Repair Validation Checklist
-
Heat Cycle Test: Drive the car through at least three full heat cycles. That means starting cold, getting it up to full operating temperature, and letting it cool down completely. Then, re-inspect the master cylinder casting, preferably with a UV light if you used dye, to ensure there’s no new seepage.
-
Pressure Integrity Check: Reconnect your pressure bleeder to the reservoir and pressurize the system to 15-20 psi. Monitor that gauge for at least 5 minutes with the engine off. A steady gauge confirms the internal seals are holding and there are no new external leaks under pressure.
-
Road Test & Pedal Feel: Take the car for a thorough road test. Verify a firm, consistent pedal feel with no sponginess or sinking. If the pedal isn’t rock solid, don’t ignore it. Go back and bleed the entire system again, starting with the furthest wheel from the master cylinder.
-
ABS Module Bleed (If Applicable): For many modern vehicles with electronic stability control or ABS, a proper bleed cycle using a scan tool is absolutely necessary. This clears air from the ABS hydraulic control unit. If your car requires it, and you skip it, you’ll never get a truly firm pedal.
The Cost and When to Make the Hard Call
DIY Replacement
Parts only. High success rate when properly bench-bled and system is thoroughly bled. Risk of air in system if rushed or steps are skipped.
Shop Replacement
Includes parts and labor. Near 100% success rate with professional bleeding and proper tools (like a scan tool for ABS). This is the safest bet for most people.
External Sealant
Less than 10% long-term success, in my experience. Sudden, catastrophic failure can lead to complete brake loss. Absolutely NOT recommended as a repair.
Here’s the reality check I give my customers: if the repair cost – including diagnosis, parts, and labor – starts to exceed 40% of your car’s private-party value, and the rest of the vehicle is showing its age (rust, worn suspension, high miles, other pending repairs), you really need to weigh your options. The fix for a master cylinder body leak is reliable, but pouring $700 or $800 into a $1,500 car might not make financial sense. On the other hand, if the car is otherwise solid and you plan to keep it, then fixing it correctly is the only safe choice. Brakes are not the place to cut corners, ever. Your life, and the lives of others, depend on them.
Keeping It From Happening Again (Prevention & Early Detection)
My #1 Maintenance Tip: Brake Fluid Flushes
Prevention starts with one simple, often overlooked habit: regular brake fluid maintenance. Brake fluid is hygroscopic – it sucks moisture right out of the air. That moisture causes internal corrosion, breaks down seals, and compromises the fluid’s boiling point. Flushing your brake fluid every 2–3 years (or as your manufacturer recommends) is cheap insurance. It protects the master cylinder bore, the caliper pistons, and especially the expensive ABS module from internal corrosion. Always use the specific fluid type listed on your reservoir cap (DOT 3, 4, or 5.1). Don’t mix them unless the manufacturer explicitly says it’s okay.
For early detection, make visual checks a part of your routine. Every time you pop the hood for an oil check, take five seconds to look at the base of the master cylinder where it meets the booster. Check for any dampness, drips, or that telltale white, crusty residue left behind by evaporated brake fluid. And check your fluid level monthly. A slow, unexplained drop in fluid with no visible external leak is your cue to run that pressure-hold test or dig deeper into the system.
One last bit of advice: if you’ve had a body leak that allowed fluid into the booster, consider bleeding the brake booster vacuum check valve or, better yet, replacing it. Fluid inside the booster can leave residue that affects vacuum operation and even damage the diaphragm, even after the master cylinder itself is fixed. And remember, for cars with electronic stability control or ABS, a proper bleed cycle using a scan tool may be needed to ensure full system function and clear any trapped air from the ABS module. Don’t skip that step if your car calls for it.
