When a xenon headlight on a VW or Audi starts acting up, most people jump straight to “bad bulb.” But after 25 years in the bay, I can tell you: the ballast is usually the real culprit. And when it starts failing, it doesn’t go quietly. Let me walk you through what you’re actually dealing with—because misdiagnosing this one can cost you way more than a $400 ballast.
How a Failing Ballast Actually Behaves
First, forget the idea that a bad ballast just makes the light go out. That’s one way it fails—but it’s rarely the first sign. What I see more often? Intermittent operation. One night it works fine. Next night, it flickers for 10 seconds like a strobe before stabilizing. Or worse—it cycles on and off every few seconds. That’s not the bulb. That’s the ballast struggling to maintain the 20,000+ volts needed to keep the xenon arc lit.
And here’s a red flag a lot of techs miss: a pink or purple tint in the beam before it dies. That’s not “the bulb aging.” That’s the ballast’s output voltage dropping below spec. The arc can’t sustain proper ionization, so the light shifts color. When that happens, the ballast is on borrowed time.
Sometimes, it just doesn’t come on at all. No flicker, no glow—dead. But don’t assume it’s the ballast yet. Could be the bulb, the igniter (that little module bolted to the back of the bulb), or even a wiring fault. That’s why you test—don’t guess.
Not every headlight problem is a ballast:
Fog inside the lens? That’s a housing vent or seal issue. “Headlamp range control defective” on the dash? That’s the leveling motor or sensor. The ballast has one job: convert 12V DC to high-voltage AC to ignite and run the bulb. If it fails, the symptoms are electrical—no light, flickering, color shift. That’s it.
How to Diagnose It—For Real
The only reliable way to confirm a bad ballast? Swap it. If the right headlight is dead, take the ballast off and put it on the left side—assuming the left is working. If the problem jumps to the left, you’ve got your answer. If the right side is still dead and the left works fine, the issue is downstream: bulb, igniter, or wiring.
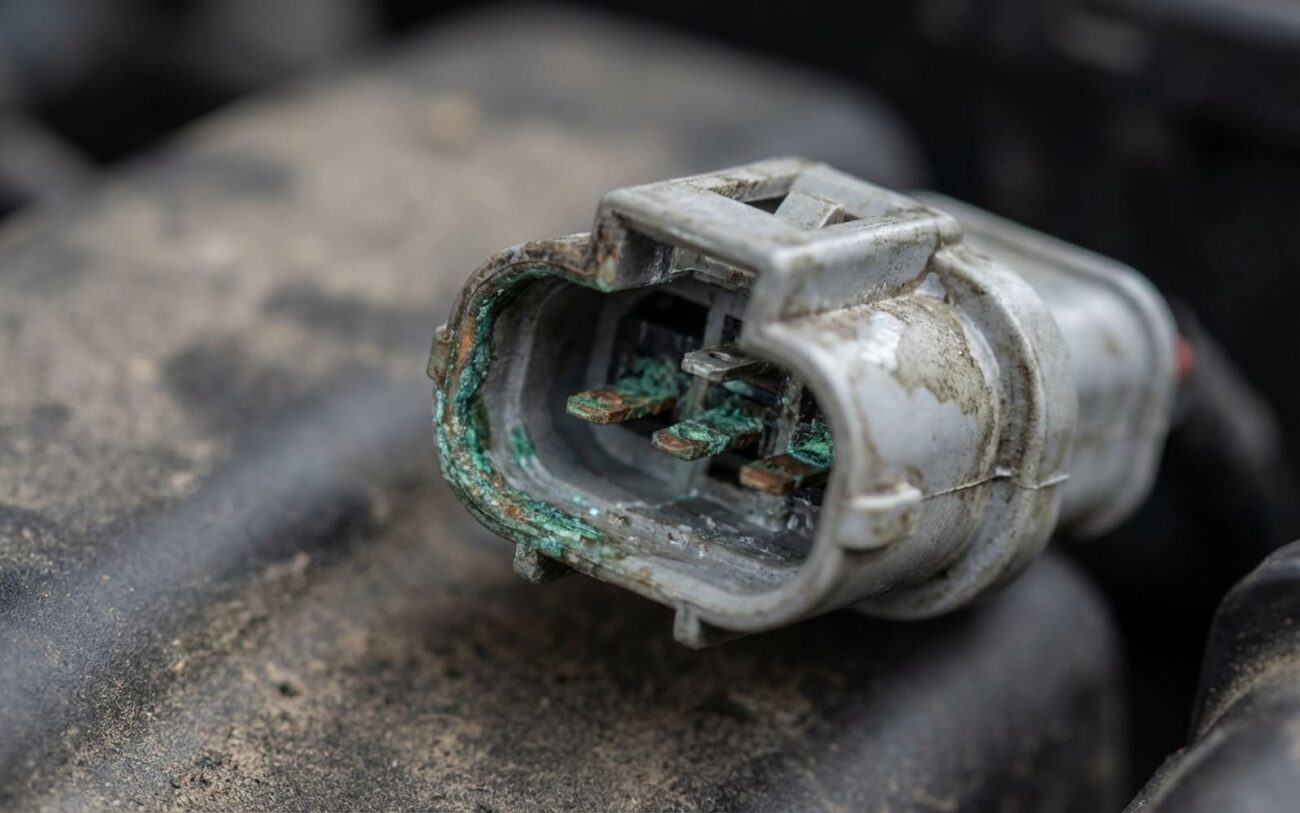
For flickering or intermittent lights, start with a visual. Pull the wheel liner (yes, you’ve got to do it) and check the ballast seal. Look for cracks in the polyurethane bead, green corrosion on the connector pins, or frayed wires. Moisture gets in, condenses on the PCB, and starts eating traces. I’ve seen ballasts that looked fine externally but had half the board turned to green mush.
Next, scan tool time. Use VCDS or ODIS to command the headlight on independently. If the module sends the signal but nothing happens, check for 12V at the ballast input. No power? Problem is upstream—fuse, relay, or control module. Power present but no light? Then it’s likely the ballast, bulb, or igniter.
And if you’re seeing pink/purple tint? Swap in a known-good D3S or D1S bulb first. If the color shift stays, the ballast is failing. Some shops have HID testers that can measure ignition voltage and operating wattage—but most of us just swap and observe.
| Symptom | Likely in Ballast | Common External Mimics | Definitive Test to Confirm Source |
|---|---|---|---|
| No light output | Internal power supply failure or shorted circuit | Failed HID bulb (D1S, D3S), failed igniter, open power/ground circuit |
Swap suspect ballast to opposite, known-good headlamp. If fault follows, ballast is faulty. Confirm 12V at ballast input with scan tool commanding headlamp ON. |
| Intermittent operation in wet conditions | Compromised moisture seal on ballast casing | Corroded headlamp connector, damaged wiring insulation, clogged headlight vent |
Inspect ballast sealant for cracks or separation. Dry thoroughly and retest. Use a borescope to check internal seal integrity if possible. |
| Flickering or pink/purple color shift | Degrading output capacitors or unstable high-voltage regulation | Aging or failing HID bulb |
Swap in a known-good bulb. If symptoms persist, ballast is failing. Professional HID testers can measure ignition voltage and operating wattage for confirmation. |
Why Ballasts Die—The Real Reasons
After pulling hundreds of these out, I can tell you: three things kill ballasts. Not “bad luck.” Not “just wear.” Real, fixable issues.
Moisture ingress is public enemy number one. The ballast is supposed to be potted in sealant—usually a polyurethane bead. But thermal cycling (heat up, cool down, repeat) cracks that seal over time. Once it does, humidity gets in, condenses on the board, and starts corroding traces. I see this most on models where the ballast is mounted low in the bumper—like the B7 A4 or MK6 Passat. Road splash, car washes, rain—it all adds up.
Heat buildup is the silent killer. Some Audi models mount the ballast right next to the radiator or turbo. No airflow? It cooks. I’ve pulled units with bulging capacitors and cracked solder joints from chronic overheating. There are actual service bulletins (like 63-13-08 for certain A6s) that call for revised mounting locations. That’s not a rumor—that’s factory admitting the design sucked.
Component quality matters more than people think. These things switch high voltage, thousands of times. Cheap capacitors or under-rated transistors can’t handle it. OEM units fail sometimes—but no-name aftermarket ballasts? I’ve had customers replace them twice in six months. Spend the money on Bosch, Valeo, or a known OEM-equivalent. Trust me.
Clarification:
A failing ballast is almost never caused by the control module. That’s a separate failure. And if water flooded the headlamp housing? Yeah, it can kill the ballast. But the root cause is the cracked lens or failed seal—not the ballast itself.
Repair Options—What Actually Works
Reseal the Ballast
Replace the Ballast Recommended
PCB Repair Rarely Worth It
Did It Actually Work?
Don’t just turn it on once and call it good. For a resealed unit, the real test is moisture exposure. Run the car through a car wash or wait for rain. Then, pull the wheel liner and inspect the ballast with a borescope. Any fogging or moisture? The seal failed.
For a replacement: do 10 on/off cycles. Clear the codes. Make sure the light fires instantly, runs steady, and matches the other side in color and brightness. If you’ve got a light meter, check output against factory specs. And yes—use the same tools: scan tool, multimeter, borescope. They’re not just for diagnosis. They’re for validation.
Validation Steps
-
For a full ballast replacement, perform at least 10 on/off cycles to check for consistent ignition.
-
Clear any stored fault codes with a scan tool and verify none return.
-
The headlight should light instantly, run steadily, and match the color and brightness of the other side.
-
If you have access to a workshop light meter, confirm the output meets factory lumen and color temperature specs.
-
The same tools used for diagnosis—scan tool, multimeter, borescope, and visual inspection—are your best allies in validation.
Costs, Risks, and the Hard Truth
Here’s what it really costs:
| Repair Type | DIY Cost | Shop Cost | Success Rate | Secondary Risk if Failed |
|---|---|---|---|---|
| Reseal ballast casing | $20 (sealant only) | $150–$250 | ~80% if no internal corrosion present | Water intrusion can damage new ballast or headlamp control module |
| Replace ballast with OEM | $300–$500 (part) + coding tool or shop fee | $600–$900 (labor + coding) | Over 95% when properly installed and coded | Minimal if correct unit and procedure used |
| Component-level PCB repair | $50 (parts, if skilled) | $200–$400 | 60–70% (highly technician-dependent) | Incorrect voltage output could damage bulb or control module |
Rule I use: if replacing both ballasts costs more than 40% of the car’s value, consider a legal halogen conversion. On older A4s, Passats, or A6s, it’s not glamorous—but it kills the recurring xenon costs. And sometimes, that’s the smart move.
How to Make It Last
Prevention is cheap. Apply dielectric grease to the ballast and headlight connectors whenever they’re disconnected. Doesn’t conduct, but it seals out moisture and stops corrosion.
Check the sealant bead every six months. Look for cracks, shrinkage, or gaps. And don’t ignore flickering at startup—that’s your first warning.
Finally, clear the headlight ventilation ducts in the bumper. These little vents equalize pressure and reduce humidity. Clogged with mud? The headlamp stays wet, the ballast overheats. Takes two minutes to clean. But it can add years to the system.
Prevention Tips
-
Inspect the ballast’s sealant bead every six months—look for cracks, shrinkage, or separation from the housing.
-
Don’t ignore