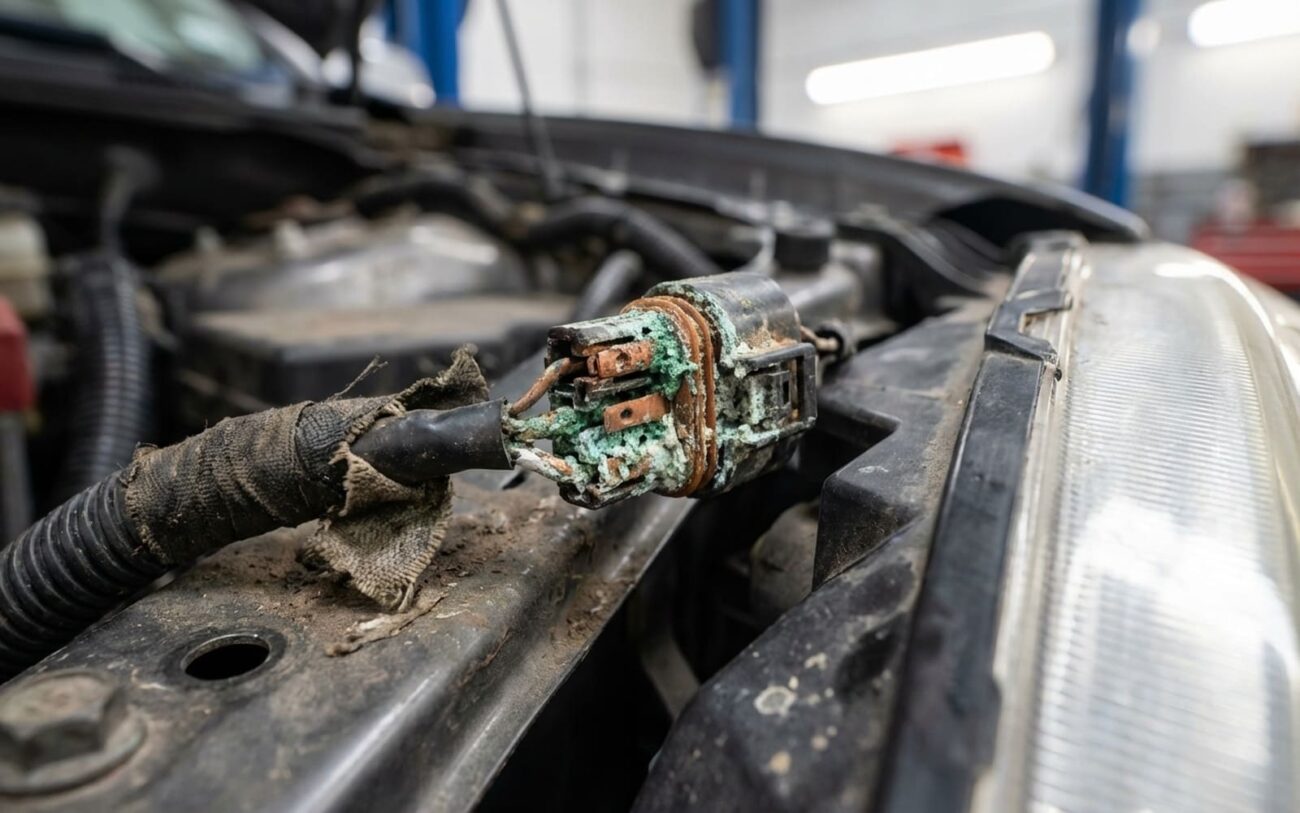
So, you’ve got that green crud on your VW or Audi headlight connector, huh?
If you’ve popped the hood and seen that telltale blue-green crust around a headlight connector on your VW or Audi, trust me, you’re not alone. I’ve pulled apart dozens of these harnesses over my 25+ years, and this isn’t some random fluke. It’s one of the most common—and frankly, preventable—electrical headaches on modern VW and Audi models.
What you’re looking at isn’t just dirt. That green stuff is active electrolytic corrosion, and it’s literally eating away at your copper wires and terminal pins. It usually starts in places where moisture loves to hide, like behind the bumper or tucked away near the plenum chamber. Water gets trapped, sits there for months, and then this happens.
Here’s the thing I see a lot: people replace bulbs, ballasts, or even entire headlight assemblies, only for the problem to come right back. Why? Because the root cause is almost always in the wiring itself—not the components. If you’ve got multiple systems acting up together—say, your left headlight, washer pump, and turn signal are all doing weird things—it’s almost certainly a shared ground point like G6 or G22 that’s corroded. These grounds are critical junctions; when they fail, they take down everything connected to them. This isn’t a random fault. It’s a known failure pattern, especially on MQB-platform vehicles and earlier T5, T6, and T7 models.
Is it the harness, or something simpler? My diagnostic approach.
Before you start tearing into wiring, let’s rule out the easy stuff. A single failed light could just be a bad bulb or a blown fuse. Multiple erratic failures could point to a failing BCM or even just a weak battery. And sometimes, what looks like corrosion on the outside is just road salt, with perfectly clean wires underneath. That’s why proper testing is absolutely critical.
Symptoms & My Go-To Tests
Here’s how I typically diagnose these issues in the shop:
-
Symptom: A single light isn’t working or flickers.
This could be a bad bulb, a faulty control module, or a blown fuse. But often, it’s a corroded or broken wire right within that specific headlight harness segment, usually near a connector.
My Definitive Test: Perform a voltage drop test under load. Turn the light on and measure the voltage drop from the power pin to ground (should be ≤0.5V) and from the ground pin to battery negative (should be ≤0.1V). If you see higher numbers, you’ve got resistance in that circuit.
-
Symptom: Multiple erratic front-end faults (e.g., headlight, turn signal, washer pump all acting weird).
This is a classic sign of a failed common ground point, like G6 or G22, where several circuits converge. Don’t jump to thinking it’s a failing BCM or a weak battery right away, though those can mimic it.
My Definitive Test: Measure resistance from the ground stud itself to the battery negative terminal. It should be less than 0.5 Ohms. Anything higher means your ground is compromised.
-
Symptom: You see visible green or blue-green corrosion on the harness or connector.
This means moisture has gotten in and started degrading the insulation and conductor integrity. Sometimes it’s just surface contamination from road salt, but don’t bet on it.
My Definitive Test: Depin the connector if possible, and perform a continuity test on the individual wire while gently flexing it. If continuity drops out, even briefly, that wire is compromised internally.
Why this keeps happening to these cars: It’s a design flaw.
This isn’t just bad luck; it’s a systemic issue with how some of these harnesses are designed and routed. The biggest culprit I’ve found? That adhesive-backed foam tape VW and Audi use to secure the harness. It acts like a sponge, soaking up road salt and moisture, then holding it tight against the wires for weeks or even months. It’s a perfect recipe for corrosion.
Beyond that, the rubber seals that are supposed to keep water out often harden with age, or they just don’t seat properly if the harness is routed too tightly from the factory. On some models, the harness runs directly under a clogged plenum chamber drain. You get a little rain or coolant overflow, and it drips straight into the connector cavity. I’ve even seen cases where a slow water pump leak migrated into the harness path, accelerating the whole corrosion process. There are known service bulletins for certain model years related to this, especially on vehicles built on the MQB platform.
How to fix it: Picking the right repair for the damage.
Assessment is Key
You can’t just patch it and hope. You need to assess honestly: is this a localized issue or a full-system failure? The repair approach depends entirely on the extent of the damage.
Once you’ve identified the extent of the corrosion, here are your options, from simplest to most involved:
Making sure the repair actually worked: Verification is non-negotiable.
Don’t just turn the key and walk away. A successful repair isn’t just about the light turning on—it’s about reliability under real conditions. For any wire splice or connector repair, you absolutely need to perform a voltage drop test under load. Turn on the headlight (or whatever circuit you repaired) and measure across the repair point. Anything over 0.5V means you still have too much resistance, and your repair isn’t good enough.
Pro Verification Tip
After any electrical repair, I always cycle every circuit—low beams, high beams, fog lights, turn signals—at least 10 times. Use a scan tool like VCDS or ODIS to check for stored or pending fault codes. A good multimeter with Min/Max recording helps catch brief voltage drops that indicate an intermittent connection you might otherwise miss.
The hard part: Deciding what to spend.
Here’s a rough idea of what these repairs typically run, including parts and labor at a reputable shop:
-
Single Wire Splice: $100 – $200
Shop cost, including labor. DIY parts are usually under $50. If done right, this has a 95% success rate.
-
Connector Replacement: $500 – $1,200
This includes OEM harness segments and professional pinning. You’re looking at a 98% success rate with this approach.
-
Full Harness Replacement: $2,000 – $3,500+
This is the ultimate fix for severe, widespread corrosion. It’s a big investment, but it boasts a 99% success rate and is highly recommended for long-term ownership.
My Rule of Thumb:
If the repair cost starts to creep over 40% of the car’s current market value, you really need to consider if the investment makes sense. However, if it’s a well-maintained vehicle you plan to keep for years, a full harness replacement can restore reliability and peace of mind.
How to stop it from happening again.
Prevention is always cheaper than repair. Here’s what I recommend to keep that green crud from coming back:
-
Get rid of that foam tape. In the front bumper area, remove any adhesive foam tape from the harness and replace it with split convoluted tubing. This lets moisture drain instead of being trapped.
-
Apply a corrosion inhibitor. Products like ACF-50 or Boeshield T-9 work wonders. Spray them on connectors and any exposed wires.
-
Clear your plenum chamber drains. Do this every fall, especially if you park under trees. Clogged drains mean water buildup right where your wiring lives.
-
Inspect regularly. During every oil change, take a quick look at visible harness sections, especially near the headlights. Catching that green powder early can save you a bundle.
