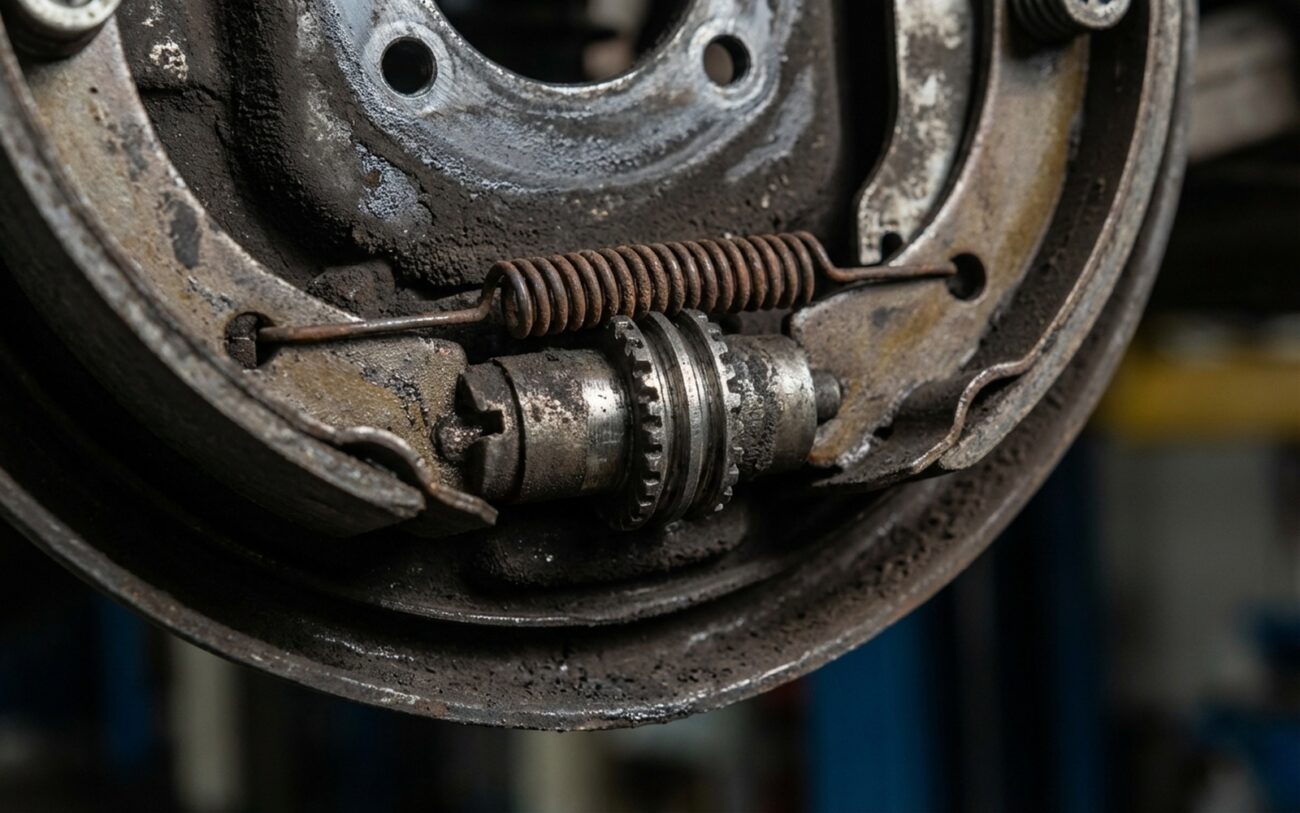
When a customer rolls in complaining about a wheel that feels like it’s dragging, my mind immediately jumps to the star wheel adjuster inside the drum brake. It’s not the only thing that can cause it, but in my 25+ years, it’s easily the most common culprit for a single-wheel drag – and often, the most overlooked.
You’ll hear the classic signs: a slight pull to one side, maybe the car feels a bit sluggish, and fuel economy takes a hit. But the real dead giveaway? Heat. After just a few miles, that wheel hub will be radiating warmth. You can feel it without even touching it, just by putting your hand near the wheel. In the worst cases, you’ll smell that sharp, acrid scent of overheated brake lining. That’s the sound of money burning, literally.
BRAKE TEMP MONITOR
Peak: 215°F
That heat isn’t just a symptom; it’s a critical diagnostic clue. It tells me the brake shoes aren’t retracting like they should and are constantly rubbing against the drum. The star wheel’s whole purpose is to maintain a tiny, precise gap – just enough for the shoes to pull back when you’re not braking, but close enough for quick, firm stops. If that star wheel is cranked too far or, more commonly, seized up, that crucial gap disappears. The shoes stay pressed against the drum, creating friction, heat, and wear with every single revolution.
The Concept
Think of it like a door hinge that’s rusted shut. You can force the door open, but it won’t swing back on its own. That’s your brake shoe, stuck against the drum.
Unlike disc brakes, which use a caliper piston and seals to pull the pads back, drum brakes rely heavily on return springs and that precise star wheel adjustment. No gap, no retraction. And if you pull the drum, you might see uneven shoe wear – often the leading shoe looks scorched at both ends while the trailing shoe is barely touched. But don’t jump to conclusions just yet. That same wear pattern can also point to a stuck wheel cylinder, a collapsed brake hose, or even a bent backing plate. The heat is what really narrows it down.
Left unchecked, a dragging brake will quickly glaze the friction material, warp the drum, and can even overheat the wheel cylinder itself. When brake fluid boils inside that cylinder, you’re looking at a soft pedal or a complete loss of braking at that wheel. This isn’t just an inconvenience; it’s a serious safety hazard that gets worse fast.
How I Figure Out If It’s the Star Wheel or Something Else
Before you start tearing into things, you’ve got to isolate the problem. A dragging drum brake can act like a lot of other issues, and a wrong diagnosis means wasted time and money. Here’s the approach I’ve used in my shop for years, step by step.
| Symptom | Often Points to Star Wheel | Common Mimics | The Definitive Test (My Go-To) |
|---|---|---|---|
| Single-wheel drag & excessive heat | Star wheel is over-adjusted or seized, keeping shoes engaged. | A seized wheel cylinder piston, a collapsed internal brake hose, weak return springs, or a bent backing plate. |
Pop the drum off (if you can) and back off the star wheel 2–3 clicks. If the wheel spins freely afterward, you’ve found your problem. |
| Uneven shoe wear (e.g., leading shoe worn at ends) | Star wheel misalignment or improper adjustment causing uneven shoe-to-drum contact. | Weak or broken return springs, a seized anchor pin, or worn contact points on the backing plate. |
With the drum off, manually actuate the star wheel with a brake spoon. Both shoes should move outward evenly. If one side lags or binds, inspect the star wheel and shoe hardware. |
| Self-adjuster isn’t working (pedal feels low over time) | Star wheel is corroded, or the adjuster lever isn’t engaging its teeth. | A broken self-adjuster cable or spring, or simply incorrect reassembly from a previous brake job. |
With the drum off, flick the self-adjuster lever by hand. The star wheel should rotate one tooth. If it’s frozen solid or the lever slips, it’s failed. |
Why These Little Guys Give Up the Ghost
So, why does this small but absolutely critical part fail? Most of the time, it’s plain old corrosion. The star wheel lives in a tough neighborhood – dark, damp, and full of brake dust, road salt, and grime. Moisture from rain, snow, or just humidity gets in there. The threaded screw and its mating socket are usually steel, and when they rust together, that mechanism binds tighter than a cheap lug nut. The self-adjuster lever can’t turn it, and neither can you with a tool, without risking damage.
A Common, Preventable Failure:
I’ve also seen plenty of cases where someone used the wrong tool – usually a flathead screwdriver – to force the star wheel. That just rounds off the teeth. Once those teeth are gone, the adjuster lever slips right over them, and your self-adjusting function is dead. Using the right brake adjustment tool isn’t optional; it’s essential.
And then there’s simple human error. I’ve had cars come in where a tech (or a DIYer) cranked the star wheel too far during a brake job, eliminating all clearance before the drum even went back on. Or worse, they adjusted it until the drum wouldn’t go on, then just beat it into place. That’s not adjustment; that’s asking for trouble. The result? Immediate drag, and often, a pissed-off customer.
Your Options for Getting It Fixed
Depending on the damage, you’ve got a few ways to tackle this. Catch it early, and it’s usually a pretty straightforward fix.
Clean and lubricate the star wheel DIY-FEASIBLE
Replace the star wheel and adjuster kit DIY-FEASIBLE
Dealing with a stuck drum Professional Only
Emergency adjustment through the access hole TEMPORARY BAILOUT
How I Know I Fixed It Right
Never, ever assume the job’s done just because the drum’s back on. You need to verify three things: proper clearance, smooth operation, and that the self-adjuster is actually working.
My Post-Repair Checklist
-
Static Test: With the car safely jacked up, spin the wheel by hand. You should hear a light, consistent scraping sound – that’s just the shoes lightly touching the drum. What you don’t want is any hard spots, binding, or a completely free spin (which means it’s too loose).
-
Dynamic Test: Take the car for a short 5-minute drive. Don’t hammer the brakes, just normal stops. When you get back, use an infrared thermometer to check the hub temperature of the repaired wheel and compare it to the opposite side. The difference should be no more than 50°F. Anything more, and you’ve still got drag.
-
Self-Adjuster Test: This is crucial. Find a safe, open area and make 5-10 firm stops while driving in reverse. This action engages the self-adjuster lever to turn the star wheel and take up any slack. Re-check the wheel spin by hand; it should feel slightly tighter, but still smooth. If it’s still too loose, do a few more reverse stops.
What This Repair Costs and When to Walk Away
Let’s talk real numbers. Drum brake work, especially when you catch it early, is usually one of the more affordable repairs on a car. It’s not like replacing a transmission.
| Repair Type | DIY Cost (Parts Only) | Shop Cost (Est.) | My Success Rate | Worst Case if It Fails Again |
|---|---|---|---|---|
| Clean/Lube Star Wheel | $5 (for cleaner/grease) | $150 – $250 | High (if caught early) | If it seizes again, you’ll overheat and likely destroy the brake shoes and possibly score or warp the drum. |
| Replace Star Wheel Kit | $15 – $30 | $200 – $350 | Very High | If you skip greasing the threads, the new parts will likely seize up quickly, putting you right back where you started. |
| Full Drum Service (Shoes, Hardware, Drums) | $80 – $150 | $300 – $500 | Highest (resets the system) | N/A — a complete service replaces most failure points, assuming quality parts and proper installation. |
Keeping It From Happening Again
Prevention here is simple, and it only takes an extra five minutes. Every single time you open up a drum brake – whether it’s for an inspection, new shoes, or replacing hardware – service that star wheel mechanism. Clean the threads thoroughly, inspect for any wear or damage, and apply a fresh coat of high-temperature brake grease. This small, often-skipped step prevents 90% of future drag issues, I guarantee it.
My Pro Maintenance Tip
For early detection, make wheel spin checks part of your routine. Once a year, or whenever you rotate your tires, jack up each corner and give the wheel a good spin by hand. You’re listening for a smooth, light drag. If you hear a heavy grind, feel significant resistance, or notice any pulsing, something’s wrong. Catching it early often means you’re just looking at a quick adjustment – not a full replacement of scorched shoes and warped drums.
