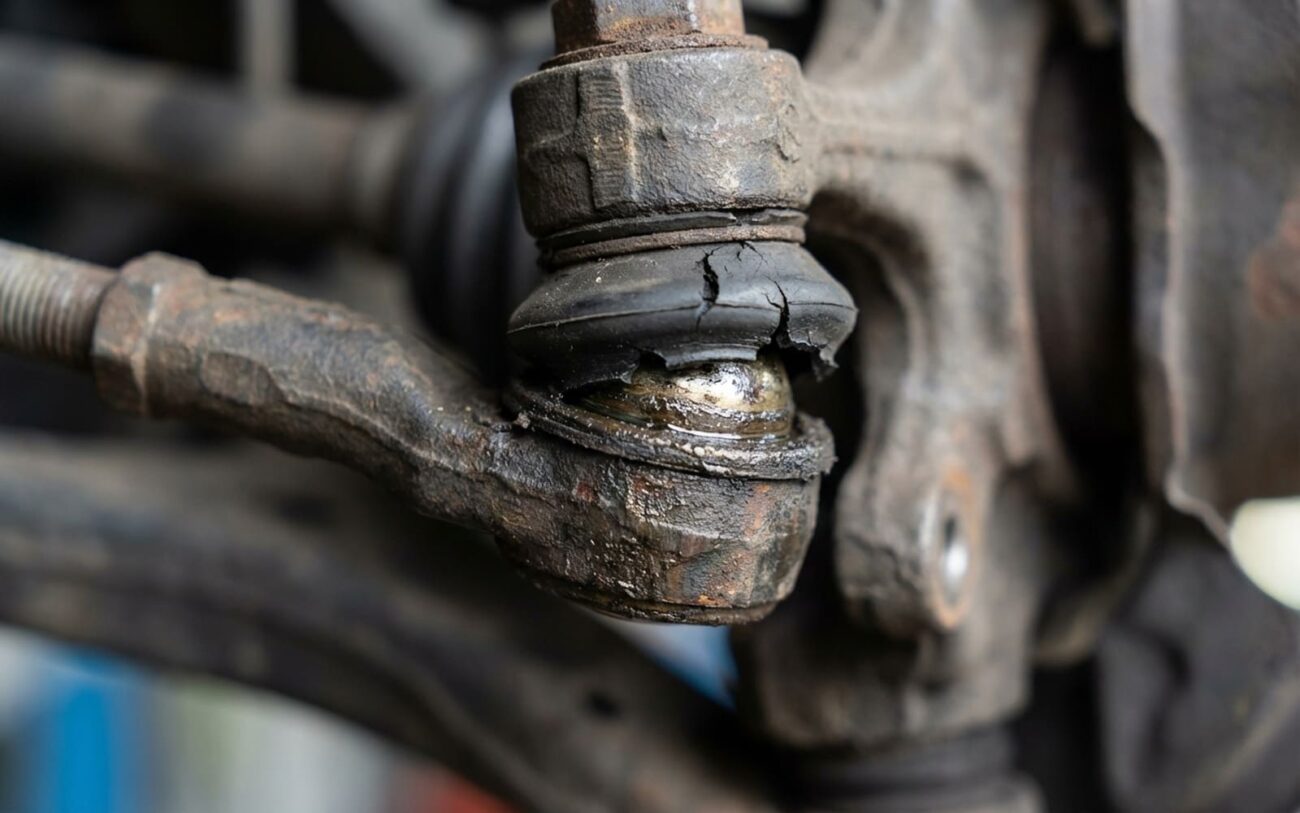
After 25 years under the hood, I’ve seen just about every kind of front-end issue. But when a Renault Logan or Sandero—especially one with 20,000 to 25,000 miles on the clock—rolls into my shop and the driver tells me, “It feels loose up front,” I don’t even need to ask a second question. I know exactly what we’re dealing with.
Nine times out of ten, it’s the outer tie rod end, completely shot. Now, most cars won’t even think about needing tie rods until well past 60,000 miles, sometimes even 100,000. So, no, this isn’t normal wear and tear. This is a known weak point on these particular models, and it’s something I see weekly. And let me tell you, you’re not imagining that clunk or that vague steering. It’s real, and it’s a problem that needs to be addressed. We’ll walk through what’s happening, how to pinpoint it, and how to get it fixed right the first time.
What You’ll Feel, Hear, and See: The Classic Signs
When an outer tie rod end starts to go, it’s not subtle. The symptoms usually start small and get worse pretty quickly. I tell my customers to look out for three main things:
First, you’ll notice a lot of steering play. You turn the wheel a few degrees, and for a split second, nothing happens. The car just doesn’t respond. That’s the ball stud inside the joint rattling around in a worn-out socket before it finally catches and starts to move the wheel. It makes the car feel vague, almost lazy, especially when you’re trying to corner or change lanes. It’s like there’s a rubber band in your steering system.
Next up is the noise. This is usually a sharp, metallic clunk or knock. You’ll hear it when you hit a pothole, go over a speed bump, or even just pull into your driveway. Sometimes, if it’s really bad, you can even hear it if you rock the steering wheel back and forth while the car’s sitting still. This isn’t just a general suspension rattle; it’s a distinct, solid impact from metal-on-metal movement right in that joint.
Finally, and this one really costs you money if you ignore it, is irregular tire wear. A failing tie rod end messes with your toe alignment—that’s how the front edges of your tires point relative to each other. When there’s play, the wheel can wobble in and out of alignment as you drive, especially over bumps. This causes the tire to scrub sideways, wearing down one edge much faster than the rest. I usually see a feathered or scalloped pattern, almost always on the inner edge of the front tires. Run your hand over the tread, across the tire, and you’ll feel those sharp edges. It’s a dead giveaway.
How I Confirm It: Shop Tests for a Worn Tie Rod End
Now, I’ll be honest with you: a loose front end and clunking noises can come from a bunch of places. Worn ball joints, bad strut mounts, even a loose steering rack can all mimic a bad tie rod end. You don’t want to throw parts at it and miss the real problem. The trick is to isolate the issue. Here’s how I confirm it in my shop, step-by-step:
1. The “Assistant Wheel Rock” Test for Steering Play:
This is my go-to for excessive steering play. With the car on the ground (or on a lift, but wheels loaded), have a helper sit in the driver’s seat and gently rock the steering wheel back and forth, just enough to take up the slack, but not enough to turn the wheels. You’ll be under the car (safely, of course, with proper jack stands if on a lift) or kneeling by the wheel. Watch the outer tie rod end where it connects to the steering knuckle. If you see movement at the ball stud—a little wobble or clunk—before the wheel actually starts to turn, that tie rod end is worn out. It’s a clear sign of internal play.
2. The “9 and 3 O’Clock” Shake Test for Clunks and Play:
For this one, you’ll need to get the front of the car safely up on jack stands, with the wheels off the ground. Grab the tire firmly at the 9 o’clock and 3 o’clock positions (like you’re holding a steering wheel). Now, push and pull sharply, trying to turn the wheel left and right. If you feel any significant play, or hear a distinct clunking noise, that’s a strong indicator. While you’re doing this, have your other hand on the tie rod end itself. You should be able to feel the movement or clunking directly in the joint if it’s the culprit. You can also use a pry bar under the ball stud to check for vertical play, but the 9 and 3 o’clock shake is usually enough for tie rod ends.
3. Tire Wear Inspection and Alignment Check:
If you’ve got that feathered or scalloped tire wear I mentioned earlier, especially on the inner edge, that’s almost certainly a toe alignment issue. While the tie rod end itself doesn’t directly cause the alignment to go out of whack when it’s static, the play in the joint allows the wheel to move dynamically, causing that scrubbing. After confirming play with the shake test, I’d measure the current toe setting. If it’s out of spec, and we’ve found play in the tie rod end, then we’ve found our root cause.
Why These Parts Fail So Soon (It’s Not Your Driving)
This early failure isn’t just bad luck; it’s a known design or manufacturing issue. From what I’ve seen in my shop over the years, it boils down to two main problems:
1. Poor Boot Integrity:
The rubber dust boot on that outer tie rod end is critical. It’s the only thing standing between the delicate ball-and-socket joint and all the nasty stuff on the road—dirt, water, road salt, you name it. On these particular Renault models, especially certain production runs of the Logan and Sandero, those boots are just not up to snuff. I’ve seen them crack, split, or even pop right off their grooves sometimes as early as 15,000 miles. Once that boot is compromised, all that road grit gets in, grinds away at the joint, and washes out the grease. It’s a death sentence for the tie rod end.
2. Insufficient Factory Lubrication:
To make matters worse, there are documented cases where certain batches of these tie rod ends left the factory with barely any grease packed into the joint. We call that a “dry joint.” So, you’ve got a joint that’s already running on minimal lubrication, and then you combine that with a boot that fails prematurely. It’s a ticking time bomb. This isn’t something you did behind the wheel; it’s a component-level weakness straight from the factory.
The Right Way to Fix It: My Step-by-Step Approach
DIY-Friendly, But Don’t Skimp on the Details
This isn’t the hardest job out there, and it’s definitely doable for a reasonably skilled DIYer with the right tools. But you absolutely cannot cut corners, especially on the alignment afterward. Your safety and your tire budget depend on it.
Preparation and Marking
First things first, get the car safely jacked up and supported. Remove the wheel. Now, before you touch anything else, you need to mark the exact position of the old outer tie rod end on the threaded shaft of the inner tie rod. I usually use a paint pen or even just a sharp scratch awl. This mark is crucial; it gets you as close as possible to your previous alignment setting, which minimizes tire wear on the drive to the alignment shop. Then, remove the cotter pin and the castle nut that holds the tie rod end to the steering knuckle.
Separation and Replacement
This is where I see a lot of mistakes. Don’t grab a hammer and start whaling on the steering knuckle to get the ball stud out. You’ll damage the knuckle or the wheel bearing. Use a proper tie rod end puller or a “pickle fork” if you have to, but a puller is always better as it won’t tear the boot on the new part (which you’re not keeping, but it’s good practice). Once it’s separated, unscrew the old tie rod end from the inner tie rod. Count the turns as you remove it, or just make sure your new one threads on to your previous mark. Thread the new tie rod end on until it aligns with your mark. This gets your toe setting close enough for a safe drive to the alignment shop.
Torque Specs and Final Assembly CRITICAL
Now, tighten that castle nut. The spec for these is typically 35 Nm (26 lb-ft). Once you hit that, you might need to turn the nut just a little bit more to align the slot for the cotter pin. But—and this is important—do not exceed 45 Nm trying to get that pin aligned. If it doesn’t line up, back off and try again, or use a slightly thinner washer if absolutely necessary (though usually, a tiny bit more torque will get it). Always install a brand-new cotter pin. Never reuse the old one. Once that’s done, tighten the jam nut on the inner tie rod to lock the outer tie rod in place.
Making Sure the Repair is Solid (And Not Wasting Your Money)
Just because the clunk is gone doesn’t mean the job’s finished. You need to validate that repair. I always do a couple of quick checks:
First, repeat that pry bar test. Get the car safely off the ground, and gently place a pry bar between the tie rod end and the steering knuckle. Try to lever it up and down. There should be absolutely zero play. If you feel any movement, something’s not right, or you’ve got another worn component.
Next, check the steering wheel free play. With the car back on the ground, turn the steering wheel gently left and right. On a properly repaired and tightened system, you should feel resistance within the first 25–30 mm (about an inch) of movement at the steering wheel rim. If it’s still got a lot of slop, you might have missed something, or there’s wear elsewhere in the steering system.
This Step is Non-Negotiable: Get an Alignment!
I cannot stress this enough: you absolutely must get a professional wheel alignment after replacing a tie rod end. Even with careful marking, your toe setting will be off. For these Renault models, you’re typically looking for a front toe setting of 0.0° ± 0.1°. Skipping this step isn’t saving money; it’s guaranteeing you’ll destroy a brand-new set of tires in a matter of weeks, sometimes even days. It’s penny-wise and pound-foolish, every single time.
What This is Going to Cost You
Let’s talk numbers. This isn’t usually a bank-breaker, but it’s not free either. Here’s a breakdown:
| Repair Type | DIY Parts Cost (Each Side) | Shop Estimate (Both Sides + Alignment) | Success Rate (If Done Right) | Risks if Ignored or Done Incorrectly |
|---|---|---|---|---|
| Replace outer tie rod end(s) + alignment | $20–$50 (for a good quality aftermarket part) | $250–$400 | 99% | Rapid, severe tire wear; catastrophic joint separation; complete loss of steering control. |
A quick note on value: If this repair, plus any other related work like rear shocks, starts to creep up to 35–40% of your car’s total market value, it’s time to seriously consider if it’s worth fixing. Sometimes, it’s just not financially sensible to keep pouring money into an aging vehicle.
Keeping It From Happening Again (Or At Least Delaying It)
My Preventative Maintenance Tips:
-
Regular Boot Inspections: Every time you get an oil change or rotate your tires, take a flashlight and visually inspect those rubber boots on your tie rod ends. Look for any cracks, tears, or if they’ve slipped off their grooves. The boot is the first and only line of defense for that joint.
-
Catch It Early: If you find a torn boot but the joint still feels tight (no play during the shake test), you might be able to save it. I’ve had success flushing out the old crud with brake cleaner, packing the joint with fresh, high-quality chassis grease, and then installing a split boot replacement. It’s not a permanent fix, but it can buy you significant time.
-
Upgrade Your Parts: If you live in an area with rough roads, or you just want better peace of mind, consider upgrading to heavy-duty aftermarket tie rod ends. Brands like Lemförder or Moog often offer better boot designs and more durable construction than the factory parts, giving you better sealing and a longer lifespan.
