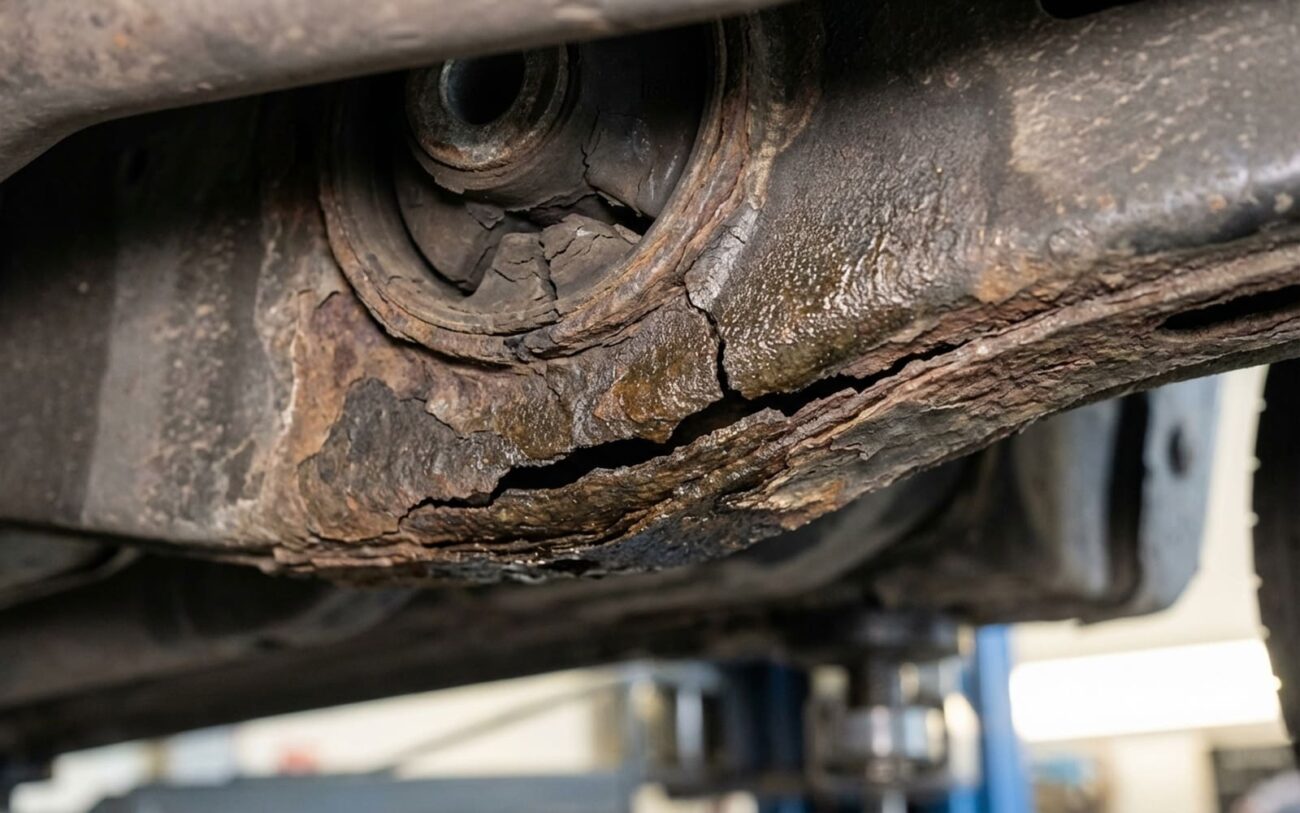
That clunk you’re hearing in your W210 or W211 Mercedes? Especially when you pull out of the driveway, hit the brakes, or catch a speed bump just wrong? Yeah, I know that sound. In my 25+ years turning wrenches on these cars, that specific thud or bang from the front or rear almost always points to one thing: your subframe mounts are failing. This isn’t just annoying noise; it’s the first warning of a major structural problem.
Recognizing the Problem: What You’ll Hear, What You’ll Feel
That clunk or thud is usually sharp, metallic, and often happens under specific loads. Think pulling away from a stop, accelerating hard, braking, or hitting a speed bump or pothole at an angle. It’s not just noise either. I’ve had customers come in complaining of vague, loose steering, a feeling like the car’s ‘wandering,’ or an alignment that just won’t hold. They’ve often been to other shops where ‘everything looks fine,’ but the alignment numbers keep drifting out of spec. That’s a huge red flag.
This isn’t a worn bushing in the usual sense; this is the car’s skeleton starting to come apart. We’re talking about structural brackets, welded directly to the unibody, that anchor the entire front or rear suspension subframe. When they rust or crack, that subframe can shift, creating metal-on-metal banging and compromising your steering, alignment, and ultimately, your safety.
Where to Look: Common Failure Points
So, where exactly does this happen on the W210 and W211 chassis? We’re talking about two main spots that are notorious for this issue:
The Front “A-Arm” Mount
This is a boxed section behind the front wheel where the lower control arm attaches. On both the W210 and W211, I typically see heavy rust or outright cracks in this area. The weld seam between the mount and the body is a prime fracture point because it’s under constant stress.
The Rear Subframe Bushing “Cup”
Especially common on W210s (wagons seem particularly susceptible) and W211s, this is the circular, cup-shaped steel housing that holds the rear subframe bushing. What happens here is the cup itself rusts through completely, sometimes leaving the bushing unsupported and free to bang around.
Why This Happens: It’s More Than Just Rust
Look, it’s not just simple rust, though that’s definitely part of it. What we’re really seeing here is a perfect storm of design, materials, and chemistry – what we call galvanic corrosion in the shop. Mercedes built these cars tough, but some areas, like those front A-arm mounts and the rear bushing cups, are boxed-in sections. They’ll trap road salt, water, and crud.
Those little factory drain holes? They clog up fast. Once that moisture gets in, especially with road salt acting as an electrolyte, it creates a galvanic reaction between the different metals used – steel body panels, aluminum subframes (on some models), and steel bushing sleeves. It’s like a battery eating away at the steel mounts from the inside out, far faster than normal rust would.
Then you add constant stress from driving – every acceleration, brake, or turn puts a load on these points. That thinned-out, corroded metal can’t take it, and you get fatigue cracks, usually right at the weld seams where the stress concentrates. Over time, that crack grows until the mount fails completely.
And let me stress this: this is not a rubber bushing failure. The bushing itself might still be in perfectly good shape. The real problem is the metal cup or bracket that holds it. You’re not replacing a simple wear item; you’re repairing the car’s structural skeleton.
How I Diagnose It: Getting My Hands Dirty
Okay, so you’ve got a clunk. How do you know it’s this serious and not just a worn control arm bushing or a stabilizer bar link? Well, the subframe clunk is usually heavier, more metallic, and often tied to torque or heavy suspension load, not just a light bump. And it’ll often come with that alignment drift or steering instability I mentioned. The only way to know for sure is to get it on a lift and get your hands dirty. No guessing from the driver’s seat. Here’s my process:
Front-End Clunk on Acceleration/Braking (Front A-Arm Mount)
First, I’ll get the car up, support the front subframe with a jack, and remove the wheel. Then, I use a good-sized pry bar on the lower control arm where it attaches to the mount. You’re watching that weld area like a hawk. If the metal moves or a crack opens up under load, that mount is failed. It’s a definitive sign.
Rear Clunk Over Bumps (Rear Subframe Bushing Cup)
For the rear, you’ve got to clean that wheel well area thoroughly – a pressure washer works best to get rid of all the crud. Then, I use a borescope to get inside that bushing cup. You’re looking for rust that’s eaten right through the metal, or metal that’s become paper-thin and flaky. A crack or severe thinning here confirms the issue.
Wandering Steering, Alignment Won’t Hold
If you’re chasing alignment issues, check all the usual suspects first: tie rods, ball joints, control arms. If they’re all tight and in good shape, but the alignment specs are still inconsistent or won’t stay set, then you really need to suspect the subframe mounts. A crack in that front A-arm mount weld, even a small one, is a dead giveaway.
My Takeaway:
Get the car on a lift, clean the areas with a pressure washer, and inspect with a flashlight and borescope. Prying on components while watching for movement is critical. Don’t skip any of this—what looks like a simple bushing job could actually be a structural repair.
So, How Do You Fix It? Professional Territory Only
Look, this isn’t a DIY job for the average weekend mechanic. We’re talking structural integrity here. If you’ve got active cracks or severe rust, you need a professional shop that knows how to do body repair, not just suspension work. Mercedes has specific repair procedures for this, and they’re not suggestions – they’re critical for safety.
How Do You Know the Repair Was Done Right?
So, you’ve paid good money for this repair. How do you know it was done right? First, the welds. They should be clean, continuous, and free of porosity – basically, they should look factory-quality. More importantly, the repaired mount has to be dimensionally correct. Mercedes specifies within 2 mm of original factory suspension pickup points. If it’s off, your camber, caster, or toe will be off, and you’ll eat tires or have handling issues.
After reassembly, a full professional alignment is non-negotiable. The car needs to hold those specs. And that clunk? It should be completely gone. Take it for a good test drive over varied roads – bumps, turns, hard braking. If you hear anything, it’s not right. For those preventative cavity wax treatments, use a borescope to check that the inside of those boxed sections is fully coated. No missed spots.
The Hard Truth: Cost, Risk, and Is It Worth It?
Let’s talk brass tacks. This isn’t cheap. You’re looking at significant shop time and specialized work. For a front A-arm mount replacement, you’re easily looking at $1,500 to $3,000+, sometimes more depending on the shop and the extent of the damage. For a rear cup repair, it’s often $2,500 to $5,000+. These aren’t estimates for DIY, because this isn’t a DIY job.
The risk of a failed weld or improper repair isn’t just a bad alignment; it’s a catastrophic suspension detachment. That’s why I stress professional, by-the-book repairs. For early-stage corrosion treatment, you might spend $200-$400 doing it yourself, or $500-$800 at a shop, but remember, that’s preventative, not a fix for structural damage.
My Rule of Thumb:
After seeing countless cars come through the shop, if the repair cost for this structural issue, plus any other deferred maintenance, starts pushing 40% of the car’s KBB private-party value in “Fair” condition, you really need to sit down and do the math. This isn’t a cosmetic repair; it’s a safety repair. You can’t cut corners, but you also can’t ignore the economics of keeping an older car on the road.
How to Prevent This (or Catch It Early)
Okay, so if you’ve got a clean car, or you’ve just had this fixed, how do you keep it from happening again? It’s all about vigilance and proactive care:
-
Inspect Regularly: Twice a year, get under there. Inspect those front A-arm mounts and the rear subframe bushing cups. Look for bubbling paint, rust streaks, or any flaking metal. Pay close attention to the weld seams.
-
Keep it Clean: Every fall, especially if you live where they salt the roads, clean out those fender liners and wheel well pockets. Get all that trapped debris and salt out.
-
Apply Protection: Then, apply a heavy-duty anti-corrosion spray – something like Fluid Film or a professional cavity wax. Get it into those factory access holes to displace any moisture that’s trying to settle in.
