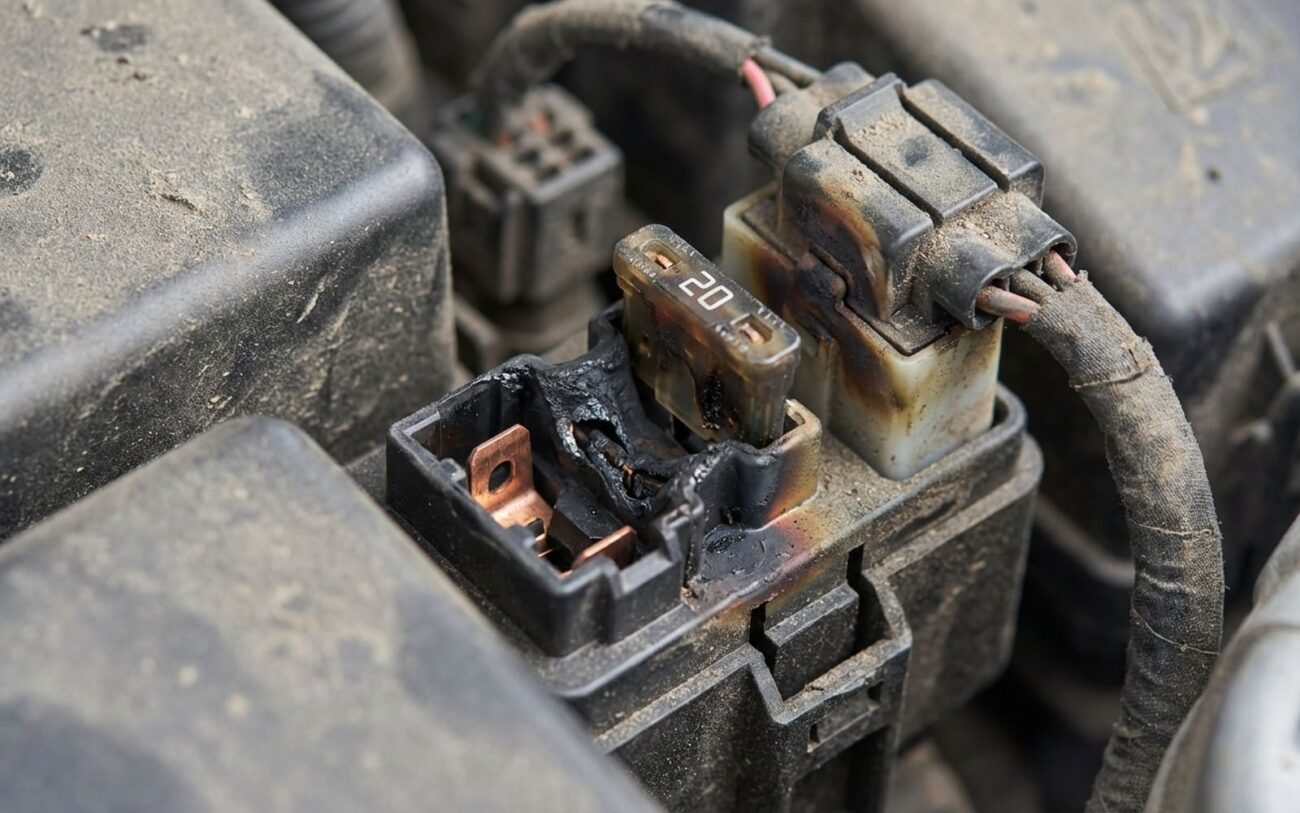
When the Fuse Box Melts: What I Look For
After 25 years turning wrenches, I can tell you a melted fuse box isn’t just a sign of trouble; it’s a serious fire hazard. Most folks think a blown fuse is the big problem. But what I’ve seen, time and again, is that the real red flag isn’t a fuse that’s failed, it’s the plastic housing around it that’s started to deform. That’s a whole different ballgame.
When you pop the hood, don’t just glance. You need to get in there and really inspect the fuse box. I’m talking about looking closely at the individual slots where your fuses and relays plug in. What you’re hunting for is any sign of physical deformation. This means warping, bubbling, or charring around a specific terminal. If you see that, it’s not normal wear and tear. That’s thermal damage, pure and simple, from excessive heat buildup.
I’ve had cars come into my shop where the fuse itself still tests good, but the plastic around it is visibly melted or distorted. How does that happen? Well, it’s usually because the internal metal blades in the fuse box aren’t making a solid connection with the fuse. That poor connection creates resistance, and resistance generates heat. It’s like a tiny electric heater right there in your fuse box, even when the circuit isn’t fully shorted out or overloaded enough to blow the fuse.
THERMAL MONITOR
Delta: +45°C
Here’s a practical tip I give everyone: after you’ve driven the car for a bit, especially on a longer trip, carefully feel the top of the fuse box. If one area is noticeably hotter than the rest—and I mean noticeably hotter, not just ambient engine warmth—especially near a particular fuse or relay slot, you’ve found a hotspot. That heat is coming from electrical resistance right there at the terminal. If you leave it unchecked, this condition only gets worse, guaranteed.
My Take
“Think of a loose electrical terminal like a loose garden hose connection: it doesn’t just leak; the friction and spray create a mess that damages everything around it. In an electrical system, that ‘mess’ is heat.”
Pinpointing the Real Source of the Heat
Once you’ve spotted melted plastic or found a hot terminal, the next critical step is figuring out why. Is the fuse box itself the problem, or is something external overloading the circuit? This distinction is absolutely crucial for a correct diagnosis. A high-resistance connection inside the fuse box—maybe from loose terminals, corrosion, or even a manufacturing defect—can generate enough heat to melt plastic even with a perfectly normal current flow. It’s not always about an overloaded circuit.
| What You See (Symptom) | Often the Fuse Box Itself | Could Be Something Else | How I Test It |
|---|---|---|---|
| Melted plastic at a fuse terminal | High-resistance connection from a fatigued or corroded terminal. | A circuit overload from a short or a failing component drawing too much current. |
Inspect the terminal for corrosion. Insert a new fuse; if it slides in too easily, the internal spring contact has likely failed. |
| Intermittent power loss to a circuit | A loose or fatigued terminal that’s failing under vibration or heat. | A bad relay, a failing switch, or a poor ground connection somewhere else in the circuit. |
Back-probe the terminal while the circuit is active. Gently tap the fuse box; any voltage drops indicate a terminal issue. |
| Localized overheating on the fuse box cover | Excessive resistance right at the fuse blade interface within the box. | Sustained high-current draw from a heavily loaded external component. |
Measure voltage drop across the fuse tabs (with the fuse installed and circuit active). A reading over 50mV strongly suggests problematic resistance. |
Why These Fuse Box Connections Fail: It’s Often a Design Flaw
In my experience, especially with certain vehicles like the Lada Vesta and Renault Logan, recurring fuse box melting isn’t some random fluke. It’s a known issue tied directly to specific design or manufacturing vulnerabilities. Usually, the problem lies within the fuse box assembly itself, not because of something the driver did or some aftermarket modification gone wrong.
Heads Up: Check for Service Bulletins!
I’ve seen service bulletins for some production runs of Body Control Modules (BCMs) and integrated fuse box assemblies that had inadequate terminal retention on high-current circuits. We’re talking about circuits powering things like the ABS module, fuel pump, or radiator fan. In these cases, the fuse might never even blow. The terminal just keeps getting hotter and hotter until the plastic starts to deform. It’s a slow burn, literally.
Your Repair Options: From a Surgical Fix to Full Replacement
This Ain’t DIY Territory (Unless You’re Trained)
Let me be clear: repairing high-current terminals in a fuse box demands precision tools and real experience. A bad crimp, a poorly seated terminal, or a damaged housing can lead directly to vehicle fires. If you haven’t been trained in automotive electrical repair, and I mean properly trained, you absolutely need to consult a specialist. Don’t mess around with this.
Single Terminal Repair Professional Only
Full Assembly Replacement Often Non-Repairable
Temporary Workaround Absolute Last Resort
How I Confirm the Fix Actually Worked
This part is where a lot of repairs fall short. You can’t just slap in a new terminal or fuse box and call it a day. Verification is critical. Mechanically, after a terminal replacement, the new terminal needs to grip that fuse firmly and evenly. If it feels loose, you’ve still got a problem.
Electrically, you need to perform a voltage drop test under load. With the circuit active (for example, the blower motor on high, or the fuel pump running), measure across the fuse tabs. Anything over 50 millivolts (0.05V) indicates residual resistance, and that means heat is still being generated. You want that number as close to zero as possible.
For a full fuse box or BCM replacement, validation is even more comprehensive. First, use a professional scan tool to verify communication across all modules. Then, and this is important, conduct a thermal evaluation. Run the vehicle for at least 30 minutes with all high-draw accessories on—headlights, AC, defroster, radio, everything. Use an infrared thermometer to scan the top of each fuse and relay. The temperature differences between terminals should be minimal, ideally less than 10°C. If you see a hot spot, you’ve missed something.
Weighing the Cost Against Your Car’s Value
Repair decisions always come down to cost versus long-term reliability, especially on budget-oriented vehicles. I see this all the time.
| Repair Type | DIY Cost (Parts) | Professional Cost | Success Rate (My Experience) | Secondary Risk |
|---|---|---|---|---|
| Single Terminal Repair | $5 – $20 | $150 – $300 | 95%+ (if done right) | Intermittent failure may return if the housing itself is weak or cracked elsewhere. |
| Full BCM Replacement | $250 – $600 | $800 – $1,500 | 99%+ (if programmed correctly) | Incorrect programming, poor moisture sealing, or damage to the new unit during installation. |
My Two Cents on Value
On a car like a Lada Vesta or Renault Logan, which might have a market value under $3,000, spending $1,500 on a new BCM often doesn’t make financial sense. In these situations, a properly executed single-terminal repair is usually the most practical and safest approach. It eliminates the fire risk at a fraction of the cost, and frankly, it’s what I’d recommend to a family member.
How to Keep This From Happening Again
Preventative Maintenance (My Shop’s Checklist)
-
Regular Inspections: Every couple of years, or whenever I’m under the hood, I’ll pull the high-current fuses (ABS, fan, blower, fuel pump) and give them a good look. Check for any pitting on the blades or if they feel loose when you reinsert them. That’s your early warning.
-
Seal Out Moisture: A very thin coat of dielectric grease on the metal fuse blades can do wonders. It prevents oxidation without insulating the connection. Just don’t glop it on; a little goes a long way.
-
Tactile Checks: Get in the habit of feeling the fuse box cover after a long drive. If you find a hot spot, you’re catching resistance early. This simple, 10-second check can turn a potential $1,000 repair into a quick, cheap fix.
-
Trust Your Nose: If you ever catch a faint smell of overheated plastic or burning electronics near the dashboard, don’t ignore it. That’s your car screaming for attention, and it’s often the earliest warning sign of a fuse box problem.
