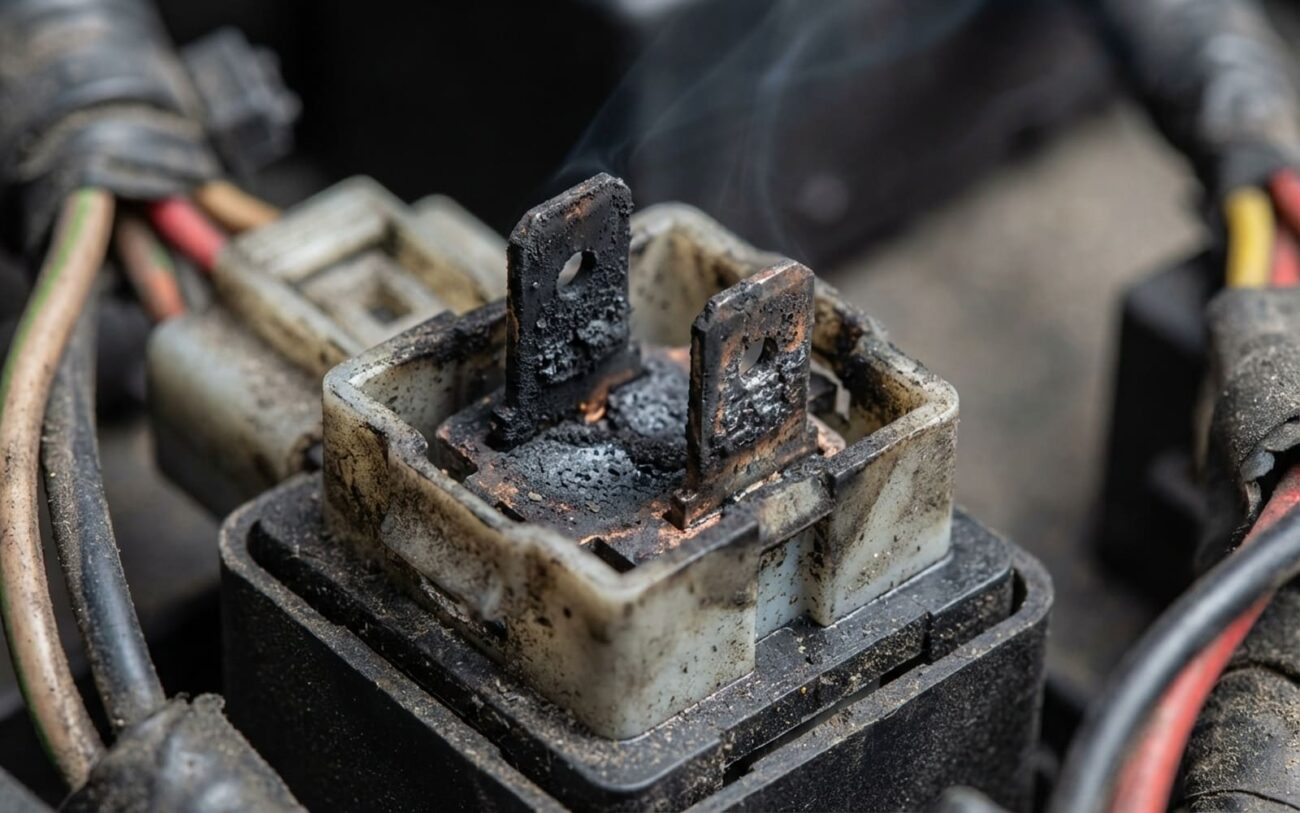
Alright, let’s talk about one of those head-scratchers that can really fool you: the clicking relay that doesn’t actually do anything. You turn the key, hit a switch, or maybe the engine cranks but the fuel pump stays silent. You hear that satisfying “click” from the relay — that’s the control side doing its job, the electromagnet pulling the contacts together. It sounds like everything should be working, right?
But then nothing happens. No fan spinning, no headlights coming on, no fuel pump hum. That click is a liar. What you’ve got is a relay that’s only half-working, and it’s a pretty common issue I see in the shop.
What’s Really Happening Inside That Click
So, what’s going on? That click tells us the relay’s coil is getting power, and it’s trying to close the internal switch. Think of a relay as two separate circuits: a low-current control side (the coil) and a high-current power side (the switch contacts). When the coil energizes, it pulls a set of contacts together, completing the power circuit for whatever component it’s feeding – your fuel pump, radiator fan, headlights, you name it.
The problem is, even if the coil pulls those contacts together, they might not actually conduct electricity. Over time, those high-current contacts inside the relay get worn out. They can burn, pit, or get covered in oxidation from repeated arcing every time the relay switches on or off. It’s like flipping a light switch where the lever moves, but the actual metal connection inside is so corroded or damaged that no power flows through. The switch moves, but the circuit stays open, or has too much resistance.
I’ve seen it countless times. The relay clicks, but the connection between terminal 30 (the main power input) and terminal 87 (the output to your component) is compromised. No power gets through, or not enough to run the component properly.
The “Tap Test” and Why It’s a Red Flag
Another classic symptom I see is intermittent operation. You might tap the fuse box, or even give the relay a light thump, and suddenly the component kicks on – the fan starts spinning, or the fuel pump primes. That’s a dead giveaway that your relay contacts are degraded. That little bit of vibration temporarily reestablishes a shaky connection, but trust me, it’s not a fix. It’s a temporary reprieve, and it’s telling you the relay is on its last legs.
Hold On: Is It Really the Relay? (The Differential Diagnosis)
This is where experience comes in. Just because you hear that click doesn’t automatically mean the relay itself is the only problem. That click only confirms the control side of the relay is working – the coil is getting power and trying to do its job. The actual power delivery could still be failing somewhere else downstream.
I’ve seen plenty of times where a clicking relay fools people into replacing it, only to find the problem persists. Other things can mimic this exact symptom, making it crucial to diagnose properly:
- Open or high-resistance wiring: A broken wire, a corroded connection, or even a partially melted wire in the power or ground path to the component can prevent power from reaching it.
- Bad ground: A poor ground connection for the component itself will stop it dead, even if it’s getting power from the relay.
- Internally failed component: Your fuel pump, fan motor, or headlight bulb could simply be burned out or seized. The relay is sending power, but the component itself can’t use it.
- Corroded relay socket terminals: Sometimes the relay is fine, but the terminals in the fuse box or relay socket itself are corroded or spread open, preventing a good connection.
So, how do we narrow it down?
My Go-To Tests for a Clicking-But-Dead Relay
When I’m faced with a clicking relay and no power, I don’t guess. I test. Here are the definitive ways I confirm if the relay’s power contacts are the actual culprit:
1. The Voltage Drop Test (My Favorite)
This is my absolute favorite test for internal relay contact issues. It tells you exactly how much resistance is inside the relay’s power path. Here’s how I do it:
- With the relay in its socket and the circuit commanded ON (so the relay is clicked and trying to send power), I use a multimeter.
- I put one lead on terminal 30 (the power input) and the other lead on terminal 87 (the power output).
- If the relay’s internal contacts are good, you should see very little voltage drop – ideally less than 0.1 volts.
- If I see a drop of more than 0.5 volts, that relay is bad. It means there’s too much resistance across those internal contacts, and it’s not letting enough current through to power the component properly.
This test is quick, and it’s definitive. It tells you if the power is getting into the relay and if the relay is successfully transferring it out with minimal loss.
2. Output Voltage Check at the Component
If the voltage drop test looks good, or if you suspect an intermittent problem, I’ll check the output voltage directly. This helps rule out wiring issues downstream:
- First, I’ll back-probe terminal 87 at the relay socket (or use a test lead if the relay has a removable cover) and verify I have full battery voltage there when the relay is clicked ON.
- Then, I’ll go to the actual component (fuel pump, fan motor, etc.) and check for full battery voltage at its power input terminal.
- If I have good voltage at pin 87, but no or low voltage at the component, then the wiring between the relay and the component is the problem.
- If I have good voltage at the component, but it’s still not working, then the component itself is likely failed (e.g., a seized motor, a burned-out bulb).
For intermittent issues, you might need to leave your meter connected and wiggle wires, tap the relay, or otherwise try to induce the failure while monitoring the voltage. That’s usually how I catch those tricky ones.
Why These Relays Give Up the Ghost (Root Causes)
Relays aren’t designed to last forever. They’re mechanical switches, and like any mechanical part, they wear out. Every time a relay opens or closes, there’s a tiny electrical arc that jumps between the contacts. Over thousands of cycles, this arcing erodes the metal surfaces, creating pits, carbon deposits, and eventually, high resistance. This wear is normal, but it gets accelerated by a few factors:
- High Amperage: If a relay is constantly switching a component that’s drawing near or above its rated amperage, those arcs are bigger and hotter, leading to faster degradation.
- Frequent Cycling: Components that turn on and off a lot (like cooling fans in stop-and-go traffic) will wear out their relays quicker.
- Moisture and Contamination: If water or dirt gets into a non-sealed relay (or even a sealed one if the seal fails), it can cause oxidation and corrosion on the contacts, drastically increasing resistance.
Crucial Pro Insight:
Here’s a big one I’ve learned over the years: a failed relay, especially a burnt one, is often a symptom, not the root cause. If your fuel pump is starting to seize up, or a fan motor is binding, it’s going to draw excessive current – what we call “locked-rotor amps.” This high current can literally weld the relay contacts together or overheat them to the point of failure. If you just replace that burnt relay without checking the current draw of the component it powers, you’re almost guaranteed to be replacing that new relay again very soon. Always check the load!
The Only Real Fix: Replace It
Look, I know some folks like to try and “fix” things, but with modern automotive relays, don’t even bother. These aren’t old-school, serviceable components. Most standard ISO micro relays are sealed units, precision-calibrated at the factory for contact tension and gap. You can’t reliably sand or clean deeply pitted contacts and expect them to work correctly or last.
Don’t Try to Repair It
I’ve seen people try to open them up and clean the contacts. It’s a waste of time. You’ll never restore the original contact surface or the precise spring tension. You’ll just end up with an unreliable fix that fails again, probably at the worst possible moment.
Verification: Did the Repair Actually Work?
Just because you swapped in a new relay and the component turned on once, don’t pat yourself on the back yet. I’ve seen too many comebacks from people who didn’t properly verify the repair. You need to make sure the problem is truly gone and that you haven’t just masked an underlying issue. Here’s how I verify it:
-
Functional Test: Cycle the system multiple times. Turn it on, turn it off, wait a bit, turn it on again. The component should activate instantly and consistently every single time, with no delays, hesitation, or weird noises.
-
Electrical Check (Voltage Drop Re-test): This is crucial. With the new relay in place and the circuit running, re-do that voltage drop test across pin 30 and pin 87. You should now see a very low voltage drop, ideally less than 0.1 volts. If it’s still high, you might have a bad new relay (it happens!), or there’s still a problem in the socket.
-
Socket Inspection: If you’re still getting issues with a new relay, pull the relay out and carefully inspect the relay socket. Look for corrosion, bent terminals, or terminals that look “spread open” and aren’t making good contact with the relay pins. I’ve had to replace entire fuse boxes because of bad relay sockets.
Cost, Risk & My Recommendation
Replacing a relay is generally a pretty straightforward, low-cost repair, assuming you’ve correctly identified it as the problem. Here’s a quick breakdown:
DIY Replacement
This is just the cost of a good quality relay. For most vehicles, it’s a simple plug-and-play job.
Shop Repair
This includes a professional diagnosis, which, as I’ve explained, is crucial to make sure you’re not missing an underlying issue, plus the labor to replace it.
Success Rate
When the relay is definitively identified as the fault, replacing it works every time. The main risk is a misdiagnosis, leaving a bad motor or wiring problem unaddressed, and then you’re back to square one.
Prevention and Keeping Your Electrical System Healthy
To avoid repeat failures, you’ve got to address the why. If you’re replacing a relay for a cooling fan or a fuel pump, always, always, always verify the current draw of the component. Especially with aftermarket parts – I’ve seen plenty of aftermarket motors that pull more amps than the original, which will just cook your new relay in short order.
My Pro Maintenance Tip:
Make a habit of inspecting your relays, especially for critical systems. After the car has been running for a while, feel the relays. If one is noticeably hot to the touch, it’s being overloaded or has high internal resistance. Also, listen to the click. A healthy relay makes a sharp, distinct “snap.” If you start hearing a weak, chattering, or buzzing sound, that’s a sign of coil weakness or contact resistance building up. It’s telling you it’s about to fail.
And don’t forget the environment. Make sure your fuse boxes are properly sealed. I’ve seen moisture ingress into relay sockets cause all sorts of corrosion, which acts like a resistor and contributes to relay failure. A clean, dry, and properly tensioned socket is just as important for reliability as the relay itself.
