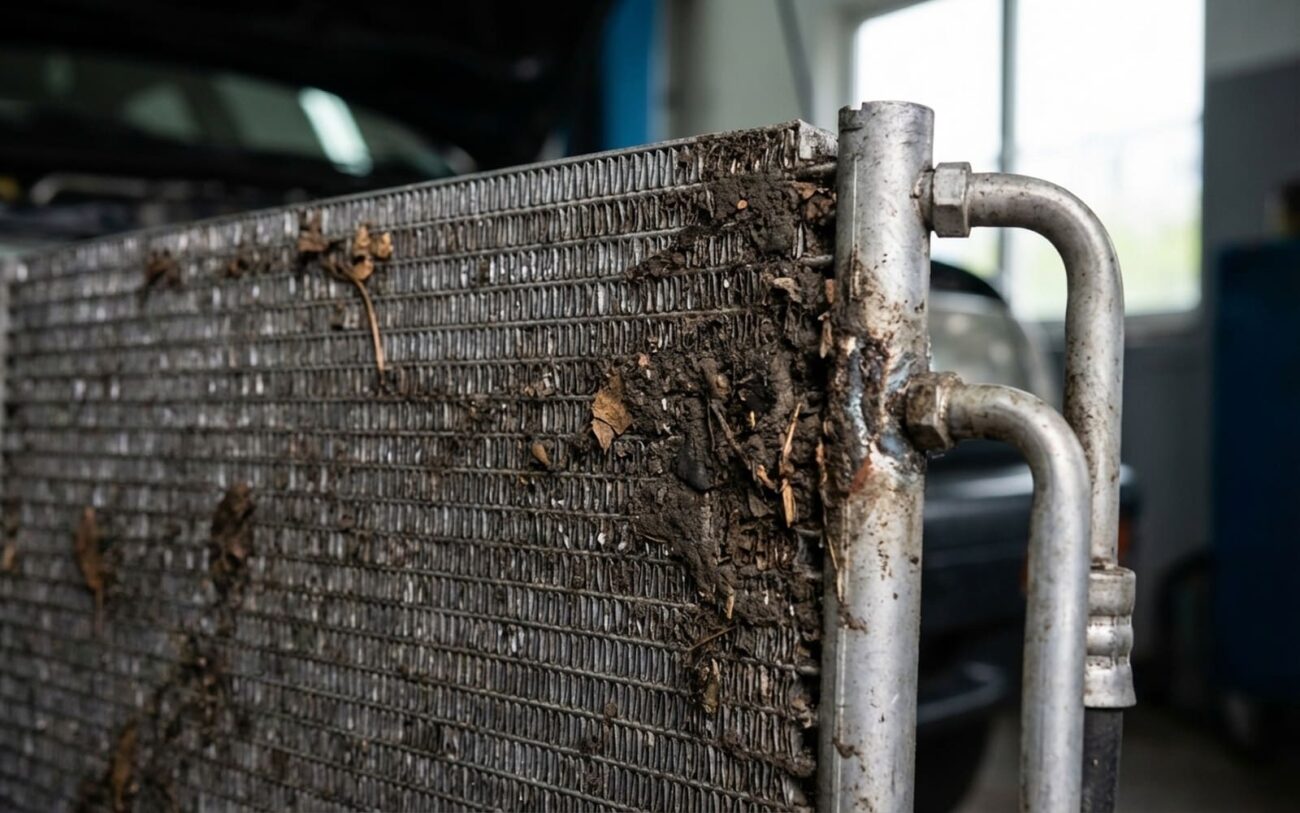
Look, I’ve been wrenching on cars for over 25 years, and when a customer rolls in complaining about warm air from their A/C, especially when they’re stuck in traffic, their first thought is almost always “compressor’s shot” or “it’s low on Freon.” I get it, those are common problems. But more often than not, the real culprit is something a lot simpler, and often cheaper, to fix: the condenser can’t do its job because it’s choked for airflow.
Think of your A/C condenser as the system’s radiator. It’s usually right up front, behind the grille, catching all that incoming air. Its critical job is to take the super-hot, high-pressure refrigerant gas coming out of the compressor and cool it down into a liquid. If air can’t flow through it properly, that heat has nowhere to go. The whole system backs up, and your A/C performance tanks. The symptoms are pretty predictable once you know what to look for, and they all point back to that one core issue: poor heat rejection at the condenser.
What You’ll Feel & What the Gauges Will Tell Me
The first thing you’ll notice is the A/C just isn’t cutting it at low speeds or when you’re idling. It might blow decent cold air when you’re cruising down the highway, but as soon as you hit stop-and-go traffic, it starts warming up. That’s your first big clue.
When I hook up my A/C manifold gauges, the high-pressure (HP) side tells the main story. With the engine running and the A/C on max, I’ll see the HP gauge spike way above the manufacturer’s spec for the ambient temperature – sometimes into the 350-400 psi range on a moderately hot day. That’s a textbook indicator of airflow blockage. The refrigerant can’t condense, so pressure just builds and builds.
This high pressure doesn’t just sit there. It triggers the system’s safety switch, which then disengages the compressor clutch. What you’ll experience is the A/C cooling briefly, then suddenly blowing warm. As soon as you get moving and some ram air hits the condenser, it might kick back on. That on-again, off-again cycling is a dead giveaway of airflow restriction. I see it all the time.
While the high side is screaming, the low-pressure (LP) side often gives supporting evidence. You might see subnormal low-side pressure – say, below 20 psi on a 90°F day. This isn’t usually a refrigerant shortage; it’s a system flow restriction. When the condenser can’t reject heat, the refrigerant doesn’t fully condense, meaning less liquid is available to meter into the evaporator. Less circulation overall leads to that low suction pressure.
Now, don’t jump to conclusions. An undercharged system, a failing cooling fan, or even a kinked line can temporarily mimic high pressure or poor cooling. But with a clogged condenser, the pressure stays high consistently, especially when airflow is minimal. That’s why we don’t just guess; we diagnose.
How I Pinpoint the Problem: Differential Diagnosis
A/C symptoms overlap like crazy. High pressure, poor cooling, cycling – they can all come from different places. Before I even think about cleaning or replacing anything, I rule out the usual suspects. Here’s my typical diagnostic flow:
Step 1: Visual Inspection (The Free & Easy One)
First thing I do is get a good look at the condenser. Shine a bright flashlight through the front grille, and if you can, from the engine side too. Is the face of the condenser packed solid with leaves, bugs, dirt, or even plastic bags? Are the delicate aluminum fins bent over and matted together? If more than, say, 20-30% of the fins are blocked or damaged, that’s a huge red flag right there. I’ve seen condensers that look like they’re wearing a fuzzy sweater made of road grime.
Step 2: Check the Cooling Fans (Don’t Overlook the Obvious)
This is critical. With the engine running and the A/C on max, are your electric cooling fans running at full speed? If not, that’s almost certainly your problem. A failed fan motor, a blown fuse, or a bad relay will cause the exact same symptoms as a clogged condenser. A quick visual and audible check at idle can save you hours of unnecessary work. Sometimes, they’ll spin, but they’re weak. You can measure airflow with an anemometer, but I usually just feel the air movement.
Step 3: The Water Mist Test (My Go-To Confirmation)
This is a classic trick that works wonders. With your A/C gauges hooked up and the system running (and showing high pressure), lightly mist the entire face of the condenser with a garden hose. Don’t blast it, just a gentle spray. If the high-side pressure drops significantly (50-100 psi) and the vent temperature inside the cabin gets noticeably colder, you’ve pretty much confirmed an airflow restriction. The water temporarily acts as a super-efficient cooling medium, bypassing the airflow problem.
Step 4: Temperature Gradient Check (IR Thermometer)
An infrared (IR) thermometer is a handy tool here. Measure the temperature of the condenser at the inlet tube (where the hot gas comes in from the compressor) and at the outlet tube (where the cooler liquid leaves for the drier). A healthy condenser should show a significant temperature drop across it, usually 30-50°F. If you see minimal drop, or hot spots on the condenser face itself, it means heat isn’t being rejected evenly or at all. This also helps differentiate external blockage from internal problems.
A Quick Clarification:
We’re talking strictly about external, air-side blockage here. Internal blockage—say, from a ruptured desiccant bag in the receiver drier or corrosion inside the tubes—is a completely different issue. That causes a refrigerant flow restriction and affects pressures differently. If the refrigerant side is cold but the fins are hot, the airflow path is the problem, not the refrigerant flow itself.
Why Condensers Get Clogged (The Root Cause)
Condensers aren’t just randomly clogging up. It’s a combination of their design and real-world driving conditions. Modern condensers use this finned-tube construction – super thin aluminum tubes with densely packed fins. That’s fantastic for maximizing surface area and heat transfer, but it also makes the condenser a perfect trap for anything flying through the air.
The problem usually starts with physical damage. Road debris – gravel, small stones, even big bugs – slams into those delicate fins at speed, bending them over. Unlike a radiator, which often has thicker fins and a bit more protection, the A/C condenser is usually the first thing in line. Once those fins are bent, they pack together, creating a solid mat that completely blocks airflow. I see this constantly on vehicles driven on gravel roads or in areas with heavy insect activity, like most of the rural routes around my shop.
Then there’s the particulate buildup. Dust, pollen, brake dust, exhaust soot – it all hits the condenser. When that stuff mixes with moisture (dew, rain, or just condensation) and a bit of oily film from the road, it forms this sticky, insulating layer. Over time, this “cement-like” crud dramatically reduces thermal efficiency. SAE research confirms that oily particulate fouling can cut air-side heat transfer by over 50%. And in humid climates, I’ve even seen biological growth like mold or algae take root in the damp fins, making the blockage even worse.
Fixing It: Cleaning vs. Replacement
External, Accessible Clogging (DIY-Feasible to Professional)
Tools I use: A fin comb set, a low-pressure air source, a soft-bristle brush, and a garden hose.
External, Hard-to-Reach Clogging (Professional-Only) PROFESSIONAL-ONLY
Essential tools: Trim removal tools, a torque wrench, and the OEM service manual.
Pro Tip:
Bumper support bolts almost always have specific torque specs (usually 25–40 ft-lb). And those plastic fasteners? They’re often one-time-use. Guessing torque or reusing old clips is how you get rattles or structural issues down the road. Always, always follow the manufacturer’s procedure.
Internal Damage or Permanent Fin Consolidation (Non-Repairable → Replace)
Required equipment: An R-134a or R-1234yf recovery/charging station, a manifold gauge set, a vacuum pump, a new condenser, a new receiver drier or accumulator (always replace these with the condenser), and OEM-specified PAG oil.
Post-Repair Validation: Prove It’s Fixed
Don’t just assume it’s fixed because the A/C feels cold. You’ve got to validate your work with data. This is where a lot of DIYers, and even some less experienced techs, fall short.
For a Cleaning Repair, I Validate:
-
High-side pressure at idle (with fans running) should now be within ±15 psi of the OEM spec for the current ambient temperature.
-
No high-pressure cut-out during a 15-minute static test (engine at 1500 RPM, A/C on max recirculation, doors open).
-
An even temperature drop across the condenser face (measured with an IR thermometer), showing that heat transfer is restored.
For a Condenser Replacement, I Validate:
-
The system must hold a deep vacuum (29.5 inHg or higher) for at least 15 minutes with no rise. This proves there are no leaks and all moisture is gone.
-
After recharge, both high- and low-side pressures must fall squarely within OEM specifications for the given ambient temperature.
-
Vent temperature must be 35–40°F below ambient air temperature. I use a digital thermometer placed in the center vent to confirm this.
Tools needed for validation: Manifold gauge set, vacuum gauge, refrigerant scale, electronic thermometer, and ideally, a UV dye or electronic leak detector for replacement jobs.
Cost, Risk & When to Just Say “No”
Repair costs and your vehicle’s overall value should always guide your decision. Here’s a realistic breakdown of what you’re looking at:
| Repair Type | DIY Cost (Approx.) | Shop Cost (Approx.) | Success Rate | Secondary Risk if Failed |
|---|---|---|---|---|
| Professional Cleaning | N/A | $150 – $300 | 90% for simple clogging | Incomplete cleaning means recurring performance issues and accelerated compressor wear. |
| Condenser Replacement (DIY) | $200 – $600 (parts + tool rental) | $800 – $1500+ | 95% if proper procedures followed | Incorrect oil charge, poor evacuation, or contamination can lead to compressor failure within months. I’ve seen it happen. |
| Condenser Replacement (Pro) | N/A | $800 – $1500+ | 98% | Very low if OEM procedures are followed; highest long-term reliability and usually comes with a warranty. |
My Economic Decision Framework:
Here’s a rule I use with my customers: if the estimated repair cost exceeds 40% of your car’s current private-party value (check Kelley Blue Book or NADA guides), and the vehicle has over 150,000 miles, you really need to consider if the investment makes sense. A new condenser won’t increase your car’s resale value, and frankly, future repairs are more likely on an older, high-mileage vehicle. Sometimes, living with reduced A/C performance – or just using cabin fans and window shades – is the smarter economic choice. It’s tough, but it’s the truth.
Prevention & Monitoring (Save Yourself Future Headaches)
Preventing condenser clogs is a whole lot easier and cheaper than fixing them. Make it a part of your seasonal maintenance, like checking your tires. Twice a year – once in the spring, once in the fall – use low-pressure water from a garden hose to rinse the condenser face. Do it from the engine side, pushing debris out the front. This gets rid of loose crud before it gets packed in tight. If you drive a lot in bug-heavy areas or on dusty roads, consider installing a fine mesh screen behind your grille. Just make sure the mesh is coarse enough (1/8” or larger) so it doesn’t restrict airflow itself.
And for crying out loud, fix fluid leaks promptly! Engine oil, coolant, power steering fluid – anything spraying onto the condenser acts like glue, trapping dust and forming that concrete-like layer we talked about. I’ve seen condensers ruined in a matter of months because of a small, neglected oil leak. Address those early.
For early detection, make it a habit to inspect the condenser during your oil changes. Grab a flashlight and shine it through the grille. Is the aluminum shiny and open, or dark and matted? And pay attention to your A/C performance: if it starts fading at idle but comes back at speed, you’ve caught it early. A simple cleaning at that stage can prevent thousands in compressor or condenser replacement costs down the road. Trust me on this one.
