When the “Pumpkin” Itself Leaks: Why a Differential Housing Leak is Serious Business
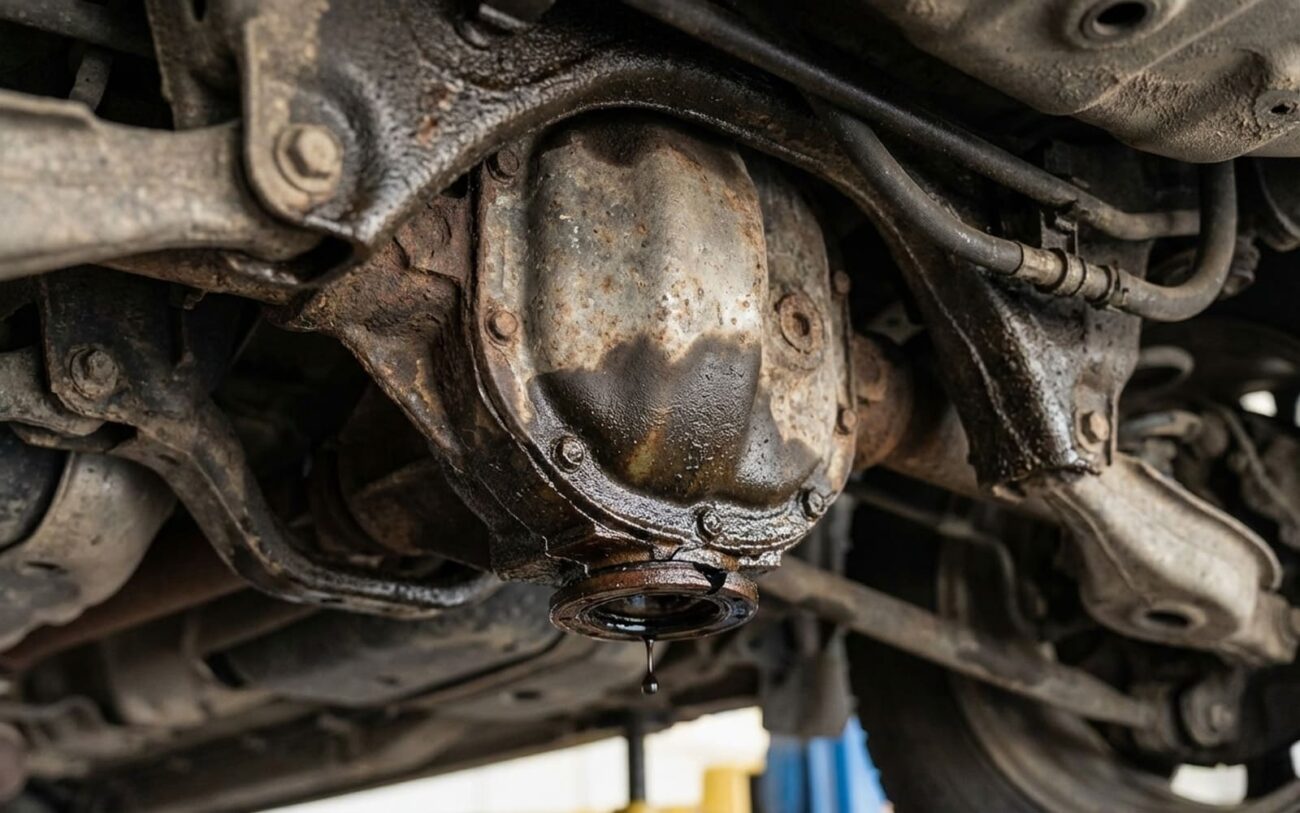
Look, when you spot fluid under the rear end of your truck or car, your first thought might be, “just another leak.” And yeah, it could be brake fluid, transmission fluid, or even just A/C condensate. But if that fluid is thick, dark, and has that unmistakable rotten-egg smell of gear oil, and it’s coming directly from the main “pumpkin” – the cast-iron or aluminum housing that holds all the gears – then you’ve got a problem that needs immediate attention. This isn’t just a drip; it’s a structural integrity issue, and believe me, that’s a big deal.
I’m talking about the core of your differential, not just a gasket or a seal. When that housing itself is compromised, you’re not just losing fluid; you’re risking catastrophic failure. Gear oil does more than lubricate; it cools those gears and bearings under immense load. Once the oil level drops, you get metal-on-metal contact. Bearings start to scream, generating heat and shedding metal shavings. Then the gear teeth start to wear, chip, or even break off. You’ll hear it – a whine under acceleration that gets worse, turning into a grinding or roaring sound, especially when you’re turning corners.
In the worst-case scenarios I’ve seen, the differential can seize up completely. Imagine that happening at highway speeds – your rear wheels lock up. That’s not just a tow job; that’s a serious safety hazard. Even a small crack near a mounting point can grow under the stresses of torque and suspension flex, eventually leading to a complete structural failure. So, if you’re seeing gear oil seep from the body of the housing itself – away from the cover gasket, pinion seal, or axle seals – you need to address it now. This isn’t something you just “monitor.”
Pinpointing the Real Source: Don’t Chase Ghost Leaks
Before you jump to conclusions and start tearing things apart, we’ve got to be absolutely sure where that leak is coming from. I can’t tell you how many times I’ve seen a pinion seal leak or an overflow from a clogged vent tube run down the housing, making it look exactly like the housing itself is cracked. Even experienced DIYers get fooled by this. So, here’s my process:
First, you need a clean slate. Get under there and thoroughly clean the entire rear axle assembly – the housing, the cover, the axle tubes, and all the seams. Brake cleaner works great for this. Make sure it’s bone dry before you do anything else.
Once it’s clean, you’ve got two solid methods for finding the exact source. My preferred method for a quick visual is to dust the entire area with a fine powder – baby powder or foot powder works perfectly. Alternatively, you can add UV dye to the gear oil. Drive the vehicle for a few miles, or just let it idle for a bit if you suspect it’s a static leak, then inspect. The leak path will show up as a discolored trail in the powder or glow brightly under a UV light. This lets you trace the fluid right back to its origin.
| What You See | Is It the Housing? | Common Imposters | How I Confirm It |
|---|---|---|---|
| Wetness in the middle of the housing, away from seams | Likely a casting flaw (porosity) or a stress crack. | Fluid tracking down from a clogged vent tube or a higher leak. |
Clean the area thoroughly. Apply powder or UV dye. The leak will originate directly from a visible flaw in the casting. A borescope can sometimes reveal internal casting defects if you suspect porosity. |
| Leak around a sensor (ABS, speed sensor, etc.) | Damaged threads (stripped, cross-threaded) or a cracked boss. | A simple failed O-ring or seal on the sensor itself. |
Remove the sensor, clean the threads and the port. If oil continues to seep directly from the threaded hole, the housing itself is damaged. Replace the sensor’s O-ring first to rule out the easy fix. |
| General wetness across the bottom of the housing | Less likely to be the housing itself; needs further isolation. | Leaking cover gasket, pinion seal, or axle seals are far more common. |
Perform a static pressure test. Plug the vent tube, then pressurize the differential to 3–5 psi (using a hand pump through the fill plug). Spray soapy water over the entire housing. Bubbles forming on the casting – not at the seams – confirm a housing leak. This is my definitive test. |
The Root Causes: Why Differential Housings Fail
So, you’ve confirmed it’s the housing itself. But why does this happen? In my 25 years turning wrenches, it usually comes down to one of three things: a flaw from the factory, constant stress, or blunt force trauma.
First up, manufacturing defects. This is often porosity – tiny air pockets trapped in the metal during the casting process. They might not leak for years, but eventually, under pressure and heat, those micro-channels open up and let gear oil seep out. I’ve seen this pattern in specific production runs, especially with some older Dana Spicer and AAM axles, particularly the aluminum ones. A small flaw can become a leak point over time.
Then there’s thermal or mechanical stress. Thermal stress cracks are more common in aluminum differentials. They usually start at a sharp corner or near a mounting ear and grow over repeated heating and cooling cycles. Think about towing a heavy trailer up a mountain, then cooling down. That constant expansion and contraction can make a hairline crack become an active leak. Mechanical stress, on the other hand, comes from things like hard launches, heavy loads, or even just the constant torque applied to the housing.
And finally, physical damage. This one’s pretty straightforward. A rock strike while off-roading, hitting a curb hard, improper jack placement, or even over-torquing a mounting bolt can crack the housing. In places where they salt the roads, corrosion around mounting points can weaken the casting, making it more susceptible to stress fractures. Just remember, a worn pinion seal or axle seal is a normal wear item – they’re designed to be replaced. A cracked or porous housing means the core structure is compromised, and that’s a whole different ballgame.
Your Options: Patch It Up or Replace the Whole Thing?
Alright, you’ve confirmed it’s the housing. Now what? Your repair options depend entirely on the location and severity of that leak. Let’s be clear: not all housing issues are created equal, and some “fixes” are just delaying the inevitable.
Epoxy Repair Professional Only
Threaded Insert Professional Only
Full Replacement Non-Repairable → Replace
Confirming the Fix: Don’t Assume It’s Sealed
Alright, you’ve done the work, the oil’s back in. Don’t assume the job is done. You’ve got to verify that repair holds up under real-world conditions. This is where a lot of people mess up, thinking a visual check is enough.
For an epoxy repair, I recommend driving the vehicle through at least three full thermal cycles. That means starting cold, getting it up to full operating temperature, and letting it cool back down completely. After each cycle, get under there with a flashlight – and a UV light if you used dye – and inspect the repair area. Any sign of seepage, even a tiny wet spot, means the repair didn’t take. For a thread insert, drive it for about 50 miles, then recheck the sensor port. It should be bone dry, and the sensor shouldn’t have loosened.
But the absolute best way to confirm success, especially for a housing leak, is to re-run that static pressure test. Plug the vent tube, pressurize the housing to 3–5 psi via the fill plug, and let it sit for at least 15 minutes. If that pressure holds steady and you don’t see any bubbles forming on the repaired area when you spray it with soapy water, then you’ve got a solid seal. This test mimics the internal pressure buildup that happens during normal operation and is far more reliable than just looking at it.
The Bottom Line: What’s This Going to Cost, and Is It Worth It?
This is where you need to be realistic. The cost isn’t just the epoxy or the insert kit. It’s the labor involved in getting the axle out (if needed), thoroughly cleaning and prepping the housing, and potentially inspecting internal components for damage if the diff ran low on oil. Don’t forget the cost of new gear oil, too.
| Repair Type | DIY Cost (Parts Only) | Shop Cost (Parts & Labor) | My Take on Success Rate | Risk if It Fails Again |
|---|---|---|---|---|
| Epoxy repair on external porosity | $50 (epoxy, cleaner, sanding tools) | $200–$400 (includes diagnosis, cleaning, repair) | 80% for minor, non-structural seeps – but only if done perfectly. | Continued leak, leading to accelerated gear or bearing failure. |
| Thread insert repair | $80 (kit, tools) | $150–$300 | 95% when done correctly by someone who knows what they’re doing. | Leak returns, or worse, the sensor gets ejected under pressure. |
| Housing/Axle Assembly Replacement | $500–$2,000 (for a good used or remanufactured unit) | $1,500–$3,500+ (parts and labor, depending on vehicle) | 100% (assuming proper installation and setup) | Incorrect setup (gear mesh), U-joint or driveshaft alignment issues. |
Here’s how I look at it in my shop: if the total cost of the repair – and that includes labor and any internal repairs needed from oil starvation – starts to exceed 50% of the vehicle’s private-party value in “Good” condition, it’s time to seriously reconsider. Dropping $3,000 into a differential on a $4,000 truck rarely makes long-term financial sense, unless it’s a specialty vehicle, a classic, or has significant sentimental value. In most cases, a good used or rebuilt axle swap is often the most economical and reliable path forward.
Prevention & Early Detection: Your Best Defense
Look, you can’t prevent a casting defect from the factory, but you can absolutely catch problems before they become catastrophic. It’s all about good habits and paying attention.
First off, always use the correct gear oil. I can’t stress this enough. Check your owner’s manual for the exact viscosity and specification. Using the wrong fluid, especially in a limited-slip differential, can lead to overheating, poor lubrication, and accelerated wear. If you’ve got a Torsen, Eaton Truetrac, or an electronic locker, the wrong additive package can absolutely ruin the clutch packs or internal mechanisms. Don’t cheap out here.
Next, keep that differential vent tube clear. It’s usually a small rubber hose or a cap near the top of the housing. If it gets clogged with mud, dirt, or ice, internal pressure builds up as the oil heats up. That pressure then forces fluid out through any weak point – even a tiny porosity spot that wouldn’t normally leak. A clogged vent can turn a minor flaw into a major leak in a hurry.
Finally, make a quick inspection part of your routine maintenance. Whenever you’re under the car for an oil change, tire rotation, or just checking things out, shine a flashlight on the differential. Look for fresh wet spots, shiny trails of oil, or accumulated grime that wasn’t there before. I even recommend cleaning the housing once a year – it makes new leaks stand out immediately. Catching a seep early means you can plan the repair on your terms, instead of reacting to a breakdown on the side of the road. And in my experience, that’s the difference between a manageable fix and a tow bill plus a ruined weekend.