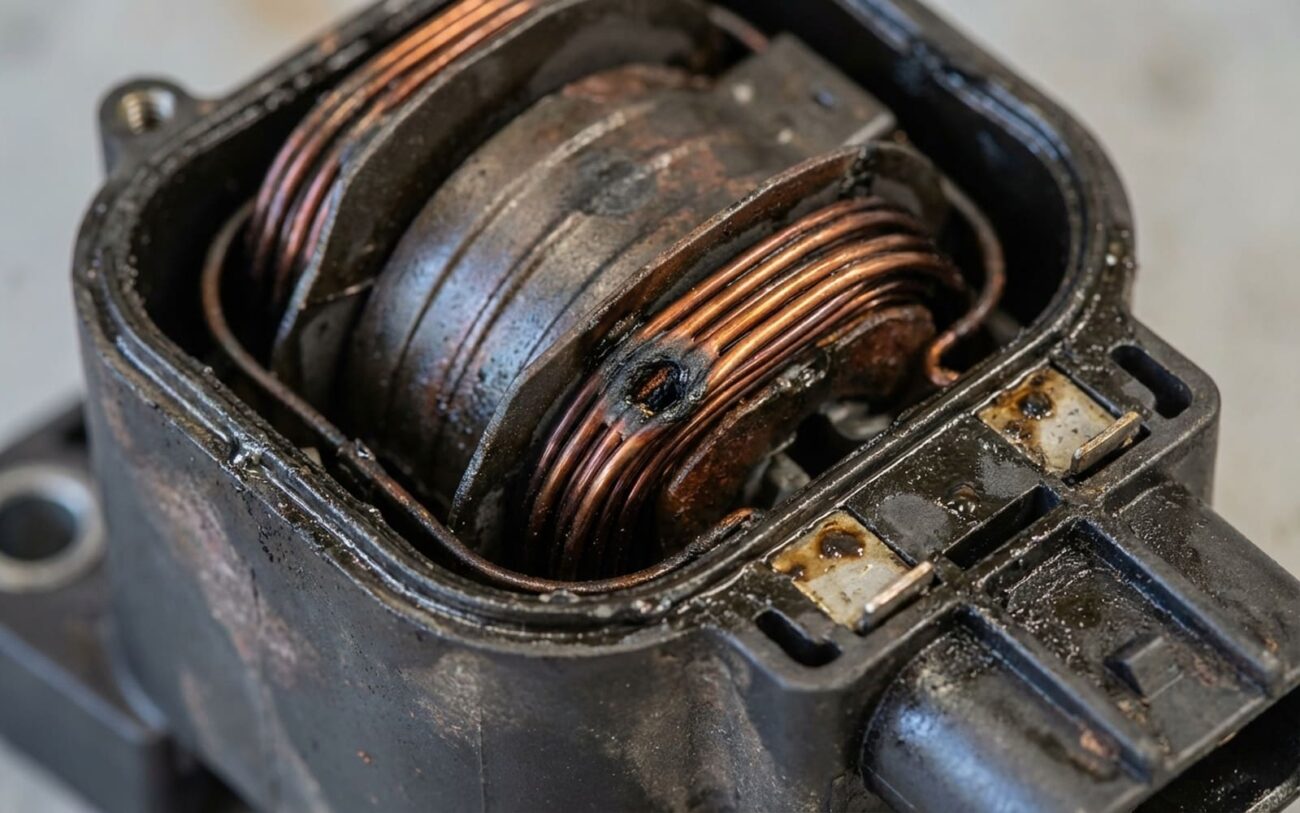
Alright, let’s talk about winding failures. After 25+ years wrenching on everything from beat-up pickups to high-end imports, I’ve seen my share of dead starters, alternators, and electric motors. And when it comes to windings, it’s rarely a sudden, catastrophic blow-up. Usually, it’s a slow burn, a quiet breakdown that gives you plenty of warnings if you know what to look for.
How You Know Something’s Wrong: The Symptoms
A winding failure starts small – a tiny crack in the insulation between two turns of copper wire inside the motor. We call that a turn-to-turn short, or an inter-turn short. It’s not a full short to ground or an open circuit, but it’s enough to mess with the motor’s magnetic field and efficiency. And that’s where the symptoms come in.
When those windings start to go, the component doesn’t just quit on you. It limps along, giving you clues. A starter with shorted armature windings? It’ll crank slow, sound like a weak battery, even if your battery’s brand new. An alternator with a bad stator? It might still put out some voltage, but it won’t hold it under load. You’ll see your headlights dim at idle, and your battery will keep running low. Blower motors for your HVAC or radiator fans might run erratically, or just flat-out stall when they’re supposed to be working hard.
But here’s the critical piece of information, the one that points straight to the windings: while the output drops, the current draw goes through the roof. That shorted path inside the motor has less resistance, so the motor pulls more amperage trying to do its job. All that excess current turns into heat – I²R losses, as we call ’em – and it cooks the component from the inside out. You might even catch a distinct burning smell. It’s not rubber or plastic; it’s a sharp, acrid odor, like overheated varnish or electrical insulation. That’s the insulation on those windings literally burning up.
Diagnosing the Beast: Is It Really the Windings?
Now, a lot of things can mimic a winding issue. Before you even think about tearing into a motor, you’ve gotta rule out the simpler, more common problems. Slow cranking? Could be a weak battery, corroded cables, or even engine mechanical issues like a tight engine. Dim lights? Might just be a failing voltage regulator or a dirty ground connection. The symptoms of winding shorts overlap with a ton of other electrical and mechanical faults, so jumping straight to “bad windings” is a classic rookie mistake.
Here’s how I typically approach it, checking the common mimics first, then moving to definitive tests:
-
High Current Draw, Low Output
This is the hallmark of a winding short. The motor pulls a ton of juice but can’t deliver the power. But don’t forget the mimics: seized bearings in the motor itself, an engine compression lock (for a starter), or a jammed fan blade or blower squirrel cage can all make a motor work harder and draw more current without a winding issue.
Definitive Test: Bench-test the component with a clamp meter. For a starter, apply full voltage (usually 12V) and measure the free-run amperage. A healthy unit should pull within 10–15% of spec. A shorted one? I’ve seen them pull 150–300% of spec while barely spinning. -
Overheating
That localized heat from excessive current in shorted windings can make one side of the housing feel noticeably hotter. But first, check for obvious stuff: blocked cooling fins, a failed cooling fan, or mechanical binding in whatever the motor is driving. These can all cause general overheating.
Definitive Test: After checking for obstructions, use an infrared thermometer or thermal camera under load. A winding short often creates a distinct hot spot, not just uniform heating across the whole component. -
Performance Degradation
This is a general loss of torque or output because the compromised windings reduce electromagnetic efficiency. But again, don’t jump to conclusions. Corroded or loose power/ground connections, a weak control signal, or a failing relay or fuse can all cause a component to underperform.
Definitive Test: Perform a voltage drop test on both power and ground circuits under load. More than 0.5V loss indicates a wiring issue. For alternators, check the AC ripple on the DC output with an oscilloscope — anything over 50mV suggests a diode or stator problem.
Why Windings Fail: The Root Causes
So, you’ve ruled out the external stuff, and you’re pretty sure it’s internal. The root of the problem is almost always insulation breakdown, and that happens for a handful of reasons:
-
Heat and Age: Every time a motor overheats, that enamel or varnish insulation gets more brittle. Over years, all that heating and cooling causes micro-cracks, eventually exposing bare copper.
-
Contamination: Oil, coolant, road grime — any of these can seep into the windings. These fluids degrade insulation over time. I’ve seen oil from a leaky valve cover destroy a starter’s field coils in less than a year.
-
Mechanical Stress: Starters, especially, take a beating. The armature gets slammed into the flywheel thousands of times. That constant vibration and shock can cause wires to shift and rub against each other or the core, eventually wearing through the insulation.
-
Voltage Spikes: A poor battery connection or an improper jump-start can send a high-voltage surge through the system. That spike can puncture thin insulation instantly, especially in older motors where the insulation is already a bit tired.
-
Manufacturing Defects: It’s rare, but it happens. A tiny nick in the wire during winding, or not enough varnish coating, can create a weak spot that just waits years to fail.
Important Clarification:
A turn-to-turn short is a failure of the motor’s internal copper windings. It’s not the same as a failed voltage regulator, a stuck starter solenoid, or a clogged fuel injector — even if those components are in the same housing. Each of those has distinct failure modes and diagnostic procedures. Don’t confuse them.
Making It Right: Your Repair Options
Once you’ve confirmed a winding short, you’ve got a couple of paths, though one is far more common for modern vehicles.
Replace the Assembly
Professional Rewind Professional Only / Specialty Shop
Professional Territory Only
For internal components like the stator in an alternator or the clutch coil in an A/C compressor, your options are even more limited. These typically require specialty tools for disassembly, and in most cases, they’re not economically repairable. The labor and skill required to rewind, say, an alternator stator usually exceed the cost of a quality remanufactured alternator. So, you’ll be replacing the full assembly. Make sure you have the right tools, like a serpentine belt tensioner tool, and always follow the factory belt routing and tension procedure.
For the vast majority of drivers, replacing the assembly is the smartest choice. It’s faster, more reliable, and usually comes with a solid warranty. Rewinding really only makes sense for classic cars, fleet vehicles with obsolete parts, or industrial applications where the replacement cost is truly prohibitive. As a general rule: if the rewind cost is more than 40% of a new or guaranteed reman unit, just go with the replacement. Few things are more frustrating than waiting weeks for a rewind, only to have it fail due to an undetected core issue.
Proving the Fix: Making Sure It Actually Worked
After you’ve replaced or rewound a component, don’t just assume it’s fixed because it powers on. You need to validate its performance under real-world conditions. This is where you separate the good techs from the guessers.
-
For a starter, it should crank the engine smoothly and quickly — not a slow “rrr-rrr” but a solid, consistent spin. No hesitation, no grinding.
-
For an alternator, test the system voltage at idle with all accessories on (A/C blasting, headlights on bright, heated seats, defroster). You should see at least 13.5 volts, ideally closer to 14.2-14.4V. Use a good multimeter or a scan tool to monitor real-time voltage.
The real test, for any electric motor, is current draw and temperature. Use a clamp-on ammeter to check the amps under load. Compare that to factory specs — a properly functioning motor should draw within 10% of its rated current. Then, run it for 5–10 minutes and check the housing temperature with an infrared thermometer. It should be warm, but not too hot to touch (anything above 160°F is a definite red flag). If it was professionally rewound, ask for their test results. A reputable shop will provide an insulation resistance reading from a megohmmeter test. You’re looking for >100 Megohms to ground. But even with bench tests, always verify operation in the actual vehicle system.
Keeping It From Happening Again: Prevention
Nobody wants to deal with this twice. A little proactive maintenance goes a long way:
-
Keep components clean: Alternators and starters, especially those low in the engine bay, get coated in dirt, salt, and grime. Clean those cooling fins regularly. A clogged alternator can’t dissipate heat, and it’ll cook its windings prematurely.
-
Fix leaks promptly: Oil or coolant dripping on a starter or alternator is a slow, silent killer. Address valve cover gaskets, water pump leaks, or intake manifold issues before they damage your electrical parts.
-
Use a battery maintainer: For vehicles that sit for weeks or months, a smart charger prevents deep discharges. Repeated full discharges really stress the charging system and shorten alternator life.
-
Monitor system voltage: Keep an eye on your dashboard gauge, or better yet, use a simple OBD2 scanner. A healthy system reads 13.8–14.4 volts while driving. Anything outside that range needs attention.
-
Listen and smell: Your senses are your best diagnostic tools. A starter that’s lost its crisp, fast spin is telling you something. And never, ever ignore that faint electrical burning smell — it’s often the very first sign of insulation breakdown.
