Wheel Speed Sensors: Don’t Get Fooled
After 25 years in the shop, I can tell you that a failing wheel speed sensor is one of the most commonly misdiagnosed problems. It’s not just a simple warning light; it throws a wrench into your vehicle’s entire safety net. I’ve seen countless times where folks — even other techs — jump straight to replacing expensive parts when the real issue was something else entirely. Let’s talk about how to get it right.
The First Clues: What Your Car is Telling You
The biggest giveaway, the one that usually sends a car into my bay, is when the ABS, Traction Control (TCS), and Electronic Stability Program (ESP) lights all decide to light up at the same time. When you see that trio, your brain should immediately go to “wheel speed sensor.” It’s a strong indicator, especially if your scan tool isn’t pointing to other related sensors like the steering angle or yaw rate sensor.
Another common symptom I see is a speedometer that’s either acting erratic, jumping all over the place, or just completely dead. The vehicle’s computer, usually the ABS module or the instrument cluster, uses input from all four wheel speed sensors to figure out how fast you’re going. If one of those signals drops out or gets noisy, the system tries to compensate, often by averaging the good signals. That usually means a wonky speedometer, which can be pretty unnerving.
Then there’s the phantom ABS activation. This is a real head-scratcher for some drivers. You’ll be rolling along at really low speeds—say, under 5 mph—on dry pavement, and suddenly you feel that familiar pulsing in the brake pedal, just like the ABS is kicking in. But there’s no reason for it! What’s happening is that a bad sensor is sending inconsistent or zero-speed data, tricking the ABS module into thinking that wheel has locked up. It’s trying to do its job, but it’s getting bad info.
What the Scan Tool Says (and What it Really Means)
When you hook up a good scan tool, you’ll almost always find a Diagnostic Trouble Code (DTC) that points to a specific wheel circuit. Common ones I see are C0035 (Left Front) or C0040 (Right Front). These “circuit fault” codes are gold because they tell you exactly which corner of the car to focus on. But here’s the kicker: a circuit code doesn’t automatically mean the sensor itself is bad. It just means the circuit has a problem.
Differential Diagnosis: Finding the Real Problem
Here’s where experience really pays off. Before you even think about ordering a new sensor, you have to confirm the actual source of the fault. In my shop, the sensor itself is often not the culprit. Wiring issues, corroded connectors, or damage to the tone ring (that’s the toothed wheel the sensor reads) are just as common, if not more so. Just throwing a sensor at it without proper testing is a waste of time and money, and it won’t fix the car.
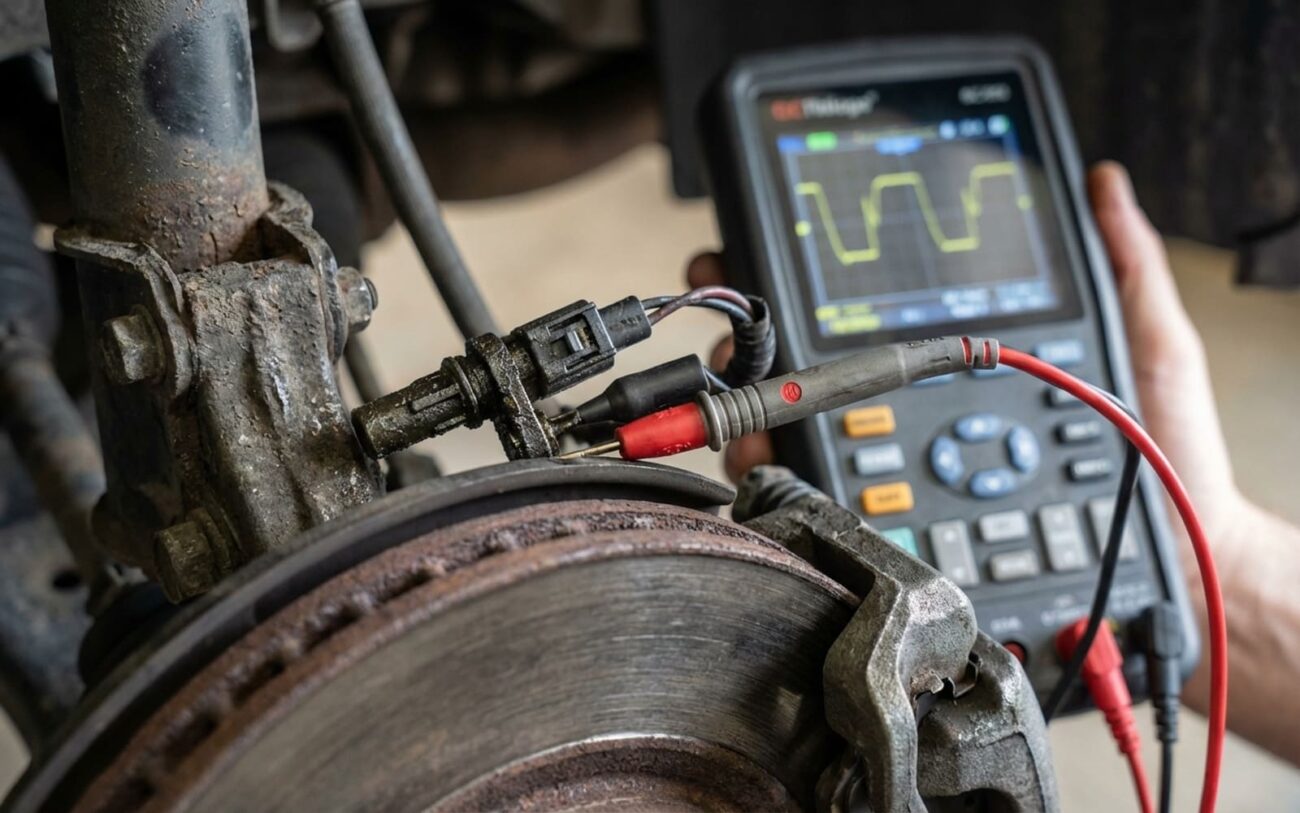
To diagnose these properly, you need the right tools. A good digital volt-ohm meter (DVOM) is essential. An oscilloscope is even better for really seeing what the sensor signal is doing. And, of course, a capable scan tool that can display live wheel speed data from all four corners is non-negotiable. With these, you can pinpoint whether the problem is internal to the sensor or somewhere else in the system.
| Symptom/DTC | Likely Sensor Failure | Common External Mimics | My Go-To Test |
|---|---|---|---|
| C0035/C0040-type DTC (Circuit Fault) | Internal coil windings are open or shorted. | Chafed wiring harness, corroded connector pins, broken wire near suspension. |
Disconnect the sensor and measure its resistance with a DVOM. Most passive sensors should read between 800–2500 ohms. Outside that range? It’s likely dead. |
| Erratic or Zero Speedometer | Intermittent internal connection (cracked coil, bad solder joint). | Missing or damaged tone ring teeth, metallic debris on sensor tip, faulty instrument cluster. |
Connect an oscilloscope to the sensor output and slowly rotate the wheel. You should see a clean, consistent AC voltage waveform. Any dropouts, spikes, or flat lines mean trouble. |
| ABS Activation at Low Speeds | Weak or noisy signal from a degraded magnet or internal damage. | Cracked or missing tone ring teeth, metallic brake dust stuck to sensor face, excessive air gap (worn bearing). |
Visually inspect the tone ring for damage or debris. Compare oscilloscope waveforms from all four wheels while driving slowly; a bad sensor/tone ring will show a different pattern. Also, check for excessive wheel bearing play, which can increase the air gap. |
If your resistance check passes, and the sensor seems to be putting out a decent signal, then you’ve got to trace that wiring harness. I’ve found so many issues near the control arm or strut tower where the harness moves with the suspension. Look for pinched, frayed, or corroded wires. A voltage drop test on the power and ground circuits at the ABS module connector can also expose hidden resistance in the wiring or connectors that a simple continuity test might miss.
When the Sensor Is the Problem: Root Cause Analysis
Okay, so you’ve done your due diligence, and the sensor itself is truly dead. These units are sealed, so you can’t really fix them, but understanding why they fail can help you avoid repeat issues or understand if environmental factors played a role.
The most common internal failure I’ve seen is a break in the fine wire coil inside the sensor. This coil is what generates the AC signal as it reads the tone ring’s teeth. Think about it: constant road vibration, heat from braking, and temperature cycles. Over time, that metal fatigues and eventually snaps, causing an open circuit. I’ve literally pulled these apart in the shop and seen the coil wire broken clean at a bend—classic thermal stress fracture.
Less often, you’ll find insulation breakdown, leading to shorted turns within the coil. This reduces the sensor’s output voltage and creates a noisy signal, which the ABS module interprets as erratic wheel speed. On some older magnetic pickup sensors, the internal permanent magnet can actually weaken if it’s exposed to prolonged high heat, like from a seized brake caliper or a dragging pad. That means a weaker signal that the module might miss.
Physical Damage & Environmental Factors:
Cracks in the sensor housing—often from impact with road debris or just plain old corrosion—are a big one. Once water gets inside, it’s game over. Corrosion builds on the coil and terminals, accelerating the failure. I’ve seen this pattern on plenty of models, especially here in the Northeast where road salt and poor undercarriage drainage are constant issues.
Fixing It Right: Repair Pathways
Safety First, Always
Restoring your ABS and stability functions isn’t just about getting rid of a light on the dash; it’s a critical safety investment. While some of these repairs are definitely DIY-friendly, others, especially those involving integrated hub assemblies, demand high precision and proper torque to avoid premature bearing failure or even dangerous wheel separation. If you’re not confident, get a pro.
Standalone Sensor Replacement DIY-FEASIBLE
Integrated Hub Assembly MODERATE TO HIGH COMPLEXITY
Post-Repair Validation: Don’t Skip This!
Replacing the part is only half the job. You’ve got to confirm the fix. I follow a three-step validation process every time:
Cost, Risk & Smart Decisions
Here’s a quick breakdown of what you’re looking at, both in terms of cost and potential headaches:
| Repair Type | DIY Part Cost | Shop Cost (Parts & Labor) | Success Rate (if diagnosed correctly) | Secondary Risk (if done improperly) |
|---|---|---|---|---|
| Single WSS (Standalone) | $50 – $150 | $200 – $400 | >95% | Misdiagnosis leaves wiring/tone ring fault unresolved. Overtorquing cracks sensor. |
| WSS/Hub Assembly | $150 – $400 | $400 – $800 | >95% | Improper axle nut torque risks bearing failure or wheel separation. ABS relearn missed. |
Prevention & Monitoring: My Two Cents
Anytime you’ve got the wheels off for a brake job or tire rotation, take an extra 30 seconds to inspect each wheel speed sensor and its wiring. Look for cracks in the housing, chafed wires, or heavy buildup of metallic brake dust on the sensor tip. A little preventative maintenance goes a long way here.
-
Make sure sensors are fully seated. Even a millimeter of misalignment can throw off the air gap and cause intermittent issues.
-
Don’t ignore those ABS/ESC lamps. Even if they go off sometimes, the historical DTCs can give you crucial insight into intermittent faults before they become a full-blown problem.
