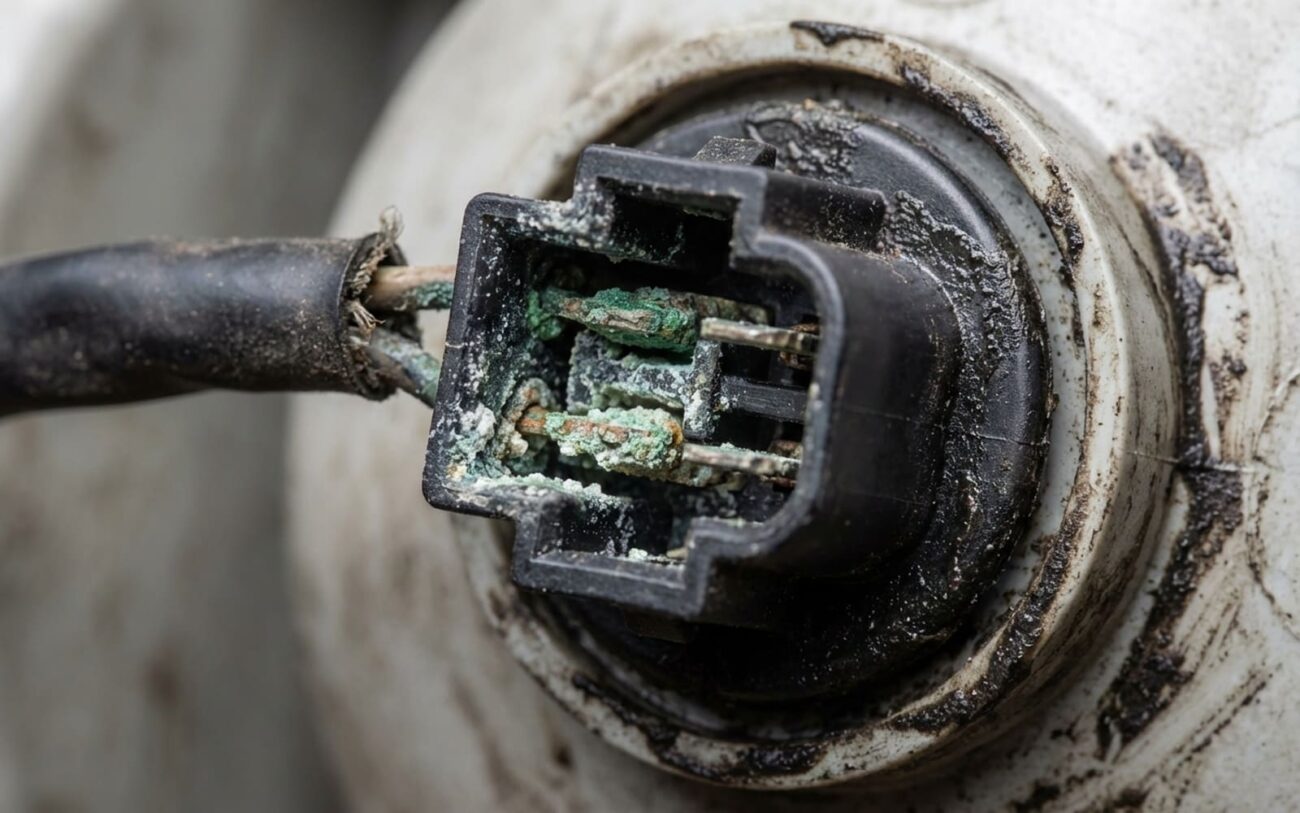
You’ve got one taillight out. You changed the bulb. Still nothing. Before you start ripping apart trim or blaming the BCM, let me tell you what I see every winter in my shop: it’s the connector. Not the bulb, not the socket—the damn plug where the harness meets the light. And if you’re in a salt belt state or near the coast, corrosion’s already eating it from the inside out.
Symptom: Light Out, Bulb’s Fine — Now What?
First, confirm the obvious: is the filament actually good? Yeah, even new bulbs fail. But once you’re sure, move to the next clue—does the dash indicator flash fast on one side? That’s not a “bulb out” warning. That’s your system telling you there’s high resistance or an open circuit. Could be one light, could be three on the same corner (tail, brake, turn). If multiple lights die together, especially on older Fords or GM trucks, look at the ground circuit in the connector. Shared ground = shared failure point.
And don’t blow this off as “just a light.” I’ve pulled connectors apart that were melting—not cracked, not discolored, but warped from heat. Resistance builds heat. Heat warps plastic. That’s not a repair job. That’s a fire hazard waiting to happen. (Yes, this matters.)
Test It Right: Don’t Guess, Measure
I don’t care how many YouTube videos you’ve watched—until you’ve run a voltage drop test, you’re guessing. A multimeter isn’t optional here. It’s the only way to know where the fault lies.
| Symptom | Indicates Connector Issue | Common Mimics | Definitive Test to Confirm Source |
|---|---|---|---|
| No power to one filament (e.g., brake light works, taillight doesn’t) | Corrosion or poor contact on the specific terminal | Open wire in harness, failed BCM output |
With the light commanded on, measure voltage from the fuse to the connector pin. Over 0.5V drop? Resistance is building. Then check from connector to socket. If voltage drops there, the connector or socket is the culprit. |
| Intermittent operation when moving the connector | Loose or corroded terminal crimp inside the connector | Fatigued or broken wire near a bend |
Back-probe the wire at the connector with your meter in continuity mode. Wiggle the harness near the housing. If the reading flickers, it’s not a broken wire—it’s a failed crimp or loose terminal. |
| No ground at the bulb socket | Corrosion on the ground terminal in the connector | Corroded body ground (e.g., frame strap) |
Ground circuit test: black lead on battery negative, red lead on the socket’s ground contact. Over 0.1V? There’s resistance. Now move the red lead to the connector’s ground terminal. If voltage drops here, the fault is upstream. If it’s still high, the connector’s the problem. |
Why It Fails: Corrosion Isn’t Random
Let’s get real—corrosion doesn’t just “happen.” It’s physics, environment, and design flaws feeding each other.
First: galvanic corrosion. You’ve got a copper terminal mating with a brass socket. Add road salt (electrolyte), and boom—you’ve got a tiny battery. One metal sacrifices itself. Out comes green crust (copper oxide) or white powder (zinc salts). I see this weekly on 2015–2017 F-150s. The connector looks fine from the outside. Open it up? It’s a science fair project.
Then there’s fretting corrosion. Engine vibration, thermal cycling—every time the car heats up and cools down, the pin and socket shift microscopically. That wears off the plating. Exposes base metal. Oxidation follows. Over time, even a few microns of movement kills conductivity.
And don’t forget terminal fatigue. The spring tension in the female terminal weakens after repeated disconnects or heat cycles. A loose fit lets in air and moisture. Once that happens, it’s a death spiral.
Oh, and those rubber seals? They dry out. Crack. Shrink. Especially on connectors mounted face-up. Water gets in. Stays in. (I’ve seen connectors full of brine on trucks parked outside all winter.)
One last thing: check the bulb base. A rusty or corroded base? That’s not just a bulb issue. It’s contaminating the socket and accelerating connector failure. Always inspect it. (Skip this if you’ve already checked, but I wouldn’t.)
How to Fix It: Four Scenarios
[DIY-FEASIBLE] Light Corrosion, Intact Terminals
Connector unplugs cleanly. You see light oxidation or powder, but the terminals aren’t pitted or loose. Clean it.
First: disconnect the battery. Then use a proper terminal removal tool—never a screwdriver. You’ll damage the locking tangs. Clean each pin with electrical contact cleaner (non-residue type) and a nylon brush made for connectors. Inspect closely: if you see bare copper or deep pitting, cleaning won’t last. Replace the terminal.
Once dry, apply a thin coat of dielectric grease. Not a glob. Just enough to coat the metal. This blocks moisture and stops galvanic action. Reinsert the terminals until they click. Test everything before closing up.
[PROFESSIONAL-RECOMMENDED] Damaged Terminals or Housing
If terminals are bent, pitted, or the housing is cracked or melted, it’s beyond cleaning. Replacement is the only real fix.
On the harness side, this is a pro job. You need an OEM service connector kit and a ratcheting crimp tool with the correct die. Most manufacturers (GM, Ford, Toyota) specify crimp-and-seal connectors with adhesive-lined heat shrink. That seal is critical—without it, moisture gets in and the repair fails in six months.
Soldering? Don’t. I’ve seen guys solder a joint, wrap it in tape, and call it good. Bad idea. Solder creates a rigid point in a flexible harness. Vibration will break it eventually. Crimp-and-seal is the standard for a reason.
Now, if the connector is on the taillight side and sold as a pigtail (like on some Toyotas), a careful DIYer can replace it. Use proper crimp connectors and heat shrink. But if you’ve never crimped before, practice first.
[NON-REPAIRABLE] Internal Wire Corrosion
Strip back the insulation. See green or black strands inside the wire? That’s not surface rust. The conductor itself is compromised. You can’t clean that.
The only reliable fix: replace the entire harness section. This isn’t a quick job. You’ve got to route new wire through grommets, secure it properly, and avoid chafing points. On older Tacomas or F-150s, this area is a known weak spot—water gets in through the rear quarter panel or bumper drain.
If you’re not confident routing wires through tight spaces, take it to a shop. This one’s worth the labor.
[TEMPORARY FIX] Emergency Workaround
In a pinch, CRC 2-26 or a similar water-displacing spray might restore contact. Spray it in, cycle the connector a few times, test. It might work for a week. Maybe two.
But be honest: it’s not a repair. It doesn’t fix worn terminals or failed seals. And over time, it can attract dirt or degrade certain plastics. Use it only to get home or to a shop. Then do it right.
Prove It Works: Don’t Just Turn It On
So the light turns on. Great. Now prove the repair is solid.
First, check voltage drop under load. Should be under 0.2V across the connector. Any more, and resistance is still building. Then gently shake and flex the harness. No flickering. No intermittent dropouts.
If you replaced the connector, make sure the seals are seated and the locking tab is engaged. Then do a water test: spray the mated connector with a garden sprayer or spray bottle. Wait 10 minutes. Disconnect and inspect. Any moisture inside? The seal failed. Reseat it or replace the connector.
These steps take 15 minutes. But they prevent comebacks. And trust me—nobody wants to do this job twice.
What’s This Gonna Cost?
| Repair Type | DIY Cost | Shop Cost | Success Rate | Secondary Risk if Poorly Done |
|---|---|---|---|---|
| Cleaning & Dielectric Grease | $15–$25 (cleaner, brush, grease) | $75–$150 | 95% if terminals are intact |
Missed terminal fatigue leads to quick recurrence |
| Connector Replacement (Harness Side) | $50–$100 (kit, tools) | $200–$500 | 99% with proper crimp and seal |
Poor crimp causes heat, resistance, and potential fire hazard |
| Full Harness Section Replacement | Not advised for DIY | $500–$1,500+ | Near 100% when done correctly |
Improper routing leads to chafing or stress fractures |
Real talk: if your car’s got multiple corroded connectors in the rear—especially in the Midwest, Northeast, or coastal areas—don’t treat this as isolated. One bad one means others are close behind. And if repair costs hit 40% of the car’s value? You’ve got to ask: is it worth it? I see older SUVs and trucks come in with $800 repair bills for wiring. Sometimes, replacement makes more sense.
Stop It From Coming Back
Prevention takes five minutes. Pays off for years.
Every time you change a bulb—especially before winter—apply a small amount of dielectric grease to the terminals. Not a glob. Just enough to coat. Blocks moisture. Stops corrosion.
Once a year, unplug the rear connectors and look inside. White powder? Green crust? Dampness? Clean it now, not later. A quick resistance check with your meter can catch rising resistance before the light fails.
And if you tow a trailer? Double down. Trailer connectors are moisture magnets. And if they leak, that water can back-feed into your main harness. Seen it too many times.
Finally, check the taillight gasket. Cracked? Brittle? Not seated? Water gets in. Eventually hits the connector. A few minutes of inspection saves hours of diagnosis later.
