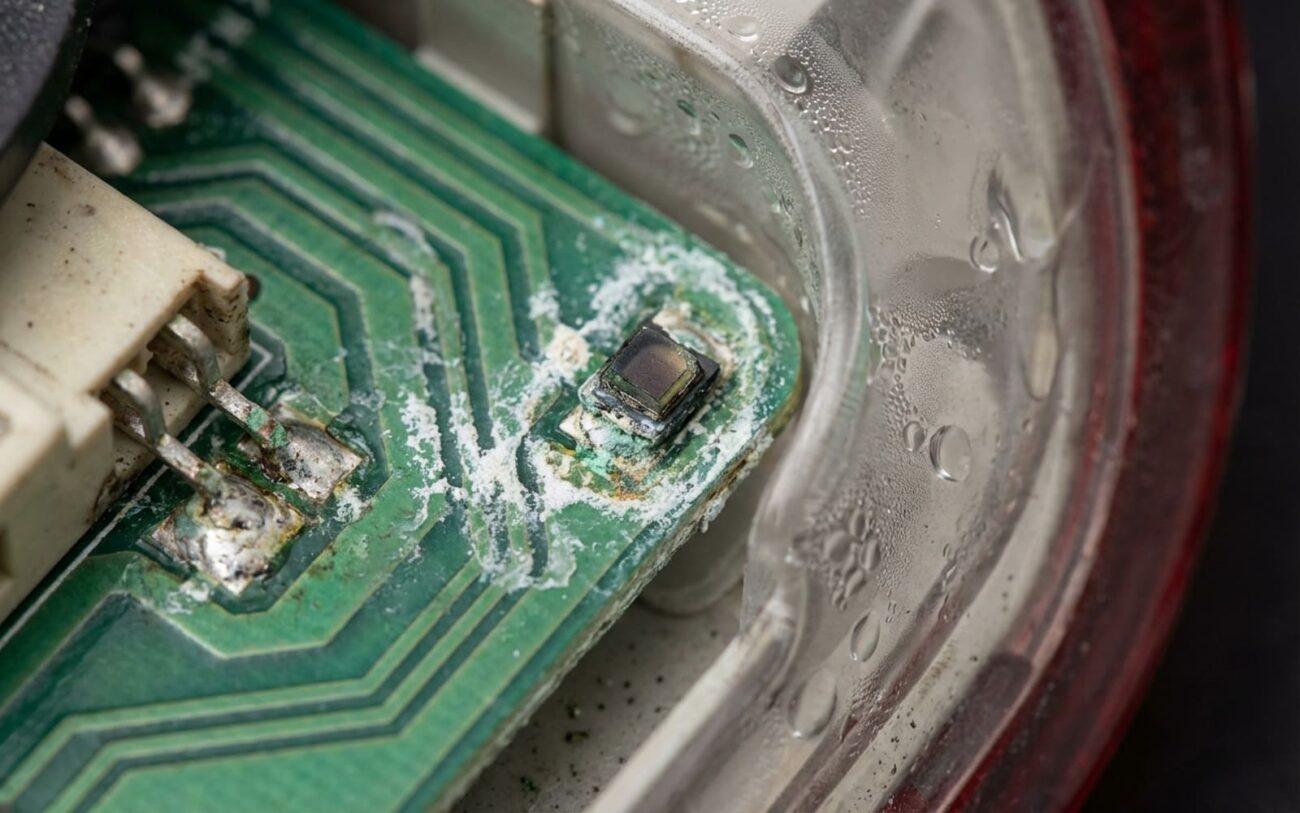
It’s Not Just Fog — It’s a Circuit Board Drowning
If you’re seeing moisture inside your tail light, don’t write it off as “just condensation.” I’ve pulled hundreds of these units apart — especially on late-model trucks and sedans — and by the time the owner notices, the real damage is already done. The problem isn’t the water itself. It’s what the water does once it gets in.
Here’s the red flag I watch for: partial LED failure with no bulb-out warning on the dash. Say your brake light ring only lights up halfway, but the truck doesn’t throw a code. That means the Body Control Module (BCM) is sending power, but the circuit board inside the housing can’t deliver it. Why? Corrosion. Either the copper trace is eaten through, or the solder joint has failed. And once that starts, it spreads — fast.
Visible droplets? That’s past the point of “normal fog.” A light haze on cold mornings? Fine. But if you can see pooling at the bottom of the lens, the seal is compromised. Pull the assembly. Look inside. If the board has white or green crust — especially near the ground points — that’s electrolytic corrosion. And I’ve seen boards go from one dead LED to total failure in under six weeks.
Where’s the Leak Coming From? Don’t Guess — Test.
Just because water’s inside the housing doesn’t mean the lens is cracked. I’ve seen more leaks come from bad gaskets or wiring seals than from actual housing failure. Misdiagnose this, and you’ll replace the wrong part — or worse, open a perfectly good housing and ruin the seal.
Here’s how I break it down:
| Symptom | Likely Internal (Housing-Related) | Common External Causes | Definitive Test to Confirm Source |
|---|---|---|---|
| Moisture in lens cavity | Failed vent membrane or hairline crack in housing from stress or material defect. | Compromised perimeter gasket between light and body panel. |
Leak test: Seal all ports and connectors, submerge housing in water, apply 5–7 psi of air to the vent hole. Bubbles indicate a housing breach. |
| LED circuit board corrosion | Internal condensation due to trapped humidity or vent failure. | Moisture wicking up wiring harness through a damaged connector seal. |
After drying, use a multimeter to check for continuity between adjacent, non-connected copper traces. Any reading means conductive corrosion. Also inspect connector rubber boot for cracks or swelling. |
| LED failure (no output) | Corrosion on PCB trace or LED emitter damaged by electrolysis. | Faulty BCM output, broken wire in harness, or corroded connector pins. |
Use multimeter in diode-test mode to check individual LEDs. Confirm power and ground at the board’s connector to rule out upstream issues. |
Why It Fails: Two Root Causes, Same Result
Most moisture failures come down to one of two things: vent failure or housing cracks. And no, they’re not the same.
Vent failure is more common. Modern tail lights aren’t sealed — they breathe through a hydrophobic membrane. It lets air move in and out but blocks liquid water. But if that vent gets clogged with salt, wax, or road grime, humidity builds up inside. It condenses. And that moisture settles on the circuit board. I’ve seen vents blocked by detailing crews who thought they were “protecting” the light with silicone spray.
Housing cracks usually happen near mounting points. Overtightened bolts, body flex, or poor molding create micro-fractures. They’re invisible to the eye, but they let water in over time. And once it’s in, corrosion takes over.
Two types of corrosion do the damage:
- Electrolytic corrosion: Moisture (especially salt-laden) creates a weak electrolyte between powered and grounded traces. Current flows across the board where it shouldn’t, eating away copper.
- Galvanic corrosion: Happens between dissimilar metals — like tin-plated components and copper traces. It’s electrochemical, and it accelerates in coastal or winter climates.
And yes — manufacturers know about this. Some models have revised gaskets or vent locations in later years. Don’t assume it’s user error.
How I Fix It — And What Actually Works
Professional Territory Only
Fixing tail light moisture issues, especially with sealed units, often requires specialized tools and careful technique. Improper repair can lead to further damage or compromised safety. There’s no safe shortcut for delicate housing separation and circuit board work.
Housing Separation & Board Repair Professional Only
Housing Crack Repair / Vent Patch DIY Feasible
Drain Hole (Temporary Fix) Temporary / Last-Resort
Did It Work? Here’s How I Know.
I don’t guess. I test.
For any housing repair, I do a full leak test: seal the electrical ports, submerge the unit, apply 5–7 psi of air through the vent. Watch for bubbles for at least a minute. None? Good. Seal holds.
For the board: bench-test with 12.8V. Cycle through parking lights, brake, turn signal, reverse. Every LED must light evenly. Then, power off — check resistance between power and ground traces. You want over 1 Megohm. Lower than that? There’s still conductive residue. Clean it again.
Once it’s back on the car, I tell the customer: check it after the next rain. If fogging returns in a week, the seal failed. If corrosion comes back in a month, the vent’s still blocked. Prevention matters.
What’s It Gonna Cost?
DIY Crack Repair
For minor cracks or board cleaning. Requires tools, cleaner, conformal coating. Success rate ~70% for early corrosion. Risk of moisture re-entry, leading to complete LED failure or BCM driver damage.
Pro Board Clean/Repair
Professional labor and materials for housing separation, board cleaning, and resealing. Higher success rate with proper tools. Risk of moisture re-entry if not sealed correctly.
Full Assembly Replacement
Part cost + ~1 hour labor. Near 100% success if OEM and properly installed. Minimal risk, provided gasket is seated correctly and vent is clear.
My rule of thumb: if a new OEM assembly costs more than 40% of your car’s current market value, consider a professional repair or look for a quality used unit from a reputable salvage yard. A used OEM tail light is often the most cost-effective solution—as long as you verify it’s dry, the LEDs work, and the gasket and vent are intact before installing it. Avoid aftermarket units with poor sealing or non-standard venting; they often fail faster.
How to Keep It From Happening Again
To Prevent Recurrence
-
Every time you remove the tail light — for a fuse, bulb, or body work — inspect the gasket. It should be soft, flat, and seated properly. Replace it if it’s cracked or hardened. And check the vent membrane (usually a black patch on the back) — blow it out with compressed air if it’s dirty.
-
Make it a habit to check your lights after a heavy rain or car wash. If fog doesn’t clear in a few hours, investigate. Early action saves the board.
-
If your vehicle has a known history — like those Mazda moisture issues or Ford F-150 leaks — stay ahead of it. Clean the vent, check the gasket, and catch it before the green crust shows up.
Cost-Saving Tip
Independent specialists often charge less than dealerships for board-level repairs. And a good used OEM unit from a reputable salvage yard? Usually the smartest move if you’re out of warranty. Just test it first.
