You’ve got a dead taillight on your F30—maybe just a strip, maybe the whole side. I’ve seen this a thousand times. It’s not always a bad bulb (there are no bulbs). It’s not always a fuse. And it’s not always the car’s wiring. The real question is: where’s the failure? I’ll tell you how to find it, fix it, and keep it from coming back—no fluff, just what works.
What You’re Actually Dealing With
If only part of the taillight is out—say, the inner brake light strip or the lower cluster—it’s almost certainly inside the housing. LED arrays on the PCB fail one by one, not all at once. But if the entire unit is dead—no tail, no brake, no turn signal—don’t jump to conclusions. Could still be the light, but now you’re looking at power or ground issues. Fuse, wiring, or FEM (Front Electronics Module). Don’t guess. Test.
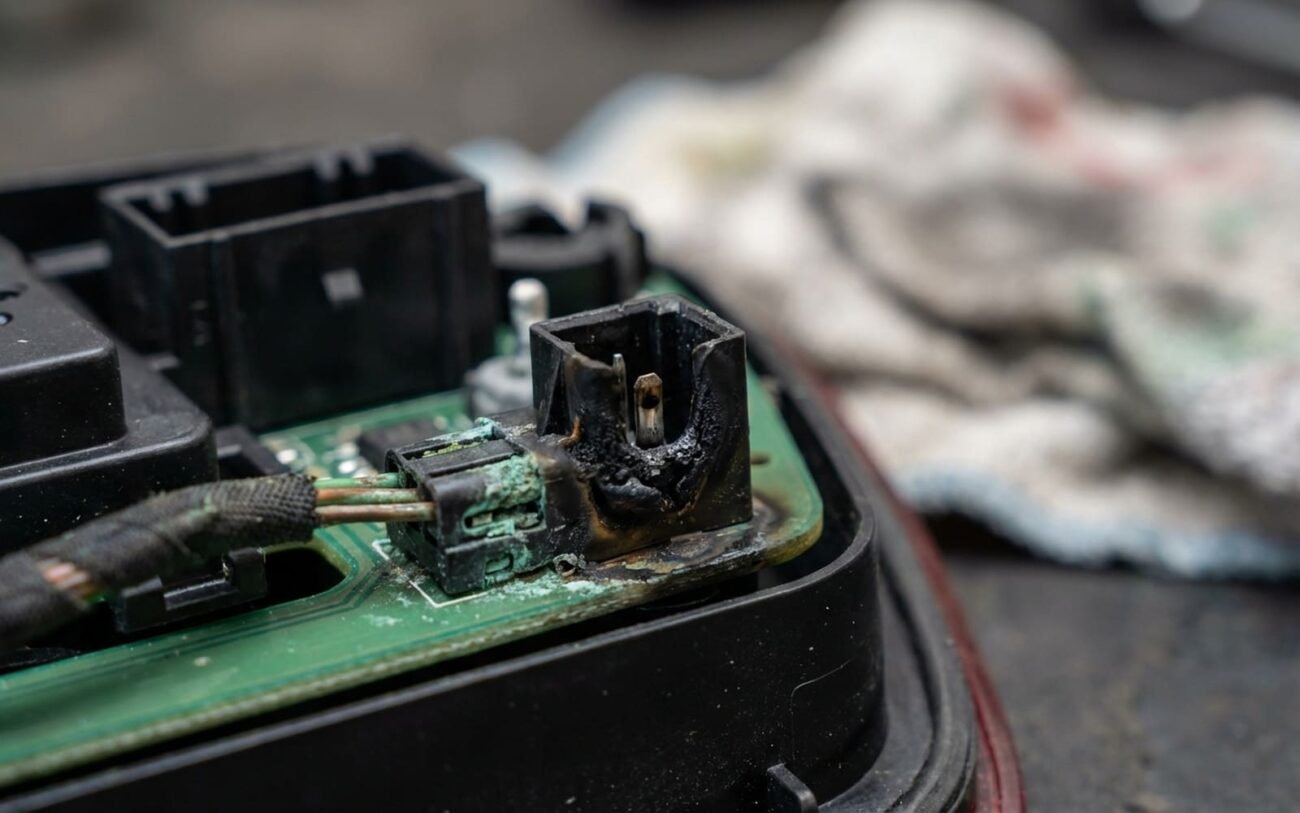
Here’s the red flag I watch for: flickering when you tap the lens or open the trunk. That’s not a loose wire in the harness. That’s a cracked solder joint or broken trace on the circuit board. And if you see fogging or water pooled behind the lens? That’s the root. Moisture gets in, corrodes the copper, and kills the circuit. I’ve pulled boards that looked like they’d been in a saltwater tank.
And before we go further—yes, this is a safety issue. A missing brake light at night? That’s how someone hits you. Don’t drive it like that. And don’t wait. Once water’s in, the damage spreads. What starts as a $50 repair becomes a $1,000 replacement in six months.
Is It the Light or the Car? Here’s How to Know
Don’t pull a single trim panel yet. First, figure out if the problem is in the taillight or the car’s wiring. The F30’s FEM (also called the BDC) controls the lights, and the trunk harness—especially near the hinges—flexes every time you open the trunk. That’s a known weak point. But so is the PCB inside the light.
| Symptom | Likely in Taillight | Could Be Car Side | How to Confirm |
|---|---|---|---|
| Partial failure (e.g., inner brake light out) | Failed LED or resistor on PCB | FEM output issue, corroded connector | Run FEM output test with scan tool. If light commands on, check for 12V and ground at the connector. If both are present, the fault is inside the housing. |
| Complete failure of one side | PCB short, severed trace, water damage | Blown fuse (F167 left, F168 right), broken wire in trunk loom | Check fuses first. Then test for 12V and ground at the connector with lights on. If power and ground are good, the light is bad. |
| Intermittent—flickers when you move the trunk | Cracked solder joint or broken trace | Loose connector, chafed wire at hinge | Back-probe the connector with a multimeter (min/max mode). Flex the housing while the light is on. Voltage drop? That’s an internal break. |
Why the Taillight Fails—And It’s Not Just “Old Age”
The PCB inside the housing is the weak link. Not the LEDs themselves—those last forever. It’s the supporting components: resistors, traces, solder joints. Thermal cycling—heat from the LEDs, cold from winter—stresses the board. Over time, solder cracks, traces break.
I’ve seen a pattern on pre-LCI F30s: resistor R47 on the inner brake light circuit fails. BMW even issued a TSB (can’t quote the number, but it’s out there). It’s a 1-ohm 2512 SMD resistor. Cheap component, high current load. Fails open. Light goes dark. Happens more than you’d think.
But the real killer? Moisture. The seal—either the perimeter gasket or the adhesive bonding the lens—dries out. Cracks. Pulls away. Water gets in. Condenses on the cold PCB. Corrodes the copper. I’ve seen boards where the traces are just… gone. Eaten through.
And don’t confuse this with a wiring issue. If the FEM isn’t sending power, that’s a different problem. If the trunk harness is broken, that’s a different fix. But if the light gets power and ground and still doesn’t work? That’s the assembly. Period.
How to Fix It—And What Actually Works
[DIY-FEASIBLE] Replace the Gasket
If the only issue is a dried-out perimeter gasket and the housing comes off cleanly, this is a solid fix. You’ll need a T20 or T30 Torx, plastic trim tools, and a new OEM gasket. Don’t over-tighten—8 Nm (71 in-lbs) is plenty. More than that, you risk cracking the housing. This won’t fix electrical issues, but it’ll stop moisture from getting in. And that’s half the battle.
[PROFESSIONAL-ONLY] PCB Repair
If you’ve got a failed resistor or minor corrosion, you can repair the board—but only if you know what you’re doing. You’ll need a hot air rework station, precision soldering iron, and the right SMD parts (like that 1-ohm 2512 for R47). Getting the lens off? Heat it to about 80°C to soften the adhesive. Don’t rush it. Crack the lens, and you’ve wasted your time.
After repair, reseal with fresh butyl tape. No shortcuts. If moisture gets back in, the board fails again. I’ve seen guys skip this step and wonder why the light died three months later.
[NON-REPAIRABLE] Replace the Assembly
If the PCB is heavily corroded, multiple LEDs are dead, or the light guide is damaged—just replace it. No point fighting it. Use a new or verified-used OEM unit. And yes, you’ll need ISTA or equivalent to code it. F30 taillights are smart. No coding? Bulb check errors, hyper-flashing, or partial function. It won’t work right.
Did It Really Work? Here’s How to Know
After any repair, test it. Not just “does it light up.” Cycle the functions—tail, brake, turn. Do it in the dark. Have someone press the brake while you walk around back. Check for even brightness. No flickering.
If you replaced the assembly, clear any fault codes and verify no new ones return. A proper ISTA adaptation should prevent errors, but I’ve seen mismatched part numbers cause issues even after coding. Double-check the LCI vs. pre-LCI fitment. They’re not interchangeable.
Pro tip: After sealing or repairing, do a water test. Spray the taillight with a hose—focus on the seams and gasket. Wait 10 minutes. Open it up. Any moisture inside? Seal failed. Do it again.
What It’ll Cost You
| Repair | DIY Cost | Shop Cost | Success Rate | Risk If It Fails |
|---|---|---|---|---|
| PCB Repair (e.g., R47) | < $10 (parts) | $150–$300 (labor) | High (if corrosion is minor) | Moisture returns, board fails again |
| New OEM Assembly | $400–$700 (part) | $800–$1,200 (part + labor + coding) | 100% (if coded right) | Wrong coding = errors or partial function |
If a new light costs more than 30% of your car’s value, go used. But only from a trusted source. And make sure it’s the right version. LCI and pre-LCI housings don’t swap without issues. Plan for coding either way.
Keep It From Coming Back
Prevention is simple: keep water out. Twice a year, clear debris from around the taillight and trunk drain channels. Leaves, pine needles, dirt—they trap water against the seal. I’ve seen perfectly good gaskets fail because the drain was clogged.
Do a quick walk-around every few weeks. Have someone hit the brakes. Look for even illumination. Catch condensation early, before it eats the board. And if you’ve repaired or replaced a seal, check it after the next heavy rain. Moisture damage doesn’t always announce itself.
Bottom line: Most F30 taillight issues come down to moisture and bad solder. Fix the root, not just the symptom. Reseal it. Test it. Don’t let it happen twice.