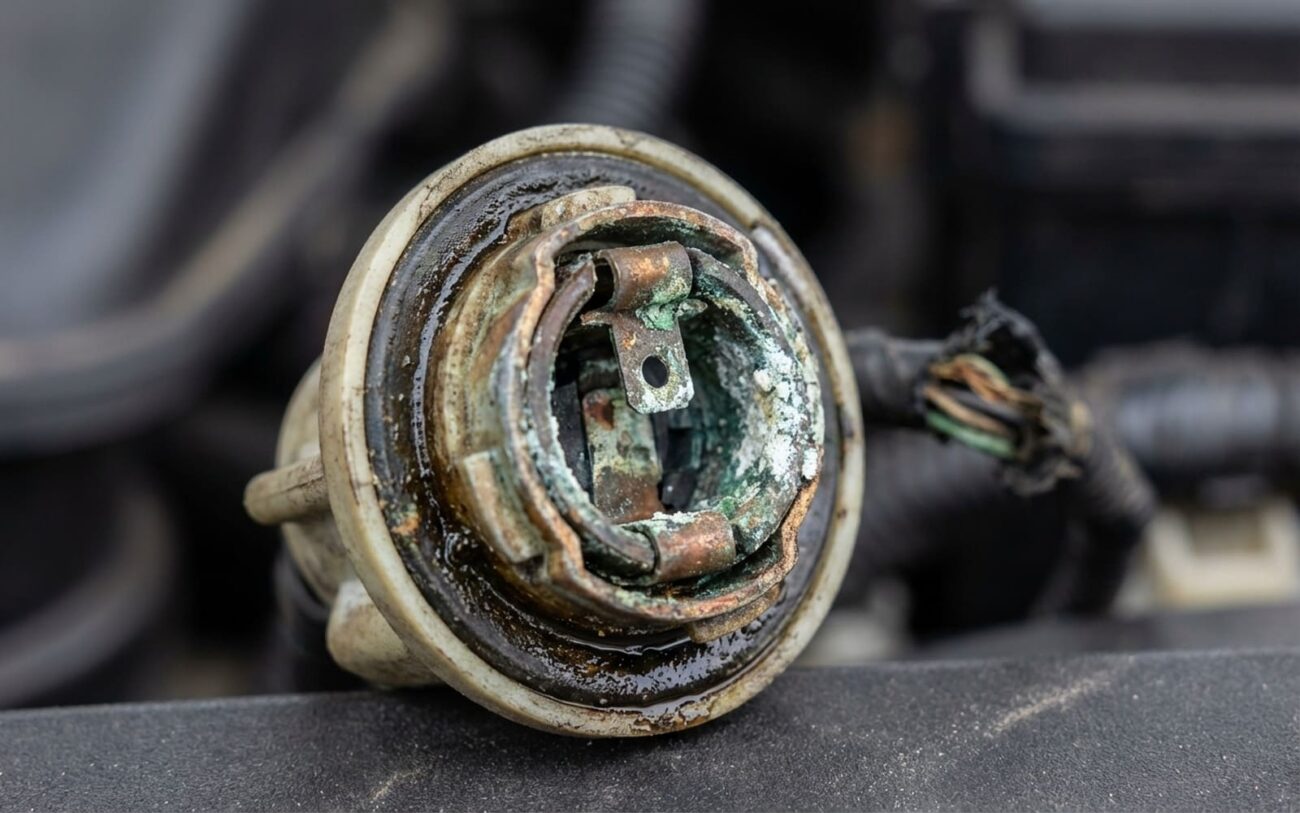
That Dead Headlight? Don’t Touch the Bulb Yet — It’s Probably the Socket
I’ve seen this a hundred times: customer pulls in, says one headlight’s dim or out. First thing they did? Swapped the bulb. Still not working. Then they try the other side — same story. Now they’re frustrated, thinking it’s a wiring nightmare or a module gone bad. But 8 times out of 10, the problem isn’t the bulb, the fuse, or the switch. It’s the socket.
And no, I don’t mean “clean it real quick and hope.” I mean the socket is corroded, melted, or the contacts are sprung — and it’s killing the circuit from the inside.
Symptoms and How to Test Like a Pro
Here’s the thing: bad sockets don’t always kill the light completely. They strangle it. That’s why you get flickering, dimness, or intermittent operation. The current’s getting through — just not enough. That’s different from a blown fuse (total blackout) or a dead bulb (open circuit).
So before you start throwing parts at it, test properly. Here’s how I do it in the shop:
| Symptom | Socket Likely Fault If… | Other Possibilities | Definitive Test |
|---|---|---|---|
| No light | Socket shows white/green crust, terminal bent, or plastic warped. New bulb does nothing. | Blown fuse, failed relay, broken wire. |
Voltage drop test: measure between socket power terminal and bulb contact under load. Over 0.5V? Resistance is too high — socket’s the culprit. |
| Dim light | Terminal looks brown or chalky. Light’s noticeably weaker than the other side. | Weak alternator, bad ground, aging bulb. |
Measure voltage at bulb contact, then at the socket’s wire connector. More than 0.7V difference? Power’s being lost in the socket. |
| Flickering | Wiggling the bulb makes it flash. Contacts feel loose or gritty. | Bad ground, failing switch, chafed wiring. |
Gently wiggle the bulb while powered. If it flickers, contacts are worn. Use multimeter in min/max mode to catch voltage drops. |
Why Sockets Die: It’s Not Just “Old Age”
Corrosion. That’s the killer. Not just surface rust — I’m talking galvanic corrosion. Happens when dissimilar metals (like tin-coated bulb base and brass socket terminal) sit in moisture. Road salt? That’s fuel on the fire.
This isn’t just “dirt.” It’s electrochemical decay. You get that white, powdery crust — sometimes blue or green — that acts like an insulator. And once resistance builds up, every time current flows, it generates heat.
And that heat? It softens the plastic, weakens the spring tension in the contacts, and accelerates oxidation. Now the bulb doesn’t seat right. Arcing starts. More heat. More damage. It’s a death spiral.
I see this constantly on older Hondas and Toyotas — especially around the taillights. But I’ve also worked on 2015–2017 F-150s where the headlight sockets melt from poor ventilation. Ford even issued a TSB on some models. It’s not random — it’s a design flaw.
And don’t confuse this with a bad bulb. A dead filament stops all current. A bad socket lets current through — just inefficiently. That’s why testing matters.
How to Fix It — And When to Walk Away
You’ve got three real options. Pick based on damage, not hope.
Clean It — If It’s Early Stage DIY-FEASIBLE
Replace the Socket — If Contacts Are Pitted or Loose DIY-FEASIBLE with proper tools
Harness Damage — This Is Pro Territory PROFESSIONAL-ONLY
If the connector’s melted or corrosion has spread into the main harness, stop. Modern connectors have locking tabs, secondary latches, specific release tools. Depinning without the right tool? You’ll break it. On BMWs or Acuras, one wrong pin and you lose half the lights. And sometimes, the harness section is $300 and requires dash disassembly. Not a DIY job unless you’ve done it before.
Field Fix — Only If You’re Stranded TEMPORARY / LAST-RESORT
Did It Work? Test It Like I Do
Don’t just turn it on and walk away. That’s how comebacks happen.
If you cleaned it: light should match the other side. Tap the housing — no flickering. Check voltage drop across the socket under load. Should be under 0.3V.
If you replaced it: check every crimp. Wiggle the wires — nothing should move. Use a clamp meter to check current draw. Compare to the good side. If it’s way off, something’s wrong.
Then, run the light for 10 minutes. Pull out an IR thermometer. Scan the socket. It should be close to ambient. If it’s 10°C hotter? Resistance is still there. You missed something.
Prevent It From Coming Back
-
Every time you touch a bulb — headlight, taillight, license plate — grease the base. Dielectric grease. Not grease from your garage. This stuff seals out moisture. It’s not optional. It’s maintenance.
-
Check your lights when you check your oil. Look for fog, cracks, or crust around the socket. Catch it early, clean it, grease it — save yourself $200 later.
-
If one side looks yellower or dimmer? Don’t wait. That’s oxidation starting. By the time it’s bad, the socket’s probably toast.
What’s This Gonna Cost?
Cleaning & Greasing
Success Rate: High — if caught early. Risk: Comes back fast if you skip the grease or housing is cracked.
Socket Replacement
Success Rate: Very High — when done right. Risk: Bad crimp or poor seal leads to repeat failure.
Harness Section Replacement
Success Rate: High — with proper tools. Risk: Wrong pinout or damaged connector causes cascading electrical issues.
Here’s What I Tell Customers
If the harness repair costs more than 25% of the car’s value, think hard. On a 15-year-old Camry, one bad socket often means others are close behind. I’ve seen guys fix one taillight, then the front marker goes, then the side lamp. It’s the whole system aging. Sometimes, it’s not worth chasing.
