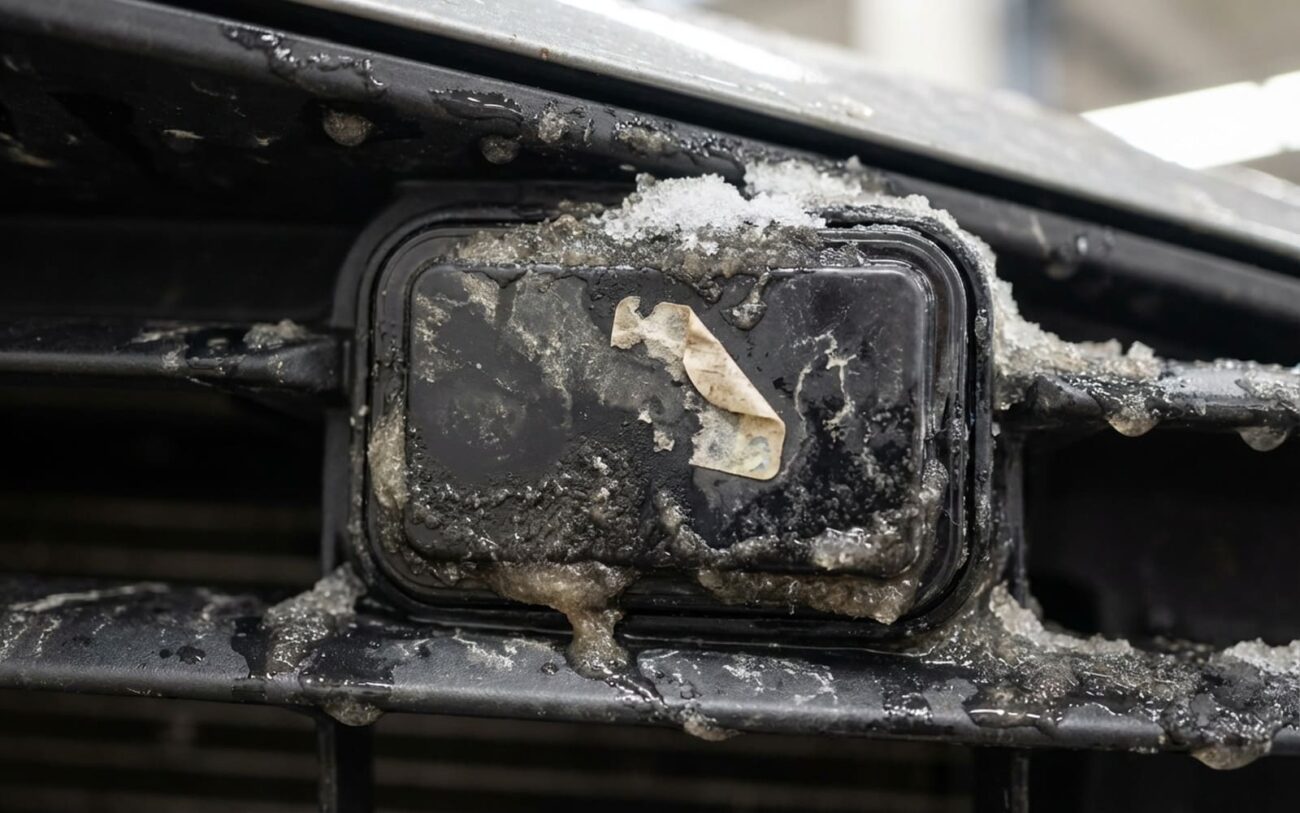
Alright, let’s talk about Adaptive Cruise Control (ACC) acting up. After 25 years in the shop, I can tell you that when your ACC suddenly quits, it’s usually not some mysterious electrical gremlin. Most times, it’s just your vehicle trying to tell you the forward-facing radar sensor can’t see straight. It’s a common issue, especially with how these systems are designed today, and often, the fix is a lot simpler than you might think.
First Signs: What Your Car Is Telling You
Unlike a general check engine light, ACC warnings are pretty specific. You’ll typically see messages pop up on your dash like “ACC Unavailable,” “Front Sensor Blocked,” or “Clean Front Grille Sensor.” These aren’t just suggestions; they’re direct alerts pointing to a visibility problem with that millimeter-wave radar unit. On most cars, you’ll find it mounted right behind the front grille or sometimes integrated cleanly into the center emblem – think the Honda or Toyota logo on some models.
Now, here’s a critical point I see folks miss: ACC isn’t a standalone system. It shares the same forward-sensing hardware with other crucial driver assistance features like Automatic Emergency Braking (AEB) and Forward Collision Warning (FCW). So, when that radar gets blocked or confused, all three systems usually go offline together. That means you’re not just losing the convenience of cruise control; you’re losing key collision mitigation features. That’s a big deal, and it’s why you don’t want to ignore these warnings.
Sometimes, the system doesn’t shut down completely but behaves erratically. Maybe you get “phantom braking” when there’s nothing there, or it fails to detect a vehicle right in front of you. That’s often a sign of a partial obstruction – maybe some slush across the sensor, or a nasty bug splatter on the lens. I’ve seen countless drivers assume the system is totally broken when, in reality, it just needs a good wipe. Trust me, ignoring these warnings means you’re driving without active safety support, and that pretty much defeats the whole purpose of having ADAS in the first place.
The First Step: A Good Look and a Clean Wipe
Before you start thinking about expensive parts, always, always start with a visual inspection. This is your first diagnostic step, and it’s free. Locate that radar sensor – it’s usually a smooth, flat panel, sometimes almost invisible, behind the grille or right in the middle of the brand emblem. Look closely for anything covering it: snow, ice, mud, dirt, even a misplaced toll transponder or a sticker. I’ve seen plenty of drivers unknowingly tape their toll tags right over the sensor, especially on vehicles where the emblem houses the radar. If you spot anything, anything at all, blocking that surface, clean it gently. Then, get back in the car and recheck the system. A quick drive, even just a minute or two, often lets the system reset and confirm the blockage is gone.
When It’s More Than Dirt: Diving Deeper with a Scan Tool
If the sensor looks spotless but that warning message just won’t go away, or if the system is acting really weird, you’re going to need a proper diagnostic scan tool. And I’m not talking about a cheap OBD2 code reader from the auto parts store. Those won’t cut it. You need a factory-level scanner or a high-end aftermarket tool that can talk directly to the radar module and pull those specific ADAS (Advanced Driver-Assistance Systems) diagnostic trouble codes (DTCs).
Here’s what I look for:
- “Radar Obstruction,” “Low Signal Strength,” or “Sensor Blocked” codes: These strongly suggest a visibility issue, even if you can’t see it with the naked eye. Maybe there’s a thin, invisible film of road salt, or condensation inside the lens that’s not obvious.
- “Internal Module Fault,” “Calibration Required,” or “Communication Error” codes: Now we’re talking about something more serious. These point to an electrical problem, a mechanical issue, or the sensor being knocked out of alignment. That’s not dirt; that’s hardware or alignment.
Sometimes, intermittent faults happen. The system works, then it doesn’t. This can be caused by things like accumulating road spray that clears up, or ice melting and refreezing. In these cases, I’ll inspect for thin films of salt or moisture, and if I have the car in the shop, I’ll monitor live radar signal strength with the scan tool during a test drive. A progressive drop in signal strength as you drive often points right back to a blockage that’s building up.
Tech Tip: Why does a bug splat disable a high-tech system? It’s all about how millimeter-wave radar works. These sensors shoot out high-frequency radio waves (usually around 77 GHz) that have to pass cleanly through a plastic cover – essentially a lens – before bouncing off objects ahead. Any material on that surface can distort, absorb, or reflect the signal, even a uniform film of water or salt. It’s enough to degrade performance and trigger a “blocked” fault. Manufacturers know this; many have service bulletins telling owners to keep the sensor area clean. I’ve seen Honda Sensing and Toyota Safety Sense systems explicitly warn that ice or snow on the grille emblem can disable the collision mitigation braking system (CMBS) and ACC. In my experience, over 80% of “ACC not working” cases in winter are resolved with a simple sensor clean – no parts, no calibration, just visibility restored.
The Fix: Cleaning It Yourself or Calling the Pros
How you fix it depends entirely on what the problem is. Most issues fall into two camps: external contamination (something on the outside) or internal failure/damage (something broken inside).
DIY Cleaning: When You Can Handle It
If it’s just external, superficial blockage – dust, light snow, or a water film – it’s a straightforward DIY job. Grab a soft-bristle brush, a microfiber cloth, and some ammonia-free glass cleaner. Gently wipe the sensor cover and the surrounding grille area. A word of caution: never use high-pressure washers aimed directly at the sensor. That forceful water can push moisture into seams or damage mounting points. And absolutely no abrasive cleaners or scrub pads; that plastic lens scratches easily, and even minor surface damage can scatter radar waves and cause problems.
For external, adhered contamination – think packed snow, dried mud, or sticky bug residue – you’ll need a bit more care. Use a plastic ice scraper (never metal!) to gently lift off the bigger debris. For ice, warm (not hot) water works best to melt it gradually. For sticky stuff, dampen a microfiber cloth with isopropyl alcohol and wipe gently. Alcohol evaporates quickly and won’t leave a film, which is exactly what you want here.
Professional Help: When It’s Beyond a Wipe
If you’re dealing with an internal failure – condensation inside the housing, persistent fogging, or a cracked lens – that’s not something you can fix in your driveway. These sensors are sealed units. Once compromised, moisture can corrode the internal electronics or permanently distort the signal. The only solution here is replacement. And this is where it gets tricky, because after installing a new unit, a factory-level scan tool is absolutely required to perform both static and dynamic calibration. Without proper calibration, the system might give you false positives, fail to engage when it should, or even brake unexpectedly. If you’re not ready for that repair, you can usually disable ACC and use conventional cruise control (if your car has it), but remember, you’re giving up AEB and FCW. That’s a significant safety trade-off you need to be aware of.
Confirming the Fix: Post-Repair Validation
After you’ve cleaned or replaced the sensor, you need to confirm the fix. For a simple cleaning, just start the vehicle and drive straight for a minute or two on a clear road. Most systems perform a self-check during this time. If the “Front Sensor Blocked” warning clears and ACC becomes available, you’re good to go. If you happen to have access to a scan tool, verify that any obstruction-related DTCs are now cleared and that the live radar signal strength is reading within normal parameters.
If you’ve replaced the sensor, validation is much more involved. Calibration must be done exactly according to the manufacturer’s procedure. This often includes a static phase (car on level ground, using a target board or alignment tool) followed by a dynamic drive (typically 10–15 minutes on a straight road with clear lane markings and other vehicles to track). Once calibration finishes, always do a verification drive to test ACC engagement, speed maintenance, and AEB response. Some systems will give you a “Calibration Successful” message; others might just require a final DTC check to confirm no new codes popped up. Never, ever skip the road test – without it, you simply can’t be sure the system is functioning safely and correctly.
The Bottom Line: Cost, Risk, and Keeping It Working
The cost of fixing an ACC radar issue can swing wildly. Cleaning it yourself is essentially free, maybe twenty bucks for supplies. But a sensor replacement? That’s a whole different story, and it can definitely strain your budget.
| Repair Type | DIY Cost | Shop Cost | Success Rate | Secondary Risk if Failed |
|---|---|---|---|---|
| Cleaning Obstruction | <$20 (microfiber, alcohol, cleaner) | $0 (if owner does it) | Near 100% for confirmed blockage | None, if done correctly |
| Sensor Replacement | N/A (pro calibration needed) | $800–$2,500 (part, labor, calibration) | ~100% when properly installed and calibrated | Incorrect calibration can lead to false braking or system failure – very dangerous. |
The big decision point comes when diagnostics confirm the radar module itself is faulty. At $800 and up, that’s not a trivial repair. As a general rule of thumb I tell my customers, if the repair cost starts to exceed 20% of your vehicle’s current market value, it’s worth a serious conversation about whether to proceed. Some owners, especially with older vehicles, choose to live without ACC and AEB. But understand that doing so reduces your car’s safety rating and absolutely must be disclosed to any potential buyers. Plus, resale value usually takes a hit. There’s no one-size-fits-all answer here; it’s a personal cost-benefit call based on your driving habits, how much you value those safety features, and your budget.
Keeping It Working: Prevention Is Key
Preventing these ACC issues is simple and, thankfully, cheap. In winter, make it a habit to clear snow and ice from the entire front grille and emblem area before you even start driving – don’t just clear the windshield. A quick brush or wipe takes seconds but prevents a cascade of disabled safety systems. If you’re driving on dirt roads or through deep puddles, give the front end a rinse afterward, paying special attention to that sensor zone.
And here’s another thing I see: avoid aftermarket front-end covers or bras unless they’re specifically designed for your exact model and ADAS configuration. Some of those can sag or shift over time and block the sensor. For ongoing monitoring, treat that first “Front Sensor Blocked” warning as a prompt, not just a nuisance. Pull over at your next safe stop and inspect the area. Incorporate sensor cleaning into your regular car wash routine – a quick wipe with a microfiber cloth can prevent a lot of headaches. If you frequently tow or drive in muddy conditions, consider applying a hydrophobic coating designed for plastic lenses (not glass treatments); it can help shed water and grime. Prevention isn’t just about avoiding repair costs; it’s about making sure your safety systems are there for you when you need them most. And hey, your owner’s manual often has specific guidance on sensor location and care – just like checking your oil, it’s part of modern vehicle maintenance.
