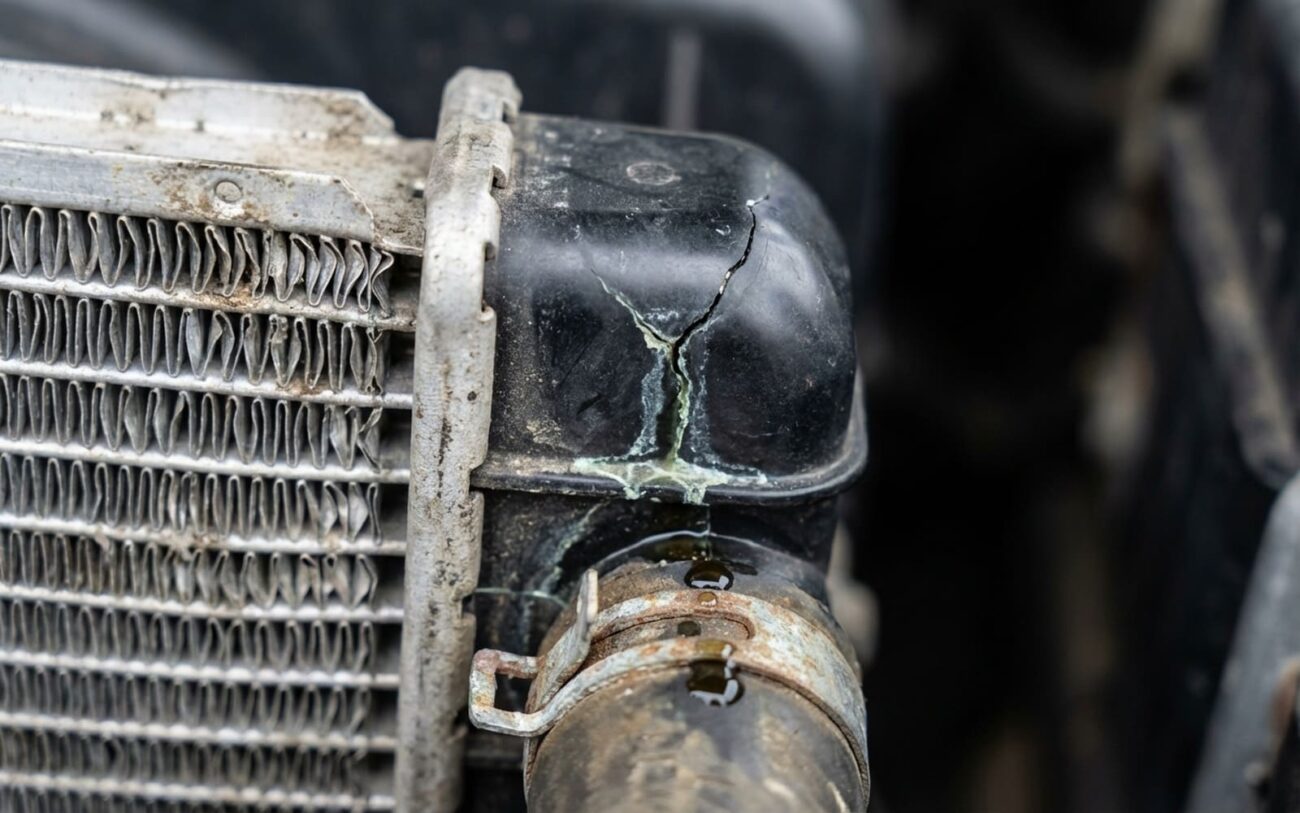
Alright, let’s talk radiators. If you’ve popped your hood because you smelled something sweet or saw a puff of steam, you’re not alone. That’s your cooling system waving a big old red flag, and nine times out of ten, it’s screaming, “I’m losing coolant!” After 25+ years turning wrenches, I’ve seen more overheated engines than I care to count, and the radiator is often the prime suspect. But here’s the kicker: it’s not always the guilty party. Before you jump to conclusions and start pricing a new radiator, let’s make sure we’re actually looking at the problem. Ignoring a real leak leads straight to overheating, and that’s the fast track to a seized engine – a repair bill nobody wants to see.
Symptoms: What Your Car Is Telling You (And What It Might Really Mean)
When a radiator is failing, it usually makes itself known pretty clearly. The most obvious sign is seeing coolant dripping right from the radiator itself – that’s the big heat exchanger up front, behind the grille. You might see it coming from the core (the finned section), the plastic side tanks, or right where those tanks meet the aluminum core. If you’ve got a puddle under the front center of the car and you can trace that drip straight up to the radiator, you’re probably looking at a genuine leak.
Another dead giveaway is steam. If you see steam rising from the grille area, not deep in the engine bay but right up front, that’s a strong indicator. And then there’s the smell: that distinct, sweet, almost syrupy odor, especially when the engine is hot. That’s ethylene glycol coolant evaporating. Combine that smell with visible steam or drips, and I’d bet my toolbox the radiator is failing.
Now, here’s where I see a lot of folks get it wrong: not every coolant issue points to the radiator. If you’re smelling that sweet coolant odor inside the cabin, that’s almost certainly a leaking heater core, not the radiator. Steam rising from the engine valley – that’s the area between the cylinder banks on a V-engine – usually means a bad water pump, a leaky thermostat housing gasket, or a failing upper hose. And if your oil looks like chocolate milk on the dipstick, you’ve got an internal failure, likely a blown head gasket or a cracked block. That’s definitely not a radiator issue, and replacing the radiator won’t fix it. You’re looking at a much bigger problem there.
Diagnosing the Real Leak: My Go-To Methods
So, you’ve got symptoms. Now it’s time to confirm the source. A lot of parts near the radiator can leak coolant and make it look like the radiator itself is toast. Think about the lower radiator hose, transmission cooler lines (if your vehicle has them), or even just the AC drain (which just emits water, not coolant, but can fool you). My gold standard for diagnosis is a cooling system pressure test. It’s simple, effective, and tells you exactly what’s going on.
You remove the radiator cap and attach a hand-operated pressure tester. Then, you pump the system up to its rated pressure – usually somewhere between 13 and 18 psi, which you’ll find marked right on the radiator cap. Once it’s pressurized, you just watch. If you see bubbles or drips coming from the radiator core or its tanks, you’ve confirmed the leak. It’s that straightforward.
Here’s a common trap I see: steam coming from the radiator cap area. If you pressurize the system and steam or coolant escapes from the cap seal, it’s not the radiator that’s bad – it’s the cap itself. A worn cap seal or a weak spring means it won’t hold pressure, allowing coolant to boil off. I always test with a known-good cap or use the tester’s built-in cap to rule this out before condemning a radiator.
And don’t forget about internal leaks. If your coolant level keeps dropping but you never see a puddle on the ground, you might have a crack in an integrated transmission cooler. Many radiators have a small automatic transmission fluid (ATF) cooler built right into one of the tanks. A crack there lets coolant mix with transmission fluid, creating a pink, milky “strawberry milkshake” on your transmission dipstick. That’s bad news for both systems. If a pressure test shows a loss of pressure with no visible external leak, that should prompt you to check the transmission fluid. If it’s contaminated, the radiator is likely the culprit – and now you’ve got two repairs on your hands.
| Symptom | Likely Radiator Issue | Common External Mimics | My Definitive Test to Confirm |
|---|---|---|---|
| Coolant puddle under front center | Crack in core, side tank, or seam failure | Lower radiator hose, transmission cooler line, hose clamp leak |
Clean and dry the area thoroughly, then perform a cooling system pressure test. For stubborn leaks, I’ll add UV dye and use a black light to pinpoint the exact origin. |
| Steam from under hood, front area | Leak from upper tank or hot core section | Failing radiator cap, overflow hose leak, hot water pump weep |
Pressurize the system using the tester’s cap. If steam or drips come from the radiator body itself (not the cap), that confirms the radiator leak. |
| Low coolant with no visible drips | Internal crack in transmission cooler section | Head gasket failure, coolant burning in combustion chamber |
Perform a pressure test. If it loses pressure with no external leak, check the transmission fluid dipstick for contamination (the “strawberry milkshake” look). |
| Seepage at radiator side tank | Plastic-to-aluminum seam failure | Leaking fan shroud bolt, nearby hose connection |
Dry the area completely, then pressure test. Sometimes I’ll dust the area with foot powder or talc – it makes the seepage path really obvious. A borescope can also help get into tight spots. |
Why Radiators Give Up the Ghost
Radiators lead a tough life. They’re right up front, taking a beating from road debris, constantly cycling through extreme heat and cold, and dealing with internal pressure. Over the years, I’ve seen a few common failure points.
Most modern radiators have plastic side tanks, and these are often the first to go. They expand and contract every single time your engine heats up and cools down. After years of that thermal cycling, you start getting microcracks, especially at the inlet and outlet necks where stress is concentrated. Corrosion is another huge factor. Using the wrong coolant, mixing different types (OAT, HOAT, IAT – they don’t play nice together), or skipping your coolant flushes can eat away at the internal fins and solder joints. Externally, road salt and general underhood grime just accelerate corrosion.
Physical damage is obvious but still common. A rock can bend fins, or worse, puncture a cooling tube. Bent fins reduce airflow and cooling efficiency, but they don’t always leak unless the damage is deep. And sometimes, it’s just a manufacturing defect. I’ve seen cases where the bond between the plastic tank and the aluminum core wasn’t fully sealed from the factory. These usually fail within a few years, especially under high-pressure or high-heat conditions. For example, on certain GM trucks from the mid-2000s, I saw recurring issues with plastic radiator tanks cracking at the mounting points due to stress. It’s a known design limitation.
Your Options: From Patch to Full Replacement
This is Professional Territory for a Reason
Fixing radiator leaks involves high temperatures, specialized tools, and critical safety considerations. While some minor fixes are possible, anything beyond basic maintenance often requires professional expertise to ensure safety and long-term reliability. There’s really no safe shortcut for critical cooling system repairs.
What you can actually do about a radiator leak depends entirely on where it is and how bad it is. Let’s walk through the real-world options I see in the shop.
Fin Straightening (Maintenance, Not a Repair)
Epoxy Repair (Professional-Only, Limited Use)
Cooling System Sealants (Temporary / Last-Resort)
Full Radiator Replacement (The Only Real Solution for Most Leaks)
Confirming the Fix: Don’t Skip This Step
You definitely don’t want to drive five miles down the road and see steam again. If you attempted an epoxy repair, the standard is strict: the system must hold full pressure for at least 30 minutes with zero drop, and no visible seepage under UV light. But even that’s not enough. Drive the car through three full heat cycles – cold start to full operating temperature and back down. Then recheck the pressure and look for any dye traces. If it holds, you’re probably good, but in my experience, most epoxy repairs fail within a few months under real driving conditions.
My Checklist for a Successful Radiator Replacement
-
The system should hold pressure at the cap’s rated level after a pressure test.
-
The coolant level in the overflow tank needs to remain stable after multiple drives and cool-downs.
-
You should get strong, consistent heat from the cabin vents – that’s your proof there are no air locks in the heater core.
-
If your vehicle has an integrated transmission cooler, double-check the transmission fluid. It should be clean, red, and free of any milky residue.
-
Tools I always use for this validation: a cooling system pressure tester, an infrared thermometer (to check inlet/outlet temperature difference, which tells you if it’s flowing right), and my eyes on that dipstick.
Cost, Risk, and Making the Call
Here’s the reality: a radiator repair or replacement isn’t usually the cheapest thing, but it’s often less than people fear, especially compared to what happens if you ignore it. The table below gives you a rough idea of what to expect.
| Repair Type | DIY Cost (Materials Only) | Shop Cost (Parts & Labor) | My Take on Success Rate | Major Risk if It Fails |
|---|---|---|---|---|
| Epoxy Repair | $20–$50 | $150–$300 | Less than 50% long-term | Sudden, complete coolant loss leading to severe engine overheating and permanent damage. |
| Radiator Replacement | $150–$500 | $500–$1,200 | Over 95% when done correctly | Air pockets or improper installation causing overheating, but usually fixable without major engine damage. |
| Sealant (Temporary) | $10–$20 | N/A (I wouldn’t charge for this as a “repair”) | Highly variable; often very short-term | Clogged passages leading to chronic overheating, heater core failure, or transmission issues if it gets into the cooler. |
Always consider the overall value of your vehicle before authorizing expensive repairs. Sometimes, it’s just not worth it.
Here’s a rule I use in the shop: if a professional radiator replacement costs more than 40% of the car’s private-party value, you need to think hard about it. Is the rest of the vehicle in good shape? Are there other known issues lurking? Also, if this is the second or third radiator failure you’ve had, you need to dig deeper. Repeated failures can point to an underlying problem – like chronic over-pressurization from a failing head gasket, or a cooling system that can’t vent properly. A pressure test on a cold system that shows a rapid rise could indicate combustion gases entering the coolant, which is a sign of a much bigger issue, possibly a head gasket problem or a cracked cylinder head. That’s a whole different ballgame.
Keeping Your Radiator Healthy for the Long Haul
Prevention beats repair every single time, especially with something as critical as your cooling system. The best thing you can do is use the correct coolant type – no mixing, no substitutions. Different chemistries (OAT, HOAT, IAT) react poorly when combined, leading to sludge and internal corrosion. Stick to a 50/50 mix with distilled water for proper freeze and boil-over protection.
Make visual checks part of your routine. Every oil change, take a quick look at the radiator. Are the fins clogged with bugs or road debris? That reduces airflow and forces the system to work harder. Are there any stains or weeping near the tank seams? Even a small seepage can signal an impending crack. Check the overflow tank monthly – the coolant should be clean and bright, not brown or murky.
Once a year, I recommend a professional cooling system pressure test. It’s a simple check that can catch weak hoses, failing caps, or slow seepage before it becomes a roadside breakdown. And if you drive in harsh conditions – extreme heat, heavy stop-and-go traffic, or salty roads – stay on top of coolant flushes per the manufacturer’s schedule. A well-maintained cooling system is one of the best investments you can make in your engine’s longevity.
