Spotting a Dying Water Pump: My Go-To Indicators
After 25 years turning wrenches, I’ve seen more than my fair share of dead water pumps. They don’t just quit on you silently, though. Your car usually gives you some pretty clear warnings, if you know what to look for. The big three I always check are coolant leaks, strange noises from the front of the engine, and any physical play in that pulley. Overheating usually comes later, and it’s almost always a symptom of one of these other issues, not the first sign.
Coolant Leaks: The Dripping Truth
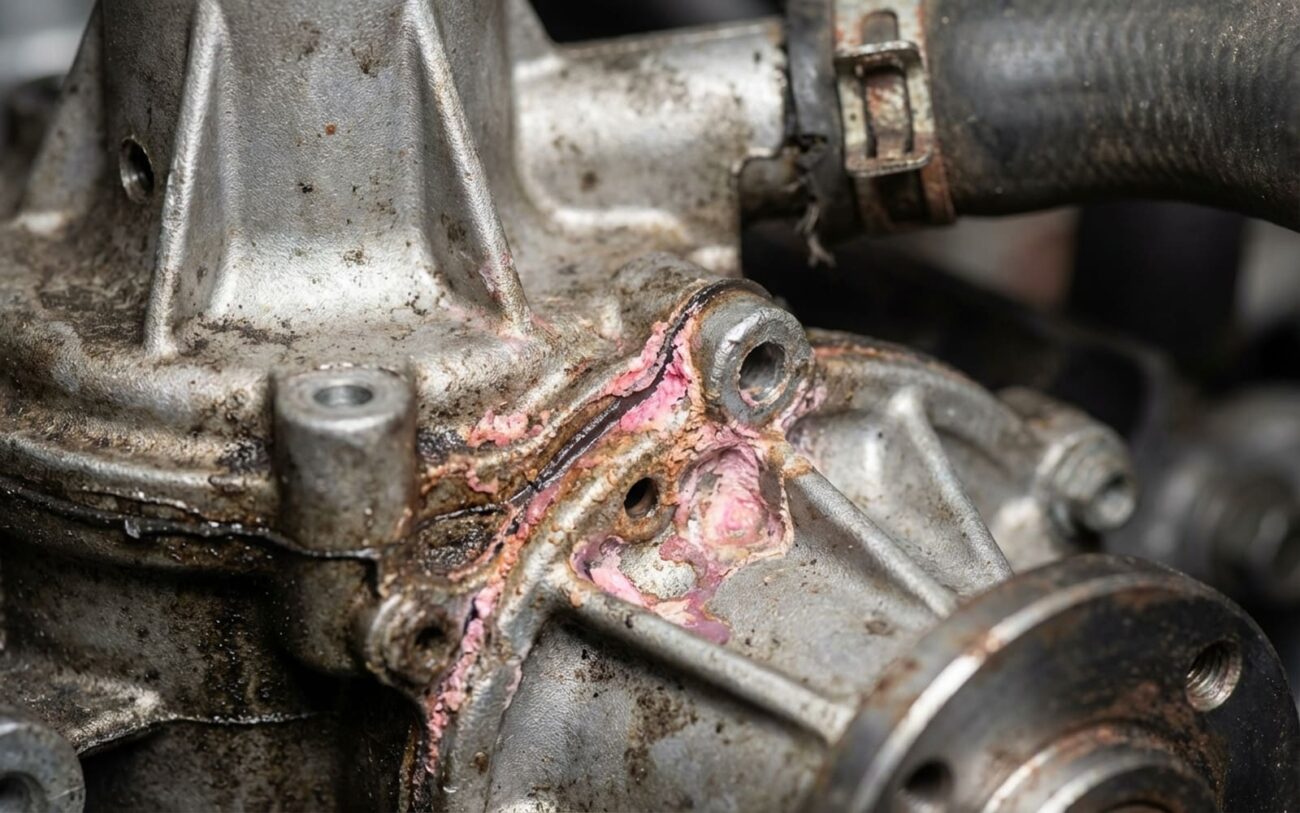
The most common giveaway is a coolant leak. Most pumps have a little hole, we call it a weep hole, right at the bottom. It’s there to let coolant escape if the internal shaft seal starts to fail, keeping that fluid from wrecking the bearing. If you spot fresh coolant dripping or pooling from that weep hole, that seal’s definitely gone. Another sign is a fine mist or spray pattern around the pulley after you’ve been driving – that’s the leaking seal flinging coolant outwards as it spins.
Now, don’t jump to conclusions. Just because there’s coolant near the pump doesn’t mean the pump itself is bad. I’ve seen plenty of leaks run down from a loose hose, a cracked thermostat housing, or even a leaky radiator cap. And if the leak is coming from right between the pump and the engine block, that’s usually a failed mounting gasket, not the pump. We’ll talk about how to really pinpoint it in a bit.
Noises: What to Listen For
Next up are noises. A worn water pump bearing usually makes a high-pitched whirring, humming, or grinding sound. It’ll get louder as you rev the engine, since the pump is belt-driven. The tricky part? A lot of other components can make similar noises – idler pulleys, tensioners, the alternator, power steering pump. That’s why you can’t just guess; you need to localize that sound properly.
Pulley Play: A Serious Warning
This one’s serious: physical play in the pulley. With the engine off and the drive belt removed, that pulley should spin smooth as silk, with absolutely no side-to-side (radial) or in-and-out (axial) wobble. If you feel any play, that bearing is shot. And if you ever see that pulley wobbling while the engine’s running, shut it down immediately. A seized water pump can shred your timing belt, especially on an interference engine, and that means bent valves and a repair bill that’ll make your eyes water.
Overheating: The End Result
Finally, you might see overheating without any obvious leaks. This can point to a failed impeller. That’s the internal rotor that actually pushes coolant through the system. If it’s cracked, corroded, or has just spun loose from the shaft, coolant stops circulating, even if your radiator’s full. But remember, overheating can also be a stuck thermostat, a clogged radiator, or air trapped in the system. So, don’t assume it’s the pump until you’ve checked for proper flow.
Diagnosing the Real Problem: Ruling Out the Imposters
Look, I’ve seen too many people replace a water pump when the real problem was something else entirely. Leaks and noises around the front of the engine are easy to misdiagnose. Before you spend a dime on parts, you need to confirm what’s actually going on. Here’s how I go about ruling out the look-alikes.
Pinpointing Coolant Leaks
For a coolant leak, the first thing I do is clean the whole area thoroughly with some brake cleaner. Get it bone dry. Then, I hook up a cooling system pressure tester to the radiator neck and pump it up to the cap’s rating – usually 13 to 18 psi. Let it sit for 20 minutes and watch. If you see a steady drip from the pump’s weep hole, that’s a confirmed internal seal failure. If it’s leaking between the pump and the engine block, you’re looking at a bad mounting gasket. And if it’s coming from higher up, well, then you trace it back to the source – hose, thermostat housing, whatever.
Localizing Engine Noises
When it comes to noise, a mechanic’s stethoscope is your best friend. Put it right on the water pump housing (not the pulley itself, that can be misleading). If the loudest noise is coming from there, it’s a strong indicator of a worn bearing. To really confirm, I’ll remove the serpentine belt and run the engine for just a minute or two (don’t do this for long, you’ll overheat). If the noise disappears, you know it’s one of the belt-driven accessories. Then you just put the belt back on and re-check each component with the stethoscope until you find the culprit.
Uncovering Overheating Causes
Overheating without a leak is trickier. First, I’ll do a flow test. With a cold engine, pull the radiator cap (carefully, if it’s hot, don’t!) and start the car. As it warms up, you should see coolant moving, maybe a little swirl. If you see good, strong flow once the thermostat opens, the pump’s probably okay. If it’s just sitting stagnant, or barely moving, that suggests an impeller issue or a stuck thermostat. Another trick is to use an infrared thermometer. Once the engine is hot, check the temperature of the top and bottom radiator hoses. If there’s less than about an 18°F (10°C) difference, it means coolant isn’t circulating properly through the radiator, which points to a flow problem. If all signs point to the pump, you’ll confirm it once you pull the pump and inspect the impeller.
What Actually Goes Wrong Inside the Water Pump?
So, you’ve diagnosed the pump. But what actually failed inside? Water pumps are sealed units, and when they go, it’s usually due to a breakdown of internal parts or the coolant itself. Knowing the root cause helps you prevent it from happening again.
Bearing Failure
The most common failure point is the sealed bearing. Over time, with all that heat and vibration, the grease dries out or just breaks down. Once that happens, the bearing starts to wear, you get that noise, and then you get play in the shaft. That wobble accelerates seal failure and, eventually, can lead to the whole thing seizing up.
Mechanical Seal Breakdown
Then there’s the mechanical seal. This is the barrier between the coolant and the bearing. When it wears out or cracks – usually due to age, debris in the coolant, or using the wrong coolant chemistry – coolant starts to seep through. That’s what the weep hole is for; it’s designed to drain that coolant externally, protecting the bearing. So, a steady drip from that weep hole is a dead giveaway that the internal seal has failed.
Impeller Degradation: The Silent Killer
Impeller degradation is a silent killer. A lot of modern pumps use plastic impellers to save weight and cost. If you’re using the wrong coolant type, or if it hasn’t been changed in years, that coolant can turn acidic. I’ve seen it eat away at aluminum housings and literally dissolve plastic impellers over time. Even metal impellers aren’t immune; cavitation – where vapor bubbles form and collapse – causes pitting and erosion, killing flow efficiency. And don’t forget electrolytic corrosion, caused by stray electrical currents in the cooling system, which can rapidly chew through aluminum parts, especially when you have dissimilar metals without proper corrosion protection.
Other Internal Issues
Sometimes, it’s just a material defect. I’ve seen pump housings with casting porosity – tiny voids in the aluminum – that develop into leaks months or even years after installation. And rarely, an impeller isn’t pressed onto the shaft correctly, so it starts spinning independently, and boom, no circulation. But let’s be clear: a leak from the pump’s mounting surface isn’t the pump’s fault; that’s a gasket or installation issue. Same for a leaky hose. Replacing the pump won’t fix those.
Getting it Fixed: Repair Approaches
Alright, you’ve figured out the problem. Now, how do we fix it? The repair approach depends heavily on where the pump is located and what kind of failure you’re dealing with.
Externally Mounted, Serpentine Belt-Driven Pumps DIY-FEASIBLE
Internally Mounted, Timing Belt-Driven Pumps PROFESSIONAL-ONLY
Non-Mechanical Failure NON-REPAIRABLE → REPLACE
Temporary Fixes TEMPORARY / LAST-RESORT
Confirming the Job is Done Right
Alright, the new pump is in. But the job isn’t done until you’ve verified the repair. You don’t want to find out it’s still leaking or overheating when you’re 50 miles from home.
First, refill the coolant correctly. Use distilled water and the exact coolant type specified in your owner’s manual – mixing types can cause gel formation or corrosion. I always use a spill-proof funnel or a vacuum filler to help purge air. Trapped air is the number one reason for overheating after a water pump replacement.
Next, I’ll do a pressure test. With the engine cold, hook up your cooling system pressure tester and pump it up to the radiator cap’s rated pressure (usually 13–18 psi). Let it sit for at least 20 minutes. If you lose more than 1 psi, you’ve still got a leak somewhere – maybe a bad gasket, a loose hose clamp, or the new pump isn’t seated right.
Then, start the engine and let it warm up. Watch that temperature gauge; it should climb steadily and then stabilize in the normal range. Visually inspect the new pump, especially that weep hole. It should be bone dry. Any seepage now means the new pump is defective or got damaged during installation.
For timing-driven pumps, you’ve got an extra step. Use a good scan tool to monitor live data. Coolant temperature should rise smoothly, and you shouldn’t see any camshaft or crankshaft correlation codes. Those codes pop up if your timing is off by even a single tooth. I’ll often recheck the timing marks after the engine has gone through a few heat cycles, just to be sure – thermal expansion can sometimes shift things slightly.
Finally, take it for a good road test. Drive it under load – climb a hill, run the A/C, get it up to highway speed. Make sure the temperature stays rock-solid. The heater should blow hot air consistently. If all of that checks out, you’ve got a solid repair.
Cost, Risk, and When to Walk Away
Let’s talk money and risk. Fixing a water pump isn’t always cheap, but it’s usually less than a new engine. The real question is, when is it just not worth it?
| Repair Type | DIY Parts Cost | Professional Shop Cost | Repair Success Rate | Risks If Repair Fails |
|---|---|---|---|---|
| Accessory-belt-driven pump replacement | $50 – $150 (pump, gasket, coolant) | $300 – $600 | High (>95%) when proper procedure is followed | Unnoticed coolant loss leads to overheating, potential head gasket or engine damage. |
| Timing-belt-driven pump replacement (with full timing kit) | $200 – $500 (timing belt, tensioner, water pump, coolant) | $800 – $1,800 | High only if timing alignment is perfect; one tooth off can cause major issues | Incorrect timing can result in no-start, misfires, or catastrophic piston-to-valve contact in interference engines. |
The financial decision gets tricky on older vehicles, especially. My rule of thumb is this: if the professional repair cost is more than about 40% of what the car is worth privately (check KBB or NADA), you really need to think hard about it. Spending $1,500 on a car worth $4,000 might not be the smartest move, especially if other big components like the transmission or suspension are also getting old. Sometimes, it’s better to cut your losses and put that money towards a newer, more reliable ride.
Keeping it Running: How to Prevent Water Pump Failure
The best repair, in my book, is the one you never have to do. Most water pump failures are preventable with some basic maintenance and a little attention.
Use the Right Coolant
First and foremost: use the correct coolant. Your owner’s manual isn’t just suggesting a type; it’s telling you exactly what to use. Honda OAT, Toyota Super Long Life, Ford Orange, GM Dex-Cool – these aren’t interchangeable. Using the wrong one can kill the corrosion inhibitors, leading to rapid impeller and housing degradation. And always, always mix with distilled water, 50/50. Tap water has minerals that cause scaling and promote electrolysis.
Timing Belt Service: Do it All at Once
If your vehicle has a timing belt, replace the water pump at the same time. The labor to get to it is almost identical, and the added cost of the pump itself is tiny compared to doing the job twice. I’ve seen too many customers replace a timing belt at 90,000 miles, only to come back a year later with a seized pump and a shredded belt. That second repair always costs more than just doing both together the first time around.
Regular Inspections and Listening
For early detection, make it part of your routine. Every few months, pop the hood and take a good look around the water pump. Look for any white, green, or pink crust – that’s dried coolant, a sure sign of a slow leak. Listen for any new high-pitched noises, especially during a cold start. And if you ever smell that sweet coolant smell or see steam from the engine, shut it down immediately and check things out.
Monitor Your Temperature Gauge
Finally, keep an eye on that temperature gauge. A needle that starts creeping up on hot days or when you’re working the engine hard can be an early warning sign of reduced coolant flow, possibly from a failing pump. Catching it early can save you from being stranded and facing a much bigger repair bill.