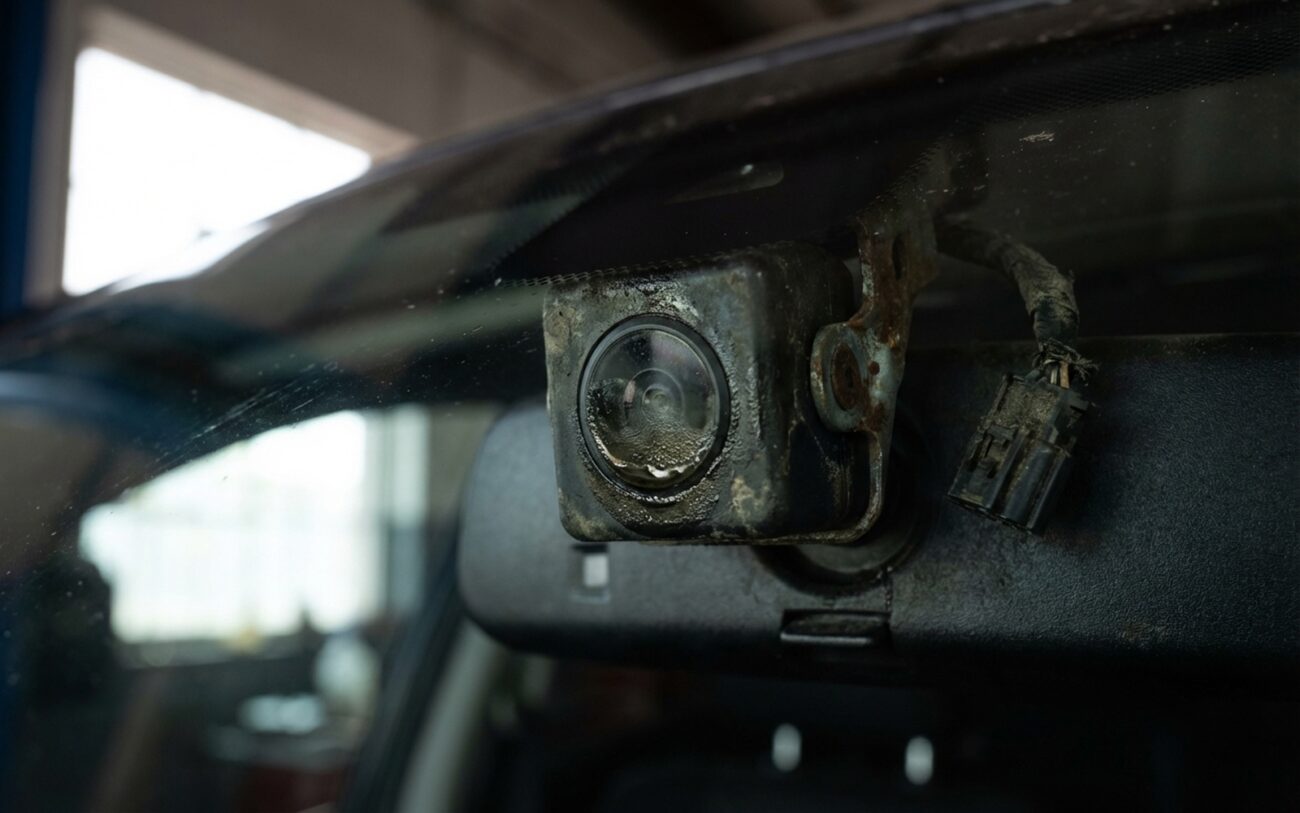
Automatic high beams should make driving safer. But when they fail, they don’t just stop working—they can turn your car into a hazard. I’ve pulled over more than one customer in my bays because their AHB system was blinding oncoming traffic, and they had no idea. That’s not a glitch. That’s a safety-critical failure. And it’s more common than you think.
Symptoms That Demand Attention
If your high beams aren’t dipping when oncoming traffic approaches, that’s the reddest flag there is. I don’t care if the system works fine behind other cars—ignoring oncoming headlights means the camera isn’t classifying objects correctly. That’s not a software hiccup. That’s a system operating in a degraded state, and it’s dangerous.
Another frequent issue: erratic behavior. Turning on high beams in a well-lit city? That tells me the ambient light sensing is off. The system should know better. Or cutting out for a reflective sign but missing a real car? That’s a perception failure. Either the camera’s input is compromised, or the algorithm is misclassifying data.
And here’s one people ignore: the “Automatic High Beams Unavailable” message popping up more often. That’s not just a warning—it’s a cry for help. Usually means the lens is dirty, the camera’s overheating, or internal electronics are flaking out.
Rule Out the Obvious First
Before you start blaming the camera or control module, check the easy stuff. I’ve seen techs replace $1,200 cameras when all it needed was a windshield clean. The camera “sees” through a small patch just above the rearview mirror—about the size of a credit card. If that’s coated in road film, bug guts, or wax residue, it’s blind. And no, the rest of the windshield being clean doesn’t matter. Just that spot.
Also check headlight aim. If your beams are pointed too high, they’ll reflect off the camera’s input and confuse the system. Happens a lot on lifted trucks or cars with worn suspension. It’s not an AHB fault—it’s a mechanical alignment issue.
And don’t forget aftermarket bulbs. I’ve had customers swap in cheap LED or HID kits, and the scatter pattern floods the camera’s field of view. The system thinks everything’s a headlight. Bad news.
Diagnostic Workflows That Actually Work
Start with a scan tool—factory-level, not OBD2. Pull live data from the forward-facing camera. Look at “Object Classification.” When an oncoming car approaches, it should read “Oncoming Vehicle” with high confidence. If it says “No Object” or “Unknown,” the camera isn’t seeing right. Could be dirty, damaged, or misaligned.
For city activation issues, monitor ambient light readings in lux. Normal daylight is 10,000–25,000 lux. Night street lighting? Around 10–50 lux. If the system thinks it’s 200 lux at night, something’s wrong—either the twilight sensor, the BCM, or the camera’s internal light meter.
Erratic behavior? Grab an oscilloscope. Check the camera’s power supply. I’ve found voltage ripple from a failing alternator or bad ground that never set a DTC but wrecked camera performance. Intermittent drops below 10V will make the system glitch out.
Root Causes: What Actually Fails
Three things go wrong most often.
First: sensor degradation. Thermal cycling—daily heat and cold—wrecks the lens coating over time. I’ve pulled cameras apart and found delamination between lens layers. Looks like fog, but it’s not. CMOS sensors degrade too, especially in Toyotas and Fords from 2015–2019. Less sensitivity in low light means it misses distant headlights.
Second: software bugs. These systems use neural networks to classify objects. If the firmware has a flaw, it might ignore real cars or react to reflections. I had a 2017 Camry that kept turning off high beams near overpasses—turned out a TSB had a patch for exactly that. One update, problem gone.
Third: internal electronics. The camera module has a processor, voltage regulators, and CAN bus chips. Heat and vibration kill them. A failing regulator can starve the sensor, causing intermittent faults. When that happens, the system defaults to safe mode—no AHB, no warnings, just silence.
Repair Paths: What You Can and Can’t Do Yourself
Cleaning the windshield? [DIY-FEASIBLE] Use isopropyl alcohol and a lint-free cloth. Focus on that small rectangle above the mirror. Don’t use waxes or silicon-based cleaners—they leave residue. I keep a dedicated microfiber just for that spot.
Replacing the camera? [PROFESSIONAL-ONLY] It’s behind the windshield, usually near the mirror base. You’ll need to remove trim, unclip wiring, and possibly detach the mirror. Torque specs on mounting bolts are tight—7 to 10 Nm. Overtighten, and you crack the housing. But the real killer is calibration. Move the camera even 0.5 degrees, and it’s blind. Factory scan tool required. No shortcuts.
Software update? [PROFESSIONAL-ONLY] Even if the file is free, you need OEM software to flash it. And yes, failed flashes happen. I’ve seen a botched update brick a module, forcing a replacement. So if there’s a TSB, let the dealer handle it.
And if you’re not fixing it? [TEMPORARY] Disable AHB in the menu. But don’t forget—now you’re responsible for every beam switch. On long drives, fatigue sets in. I’ve had customers leave high beams on for miles, not realizing. That defeats the whole point of the system.
Validation: Don’t Skip the Test Drive
You’re not done when the part’s in. You’re done when it works.
First, check the scan tool. Confirm “Calibration Complete” and no stored codes. Then hit the road—nighttime, dark two-lane highway. The system should dip high beams at least 200 meters from oncoming traffic (per SAE J1211). If it waits until 50 meters, it’s too late.
Watch live data during the drive. “Object Detected” should trigger, and “Classification” should read “Oncoming Vehicle.” If it’s blank or says “Unknown,” the camera isn’t seeing right. Recalibrate or suspect a bad module.
Cost vs. Value: When to Walk Away
| Repair Type | DIY Cost | Shop Cost | Success Rate | Secondary Risk if Failed |
|---|---|---|---|---|
| Windshield/Camera Lens Cleaning | <$10 | $50–$100 | High, if contamination was the sole issue | None. Worst case, you waste time and cleaner. |
| Camera Module Replacement & Calibration | $500–$1,500 (OEM part only) | $750–$2,000 (parts + labor + calibration) | Very high, if done correctly with proper tools | Improper calibration leads to recurring issues, requiring a redo and more labor. |
| Control Module Software Update | Often $0 if covered under warranty or TSB | $100–$200 (dealer labor) | Medium to high, especially if a documented fix exists | Rare, but a failed flash could corrupt the module, necessitating replacement. |
Here’s my rule: if the repair costs more than 20% of a standard headlight assembly, just disable the system. For example, if a non-AHB headlight is $600, and the camera fix is over $120, you’re overpaying for a convenience. Turn off AHB in the menu. Manual control isn’t fancy, but it’s safe, legal, and won’t drain your wallet.
Prevention: Keep It Working Before It Breaks
Windshield replacement is the biggest threat to AHB systems. Never use generic glass. It might fit, but the optical clarity in the camera zone? Often off. I’ve had customers come in after a “cheap” windshield job, and the system never worked right. The glass had micro-distortion or the mounting bracket didn’t align. Recalibration failed every time.
Use OEM or ADAS-approved glass. And make sure the shop recalibrates afterward—static calibration on a target board, not just a drive. Skipping it is like driving with out-of-alignment tires and wondering why the car pulls.
Monthly, check the camera’s field of view. Look for stickers, haze, or buildup. Clean it like you would a lens on a DSLR—gently, with the right tools. And if you see warning messages, don’t wait. A $10 clean today can save a $1,500 camera tomorrow.
