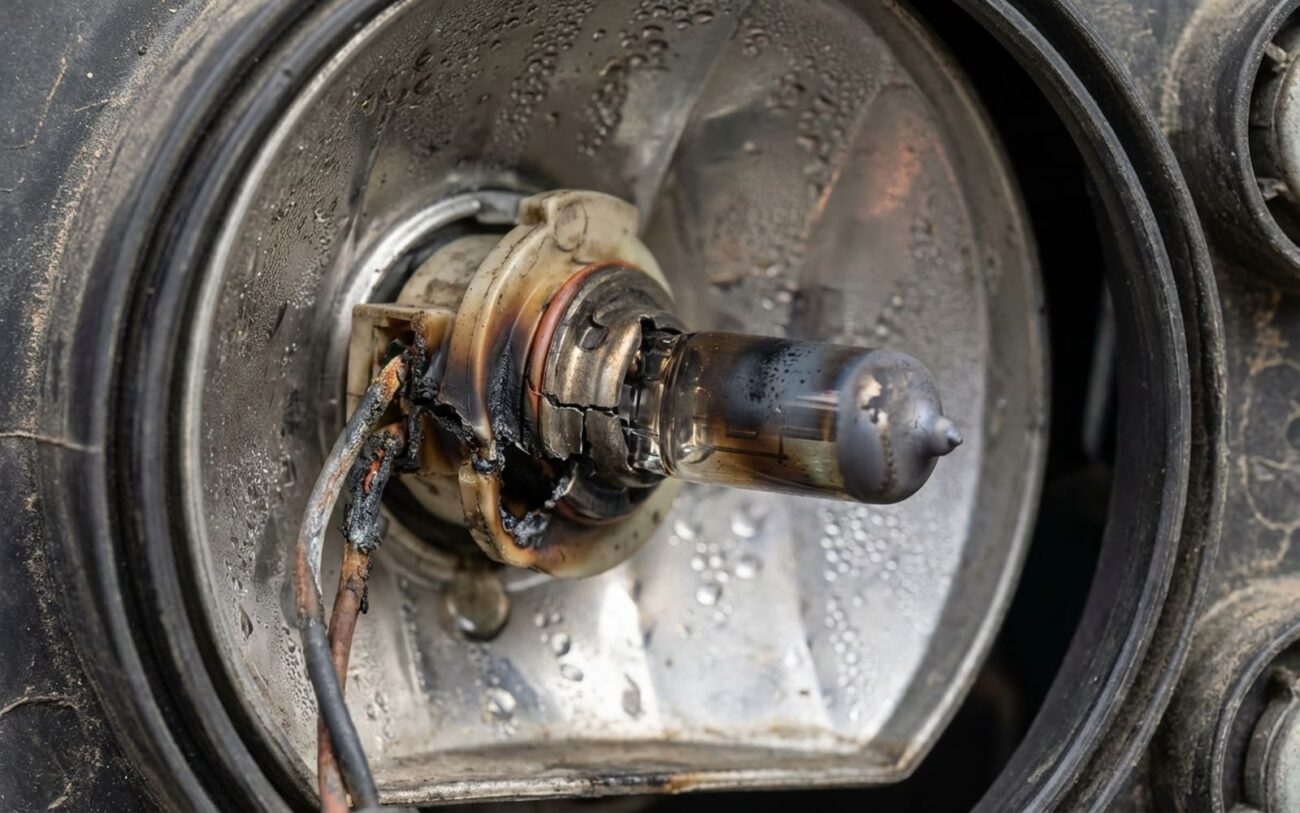
If you’re changing headlight bulbs more than once a year, something’s wrong. And no, it’s not because you bought cheap bulbs — though that doesn’t help. I’ve torn down thousands of headlight assemblies over 25 years, from beat-up Corollas to high-dollar German sedans, and I can tell you this: premature bulb failure is a symptom, not the problem. It’s your car trying to talk to you. Usually, it’s screaming about overvoltage or moisture. Ignore it, and you’ll burn through bulbs, fry electronics, or end up driving blind in the rain.
What the Dead Bulb Is Telling You
Before you plug in another bulb, look at the one that failed. I mean really look. The filament and glass don’t lie.
If the glass is clean but the filament is melted, sagging, or formed into a little ball — like it collapsed in on itself — that’s overvoltage damage. Plain and simple. The alternator’s voltage regulator is supposed to hold system voltage between 13.8 and 14.6 volts. When it fails, voltage climbs — often to 15.5V or higher, especially above idle. That extra juice forces too much current through the filament. It overheats, tungsten vaporizes, and the bulb dies in weeks instead of years.
And here’s the part most people miss: if your bulbs are cooking from overvoltage, so are your ECM, cluster, and infotainment. I’ve pulled PCMs out of Camrys with charred circuit boards — traced back to a $40 alternator that wasn’t regulating. Repeated bulb failure was the first clue. Don’t wait for the check engine light.
If the bulb’s glass is blackened, milky, or has a frosty film inside, moisture got in. Halogen bulbs rely on a sealed chemical cycle: tungsten evaporates, then redeposits on the filament thanks to halogen gas. Introduce water or oxygen, and that cycle breaks. Tungsten coats the glass instead, weakening the filament until it snaps. This almost always means the housing seal is compromised — or the bulb’s own O-ring failed.
How to Diagnose It Like a Pro
Stop guessing. Test.
First, grab a digital multimeter — the kind with Min/Max recording. You need it because voltage spikes can be brief and hard to catch. Set it to DC voltage, backprobe the headlight socket (with the bulb unplugged), and run the engine at 2,000 RPM. Turn on the headlights, A/C, rear defroster — load it up.
If you see anything above 14.8V, you’ve got overcharging. Could be a bad voltage regulator, failed alternator diode, or — on older GMs and Fords — a failing PCM that’s sending bad regulation signals. Below 12.8V? That’s not a bulb issue — that’s a ground problem or weak circuit. Either way, your bulbs are getting abused.
Now, look at the housing. Remove the bulb and shine a flashlight through the lens. Any fog, water droplets, or condensation inside? That’s a failed seal. But don’t stop there — check the back of the housing. Is there oily residue around the bulb base? That’s not water. That’s degraded O-ring material or engine oil from a blown valve cover gasket leaking into the headlight cavity. I’ve seen that on 2012–2015 BMWs more times than I can count.
And don’t forget the breather tube. Most modern housings have a small rubber vent near the bottom. If it’s clogged with mud or disconnected, pressure can’t equalize. The housing “breathes” in moist air every time it cools down. That’s a slow death sentence for bulbs.
What Actually Fails — And Why
Bulbs die from bad manufacturing, sure. But it’s not the main issue. I’ve tested no-name halogens side-by-side with Philips — the cheap ones often have uneven filament winding, weak support wires, or inconsistent gas fill. That knocks 30–40% off their lifespan. But even a perfect bulb won’t last long if your voltage is spiking or your housing is weeping.
Headlight seals fail from thermal cycling and UV exposure. OEMs use butyl rubber or hot-melt adhesive to bond the lens to the housing. After five years of sun, cold, and heat cycles, that seal dries out, cracks, and pulls away. It’s not sudden — it’s a slow leak that lets humidity in. Turn the lights on, it heats up. Turn them off, it cools and sucks in damp air. Repeat for a few months, and you’ve got a swamp inside.
The bulb’s O-ring is a separate issue. It’s a rubber gasket that seals the back of the housing where the bulb plugs in. If it’s cracked, missing, or hardened, water gets in from under the hood — especially during car washes or heavy rain. That’s an easy fix: replace the O-ring (they’re cheap) and smear a little dielectric grease on it. But if the perimeter seal is gone, you’ve got a bigger problem.
How to Fix It — For Real
Overvoltage? Fix the source.
Don’t just replace the alternator — test it first. I’ve seen good alternators blamed because the ground strap was corroded. Check the battery terminals, ground connections at the chassis and engine block. Clean them. Retest.
If voltage still spikes, replace the alternator with an OEM-spec or high-quality reman unit. Skip the $80 Amazon special — I’ve had three fail within six months on the same Honda. And yes, I keep the cores. They’re all the same failure: undersized diodes and fake regulators.
Moisture in the housing? You’ve got options — but pick wisely.
- Reseal it (if you’re good with your hands): Heat the perimeter to about 200°F with a heat gun, carefully separate the lens with plastic trim tools, clean off all old sealant with isopropyl alcohol, then apply fresh butyl tape or high-temp urethane. Clamp it, let it cure 24 hours. I’ve done this on dozens of Hondas — it works, but only if you’re meticulous. One gap, and you’re back to square one.
- Replace the housing: If the lens is cracked, the reflector’s fogged, or the vent is damaged, just swap it. New assemblies run $150–$600, and they’re plug-and-play. Many aftermarket units now have better optics than OEM. On 2010–2016 Accords, I won’t even bother resealing — the housings are junk from the factory.
- Desiccant packs? Forget it. I’ve seen guys shove silica gel bags in through the bulb hole. It might help for a month — then the pack saturates, melts, or sheds dust onto the reflector. I pulled one apart last month — looked like someone sprinkled chalk inside. Ruined the beam pattern.
Just bad bulbs? Easy fix. Stick with Philips or Osram. And for God’s sake, wear gloves. Skin oils on the quartz glass create hot spots. I’ve had bulbs crack within an hour from that. Use a lint-free cloth if you don’t have gloves.
Verify the Fix — Or It Didn’t Happen
You think it’s fixed? Prove it.
After replacing an alternator, retest voltage at the headlight socket under real-world loads: idle, 2,000 RPM, with everything on. Use Min/Max to catch spikes. If it stays between 13.8 and 14.6V, you’re good.
After resealing a housing, do a water test. Spray it with a garden hose — gently — for 5 minutes. Let it dry 24 hours. Peek inside. No fog? You nailed it. Still wet? You missed a spot.
And if you just swapped bulbs? Wait. A quality halogen should last 500–1,000 hours. If it dies in six weeks, go back. Check voltage. Check for moisture. Don’t keep throwing bulbs at it — you’re missing the real issue.
What This Costs — And When to Just Replace It
| Repair Type | DIY Cost | Shop Cost | Success Rate | Secondary Risk if Failed |
|---|---|---|---|---|
| Headlamp Housing Reseal | $25–$40 (sealant, cleaning supplies) | $250–$400 (1.5–2.5 hours labor) | 70% (highly dependent on technique and housing condition) | Ongoing moisture leads to corroded connectors, damaged reflectors, or bulb rupture. May require full housing replacement later. |
| Headlamp Housing Replacement | $150–$600 (aftermarket or OEM) | $500–$1,200 (part + labor) | 100% (with new, intact housing) | Negligible if installed correctly. New housing includes fresh seals and often improved optics. |
Here’s my rule: if the labor quote for resealing is more than 40% of a new housing’s cost, just replace it. You save time, get better light output, and don’t have to worry about it again. On newer cars with projectors and LED-ready optics, it’s even more worth it.
Keep It From Happening Again
To Prevent Recurrence
-
Check your charging voltage once a year. A 10-minute multimeter test can save you hundreds in bulb replacements and electrical damage.
-
Inspect headlights during oil changes. Look for fog, water, or oily residue. Clean and regrease the bulb O-ring every time you replace a bulb — dielectric grease is cheap insurance.
-
Buy quality bulbs. Philips or Osram. No exceptions. And install them clean — skin oils kill bulbs faster than you think.
