You detail your car’s interior—maybe you even paid good money for it—and suddenly half the car stops working. Power seats dead. Climate fan gone. Warning lights all over the dash. I’ve pulled into my shop more than once to find a customer sitting in their car, key in hand, just hoping it’ll magically come back to life. It doesn’t. And nine times out of ten? Water got into a control module. Not the switches. Not the motors. The actual brain behind the system.
When Everything Dies at Once, Think Water in the Modules
If your seat, HVAC, door locks, and memory settings all go dark after a cleaning, don’t start pulling apart door panels. You’re not dealing with a single failed component. You’re dealing with water intrusion into one or more electronic control modules—usually the body control module (BCM), seat control module, or HVAC module. These aren’t waterproof. They’re plastic boxes full of delicate circuitry, tucked under seats, behind kick panels, or near the firewall. And yes, I’ve seen them fail from a detailer’s steam wand getting too close.
The big red flag? Multiple unrelated systems failing simultaneously. That’s not a blown fuse. That’s a shared failure point—usually a CAN bus or power ground compromised by water. And if you’re getting U-codes (communication errors) across several modules, that’s your smoking gun. But here’s what most people get wrong: they yank out the module and plug in a new one. Bad move. If there’s still a short in the harness or connector, you’ll fry the replacement the second you power it up. Seen it happen. Twice last month.
How to Diagnose This Without Guessing
Start with the basics. Grab a digital multimeter and a scan tool that can talk to body and chassis modules—not just engine codes. Cheap OBD2 readers won’t cut it. You need to see if modules are online, what DTCs they’re throwing, and whether they’re getting stable power.
First, check fuses. But don’t just look at them—test for continuity. I’ve pulled fuses that looked fine but were cracked internally. If the fuse is good, move to the module connector. Back-probe the power and ground pins with the ignition on. You should see 12–14V. If it’s below 10.5V, you’ve got a wiring or ground issue upstream. Don’t waste time on the module yet.
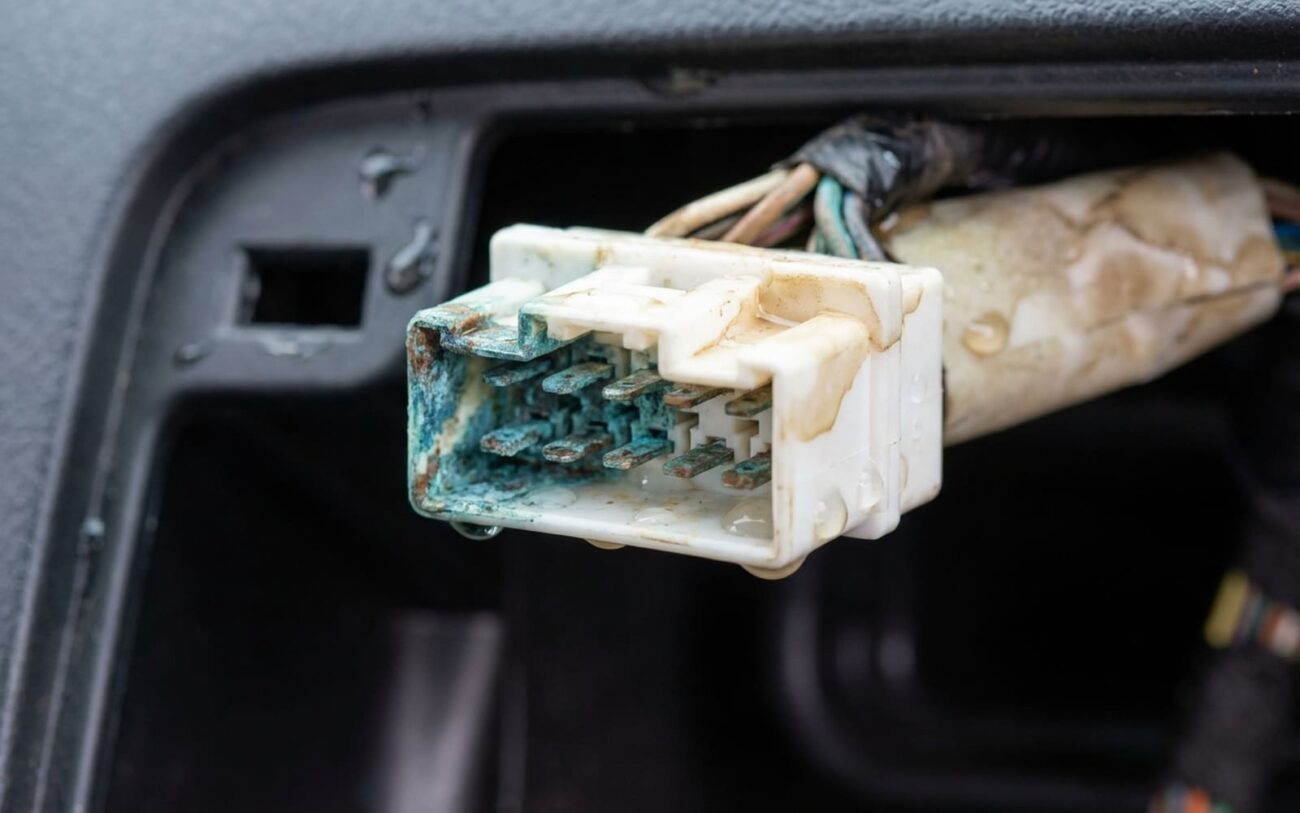
Next, scan the network. If the seat or HVAC module shows as “Not Present,” but power and ground are solid, the module itself is likely toast. But if it’s online and reporting garbage data—like 0% fan speed when the blower should be screaming—check the connector. Pull it apart. Look for white crust, green corrosion, or moisture trails. That’s electrolytic damage. Water got in, left minerals behind, and now it’s shorting things out.
For CAN bus issues (multiple U-codes), measure resistance between CAN high and CAN low at the OBD2 port. Should be around 60 ohms. If it’s way lower—say 20 or 30—you’ve got a shorted module. Now, unplug suspect modules one at a time (seat, HVAC, door) and recheck. When the resistance jumps back to 60, you’ve found the culprit. I do this on BMWs and Mercedes all the time. Works every time.
What Water Actually Does Inside a Module
It’s not just “water kills electronics.” There’s a process. Tap water, steam, even bottled water—they all have minerals. When that bridges copper traces on a circuit board, it starts galvanic corrosion. Over time, those thin pathways erode and break. Open circuit. No signal.
Then there’s mineral bridging. As the water evaporates, it leaves behind deposits that connect pins or traces that shouldn’t be connected. That’s what causes phantom drains, erratic behavior, or sudden shutdowns. I’ve seen a BCM draw 800mA with the key off because of a tiny mineral bridge between two pins.
And don’t forget capacitor failure. Surface-mount caps are fragile. Moisture gets in, causes a short, they overheat, pop, or leak electrolyte—which is itself corrosive. That goo spreads, takes out nearby components, and turns the board into a disaster zone.
On certain vehicles—like 2014–2018 F-150s or 2017–2020 Toyota Highlanders—the BCM sits right under the driver’s seat. Spill a drink? Get the interior steam-cleaned? That’s a $600 repair waiting to happen. There are TSBs on this. It’s not rare. It’s routine.
What You Can Actually Do to Fix It
1. Clean the connector (DIY-friendly)
If the module housing is dry but the connector pins are corroded, this is a solid DIY fix. Disconnect the battery. Unplug the module. Use electrical contact cleaner—non-conductive, no residue—and a soft brush (old toothbrush works). Clean every pin. Let it dry overnight. Apply a thin coat of dielectric grease before reconnecting. I’ve brought back modules this way. But if the board inside is already corroded? This won’t help.
2. Repair the PCB (shop-only)
Open the module and see white trails or green gunk on the board? This is pro territory. You need an ESD-safe station, 30W fine-tip iron, flux, and patience. Clean the board with 99% isopropyl alcohol. Inspect for broken traces—especially near connectors. Replace blown capacitors. Reconnect damaged paths with jumper wires or conductive epoxy. I’ve repaired dozens, but I’ve also killed a few by overheating SMD components. Not for beginners.
3. Replace the module (last resort)
If the board is blackened, layers are delaminated, or ICs are fried, it’s done. Replacement is the only option. But—big but—modern modules aren’t plug-and-play. They need programming. Security access. Module adaptation. You can’t just swap in a used BCM from a junkyard and expect it to work. You need a factory-level tool: GM’s SPS, Ford’s FDRS, or a high-end Autel or Snap-on with body module support. Skipping this means no seat memory, no HVAC control, or a car that won’t even start.
4. Drying with desiccant (risky, temporary)
I’ve tried it. Sometimes it works—for a week. Seal the module in a ziplock with silica packs for 3–5 days. Never use a hairdryer. Heat warps plastic, melts solder, and drives moisture deeper. I’ve had customers destroy perfectly salvageable modules this way. So don’t.
How to Know If It’s Really Fixed
Don’t just turn the key and say “it works.” Test it.
For cleaned or repaired modules:
– All functions must work: seat travel, memory presets, HVAC fan speeds.
– No active DTCs—especially U-codes or B-codes.
– Stable 12–14V at power and ground pins (check with DMM).
– On a scope, CAN signals should show clean differential (~2.5–3.5V).
For replacements:
– Module must appear “Online” in network scan.
– Bi-directional controls must respond (e.g., command seat forward via scanner).
– Security access granted, adaptations completed (like seat range learning).
– No “Configuration Mismatch” or “Module Not Programmed” codes.
If you’re not doing this with a professional scan tool and a DMM, you’re guessing.
Is It Worth Fixing?
Let’s talk money. Here’s what you’re really facing:
| Repair Type | DIY Cost | Shop Cost | Success Rate | Secondary Risk if Failed |
|---|---|---|---|---|
| Connector Cleaning | $20 (cleaner, grease) | $150–$300 | High—if corrosion is pin-only | Minimal |
| Professional PCB Repair | $50–$200 (parts) | $400–$800 | Moderate—depends on damage | Latent failure; board may die under load |
| Module Replacement & Programming | $300–$1,500 (part) + $200–$500 (programming) | $500–$2,000+ | Very High—if done right | Wrong coding can brick the module or disable other systems |
If repair costs are pushing 40% of your car’s value, stop. Water doesn’t stop at one module. Check the passenger side, center console, under the dash. I’ve seen harnesses soaked for months, slowly killing everything. Better to find it all now than replace modules one by one.
How to Not Do This Again
Simple rules:
-
No steam cleaners near footwells, under seats, or behind the dash. These areas are electronics zones. Treat them like a server room—no liquids.
-
Use a damp microfiber cloth, not a soaked sponge. Wring it out until it’s just shy of dry.
-
Keep liquids away from seat tracks and console openings. That’s where modules live.
-
Pull floor mats, dry them completely before reinstalling.
And after any liquid exposure—spill, detailing, car wash—test everything. Run the seats. Check memory. Cycle the fan. Watch for warning lights. Do it while the car’s still damp. If something’s off, disconnect the battery and dry the area now. That 10-minute check could save you a grand.
If you’re a detailer: this is on you. I’ve seen shops void warranties because they used a pressure washer inside the cabin. Don’t be that shop. Protect the car. Protect your business.
