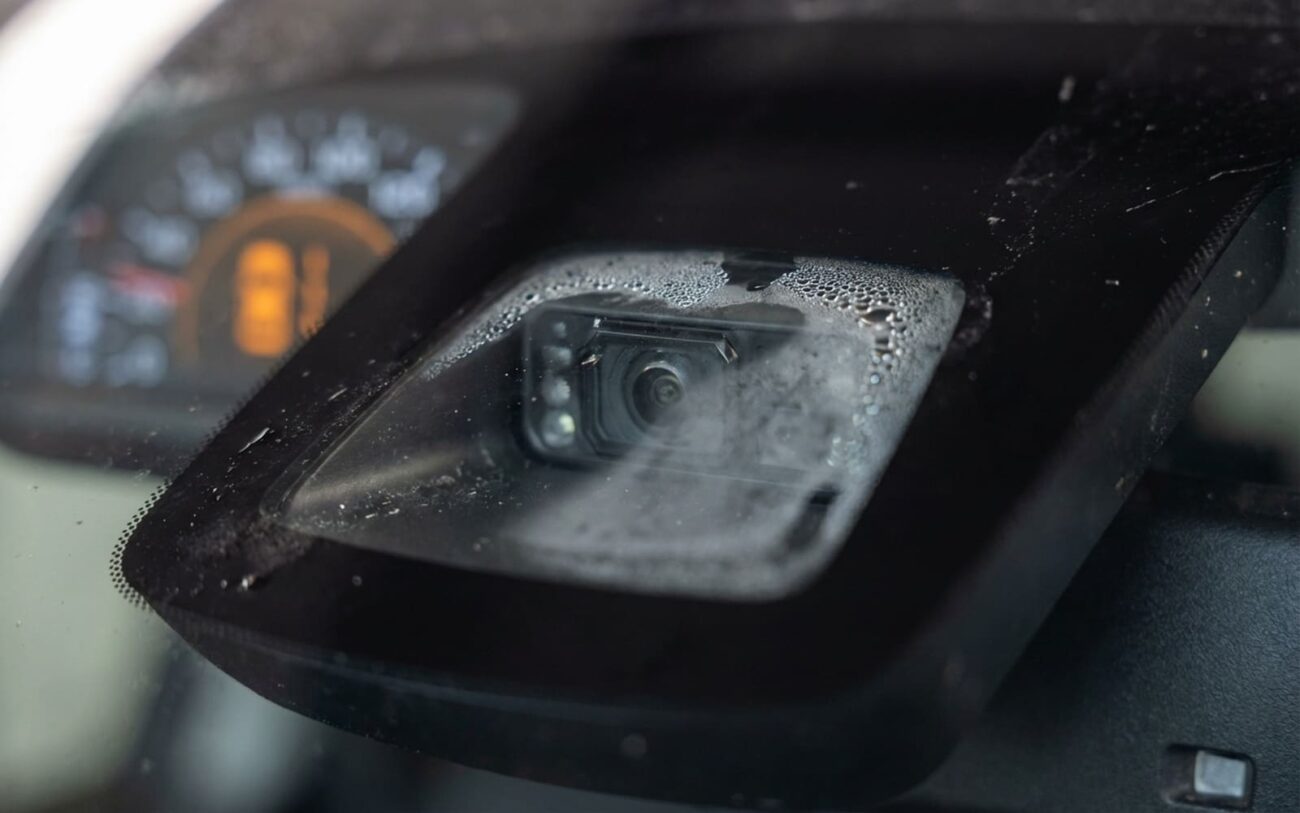
Moisture inside the forward-facing camera housing? That’s not a “maybe” issue—it’s a ticking time bomb. I’ve been doing this for 25 years, and I can tell you right now: once water gets in there, the clock starts. This isn’t some soft failure you can ignore. It kills circuits, corrupts signals, and takes out multiple safety systems at once. And no, wiping the windshield won’t fix it. This is hardware death by slow corrosion.
What You’ll Actually See (and What It Means)
Start with the dashboard. If the LDW icon is grayed out, crossed out, or showing “System Unavailable,” don’t just assume it’s a software hiccup. I’ve seen techs clear codes, reset modules, and send cars back—only for the same warning to come back two days later. That’s because the root cause isn’t in the software. It’s physical.
Sometimes the system doesn’t die completely—it stutters. You get false lane departure warnings when you’re perfectly centered. Or worse: no warning at all when you drift. That’s dangerous. It erodes trust. Drivers stop believing the system, and then they ignore it when it does work.
But here’s the key: those symptoms could mean a dozen different things. A dirty windshield? Sure. Bad calibration? Absolutely. But if you’re seeing intermittent failure—especially after rain, car washes, or high humidity—that’s the red flag. Moisture inside the housing loves to show up under those conditions.
How to Confirm It’s Moisture (Not Just Guessing)
You can’t go by codes alone. “Implausible Signal” or “Internal Fault” doesn’t tell you why. Could be a dead circuit board. Could be a wiring issue. Could be moisture. So you test.
First: look. Remove any trim, get a clear view through the windshield. Use a borescope if you have one. If you see fog or droplets on the inside of the lens—behind the glass, not on it—that’s game over. The seal is broken. Wipe the outside clean first. Don’t confuse external condensation with internal failure.
Second: test for electrical compromise. Pull the camera (yes, you’ll need to recalibrate later). Check resistance between pins with a multimeter. Moisture creates leakage paths—low resistance where there shouldn’t be. If the module is dry but still throwing codes? Then it’s likely electronic failure, not environmental.
Third: simulate conditions. Run the car through a steam test or car wash, monitor the camera signal with an oscilloscope. If the data stream drops exactly when humidity spikes—and the connector is clean and tight—then the issue is internal. No signal drop? Then look at wiring, connectors, or ECU communication.
Why It Failed (And It’s Not What You Think)
This isn’t a “water got in through the windshield” problem. That’s a different failure mode. This is about the camera’s own seal—its hermetic housing. These units are supposed to be sealed for life. When moisture breaches that, it’s because the housing failed.
Common causes? Material defects in the plastic weld or lens bond. Aging desiccant—most modules have a tiny packet inside to absorb residual humidity during manufacturing. After 5–10 years, it saturates. Once it’s full, any drop in temperature causes condensation on the cold inner lens. And that’s where it starts: tiny droplets, then corrosion, then circuit failure.
Thermal cycling doesn’t help. Summer heat, winter cold—expansion and contraction stress the housing over time. I’ve seen hairline cracks that don’t show up until the third winter.
And don’t underestimate physical damage. A rock strike, a tech poking at the lens during windshield replacement, or overtightening the mounting bolts—all can stress or crack the housing. I’ve seen a tech torque the bracket to 15 Nm instead of 8. That extra force warped the base, broke the seal. Took six months to show up. But it came.
How to Fix It (Spoiler: You Can’t “Dry It Out”)
Let me stop you right there: no, you can’t open it, dry it, and reseal it with epoxy. I’ve seen guys try. It fails. Every time. You can’t replicate the factory seal. You can’t guarantee it’ll survive thermal cycling or vibration. And even if it works for a month, it’s a liability.
If there’s visible moisture, pooling, mineral deposits, or corrosion on the board—replace the module. Full stop. No exceptions. The circuitry is compromised. Cleaning won’t fix micro-shorts or etched traces.
Even if it’s just light fogging or a saturated desiccant—replace it. There’s no way to reliably recharge or replace the internal desiccant in the field. And once the seal’s integrity is suspect, it’s done.
Yes, there’s a trick: warm the housing with a hair dryer on low, held 12 inches away. If the system comes back, that’s a strong indicator moisture is the issue. But—(and this is important)—this is for diagnosis only. I’ve seen people leave a heat gun on too long and melt the housing or weaken the adhesive bond to the windshield. Don’t turn a diagnostic step into a “fix.”
After Replacement: Don’t Skip This
Swapping the module is only half the job. If you don’t calibrate it, you’ve done nothing. I don’t care if the icon lights up green—without proper calibration, it’s lying to the driver.
You need OEM-level tools. GM’s Tech2, Subaru’s SSM, Ford’s IDS—no third-party scanner cuts it. You need the factory procedure, the calibration targets (if static), and a level surface. Torque the mounting bolts to spec—usually 8–10 Nm, but always verify. Overtighten, and you risk distorting the housing. Undertighten, and it can vibrate out of alignment.
For dynamic calibration, follow the drive cycle exactly: straight road, clear lane markings, no traffic, specific speed range. If the scan tool says “Calibration Failed” or “Not Complete,” it doesn’t matter if the system seems to work. It’s not safe.
I’ve diagnosed three cars in the past year where a camera was replaced, but the tech skipped the drive cycle. Customer thought it was fixed. Then, during an emergency maneuver, AEB didn’t trigger. That’s not a repair. That’s a lawsuit waiting to happen.
Cost, Risk, and When to Walk Away
| Repair Type | DIY Cost | Shop Cost | Success Rate | Secondary Risk if Failed |
|---|---|---|---|---|
| Camera Assembly Replacement & Recalibration | Not Feasible (requires OEM scan tool, calibration targets, torque specs) | $800 – $2,200 (varies by make/model; luxury and European brands on higher end) | 98%+ (when performed correctly with proper calibration) | Improper calibration can cause delayed or incorrect LDW alerts, unintended Lane Keep Assist corrections, or failure of AEB. This creates a real safety hazard, especially at highway speeds. |
If the repair costs more than 20% of your car’s private-party value, and LDW isn’t required for inspection, some owners choose to disable the system entirely via the scan tool. It’s not ideal—but for a 12-year-old Camry, it might make sense. Just know what you’re giving up: no more lane keeping, no AEB, no adaptive cruise. You’re back to pure driver control.
How to Avoid This Mess in the First Place
Most of these failures start with a bad windshield replacement. If you ever need a new windshield, use a shop certified in ADAS recalibration. They should use the OEM bracket, correct adhesive, and torque the bolts to spec. A misaligned bracket twists the camera housing over time. I’ve seen it cause a slow leak that didn’t show up for two years.
And when you clean your windshield, take two seconds to check the camera. Any fog inside? Cracks? Residue? Catch it early, and you might buy some time—but replacement is still the only real fix.
Finally: these ADAS systems were designed for a 10-year lifespan. After that, aging components become a liability. If you’re restoring an older vehicle with factory ADAS, assume these sensors are on borrowed time. Stay proactive. Use qualified techs. Because when it comes to safety systems, “works most of the time” isn’t good enough.
