Alright, let’s talk differentials. Specifically, when something’s gone sideways in the rear end. In my 25+ years turning wrenches, I’ve seen more than my share of blown diffs. And usually, the first clue comes from a simple test you can do right in your driveway, if you know what to look for.
The One-Wheel Spin Test: My Go-To Diagnostic
Here’s the first thing I do when a customer complains about rear-end issues: get the vehicle safely on jack stands, put the transmission in neutral, and spin one of the rear tires by hand. What happens next tells you a lot.
If you spin one wheel and the other wheel spins in the opposite direction, that’s completely normal for an open differential. That’s exactly how it’s designed to work, letting wheels turn at different speeds around corners. Nothing to worry about there.
But if you spin one tire and the opposite wheel just sits there, completely lifeless, offering no resistance or mechanical connection? Then you’ve got a serious internal failure. I’ve seen this symptom hundreds of times, and it almost always means the differential’s internal gear train is broken. You’ve lost drive to one side, completely.
Delta: 100% Loss
On-Road Symptoms: What You’ll Feel and Hear
This kind of failure rarely happens without a heads-up. On the road, the first thing you’ll usually notice is a sudden “clunk” or “bang” from the rear axle. This happens when you accelerate hard or lift off the throttle quickly. It’s the sound of a gear tooth shearing off or a spider gear collapsing under load. You might also feel a shudder, or a momentary loss of power to the wheels.
Another big red flag is a constant grinding or howling noise coming from the center of the rear end. This noise will often change with speed and whether you’re accelerating or coasting. Don’t ignore these sounds.
Don’t Jump to Conclusions: Rule Out the Mimics First
Before you condemn the entire differential, you’ve got to rule out other components that can show similar symptoms. I’ve seen plenty of misdiagnoses that cost customers a lot of money. A broken axle shaft, for instance, or a stripped hub spline, will also cause one wheel to spin freely. Same goes for clunks and grinding—a failed U-joint or a disintegrating wheel bearing can sound nearly identical. Diagnosing the source correctly saves you from costly missteps.
| Symptom | Most Likely Differential Failure | Common External Causes (Mimics) | How I Confirm the Source |
|---|---|---|---|
| One wheel spins freely on jack stands | Broken spider gears, sheared cross shaft, failed side gears inside the carrier. | Broken axle shaft, stripped hub splines, disconnected CV joint (if applicable). |
With the wheel off, try to rotate the axle shaft by hand. If the shaft turns but the wheel doesn’t, the hub splines are stripped. If the shaft won’t turn, but the wheel still spins freely, you’re looking at an internal diff issue. Pull the cover. |
| Loud clunk during acceleration or deceleration | Failed differential gears, broken axle shaft (especially at the C-clip or yoke). | Worn or failed U-joint, excessive wheel bearing play, loose rear hub, worn slip yoke. |
With the vehicle safely supported, rotate the tire back and forth in gear (or with the parking brake partially engaged). Listen carefully. Does the clunk originate right at the wheel, or does it transmit through the axle housing? Check U-joints for play. |
| Constant grinding or howling from rear axle | Worn ring and pinion gears, failed carrier bearings, improper backlash. | Poorly adjusted pinion bearing, loose exhaust contacting the chassis, worn pinion yoke, failing wheel bearings. |
Use a chassis ear or mechanics stethoscope on the differential housing, axle tubes, and wheel hubs to pinpoint the noise. Then, drain the differential fluid and inspect the magnetic drain plug (if equipped) for metallic shavings or glitter. That’s a dead giveaway for internal wear. |
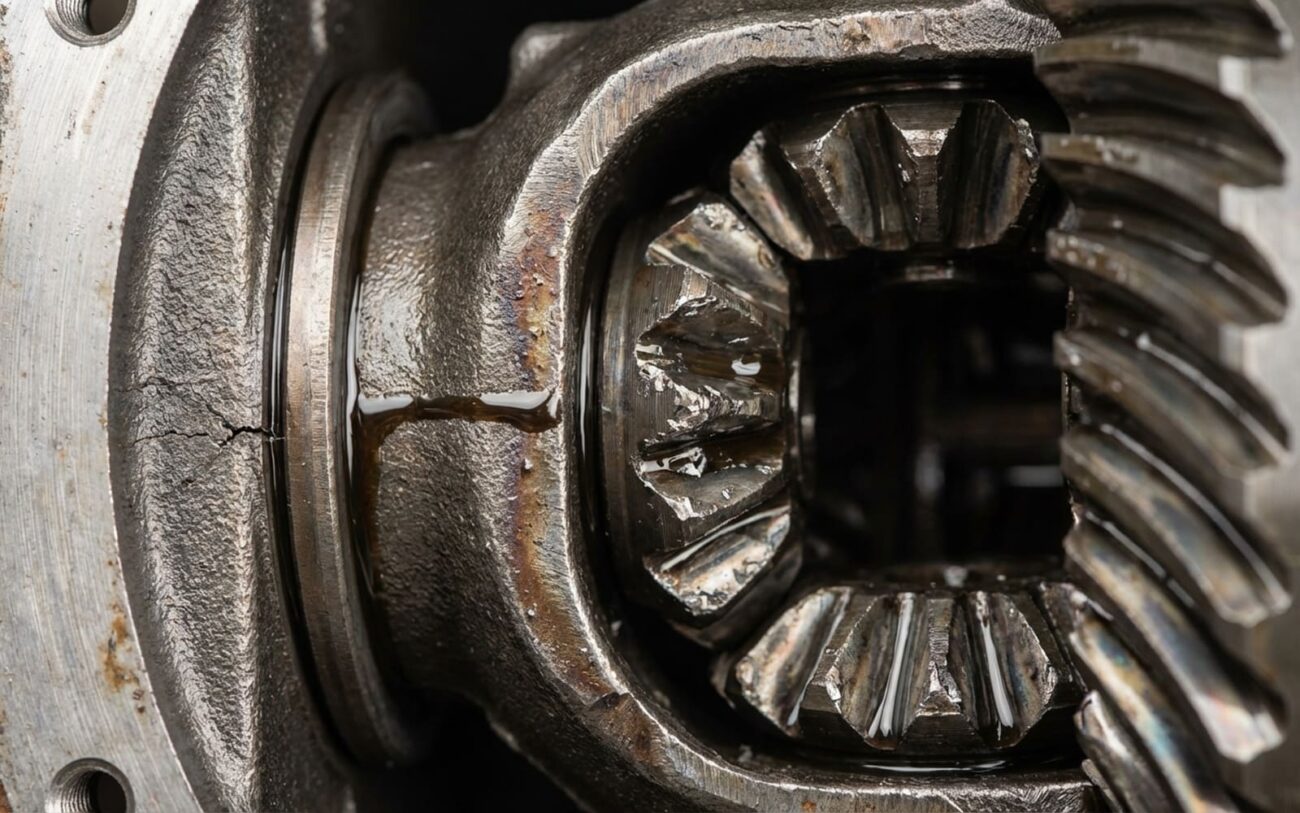
What Exactly Fails Inside the “Pumpkin”
When I talk about a “true” differential failure, I mean something inside the carrier—what we mechanics often call the “pumpkin”—has catastrophically failed. We’re not talking about a simple leak, a bad seal, or even a broken axle shaft (that’s an axle problem, not a diff problem). This is about the core gear set itself.
In an open differential, the spider gears and their cross shaft are usually the weakest link. Under sudden, high-torque loads—picture one wheel on ice and the other on dry pavement, then you stomp on the gas—that cross shaft can shear right off. Once it breaks, the spider gears collapse, and all torque transfer to either axle is gone. It’s an instant loss of drive, and you’re not going anywhere.
The Concept
“Think of it like a relay race where one runner drops the baton: no matter how fast the others are, the whole team stops moving.”
Another common, but often overlooked, failure is a spun bearing race. The differential carrier has precisely machined bores that hold the carrier bearings. Over time, or sometimes due to improper installation during a previous repair, these can loosen up. When that outer bearing race starts spinning within the housing, it destroys the critical gear alignment, ruins bearing preload, and generates a loud whine. Eventually, it leads to total tooth failure in the ring and pinion gears.
Here’s a tech tip I’ve picked up:
Some axle families—like certain 8.8-inch units in older Ford SUVs and trucks—are notorious for casting porosity in the bearing bore area. This defect can really accelerate a spun bearing failure. I’ve seen it more than once in my shop. And just to be clear: a leaking pinion seal is usually just that, a leaking seal. It’s not typically a sign of impending gear trouble, though you should still get it fixed to keep the fluid level correct.
Fixing a Differential: This Ain’t No DIY Job
Professional Territory Only
Let me be absolutely clear: there’s no magic additive or loose bolt to tighten that will fix a broken differential gear set. This is internal work, and it’s almost always professional-only territory for nearly every DIYer. You’re dealing with extremely precise tolerances. Replacing just the spider gears is possible if the rest of the unit is intact, but if the ring and pinion or main carrier bearings are damaged, you’re looking at a full rebuild.
Precision Setup Professional Only
Torque & Pattern Check Professional Only
Housing Assessment Non-Repairable → Replace
How I Confirm the Repair Actually Worked
A proper differential repair isn’t finished when the last bolt is torqued down. It’s only validated through rigorous testing. Any reputable shop, including mine, will road-test the vehicle under real-world conditions: hard acceleration, coasting, tight turns, and sustained highway speeds. I’m listening for any whine, chatter, or grinding. A healthy differential should be quiet, almost silent.
My Post-Repair Checklist
-
Temperature Check: After a good, hard test drive, I’ll hit the differential housing with an infrared temperature gun. It shouldn’t be more than 50°C (about 122°F) above ambient air temperature. Excessive heat means something is still wrong with friction or preload.
-
Leak Inspection: I check the cover gasket and pinion seal carefully after the test drive, and then again after the vehicle has sat overnight. Any fresh drips mean a seal wasn’t installed correctly.
-
Backlash Verification (Optional but Recommended): On some critical rebuilds, I’ll even recommend the customer bring the vehicle back after 500 miles. We’ll re-check the backlash, as gears and bearings can sometimes settle slightly during the initial break-in period.
The Cost and the Tough Decision
Let’s be honest, differential repair isn’t cheap. You’re dealing with specialized labor and precision parts. Here’s a general breakdown of what you can expect:
Parts Only (DIY Attempt)
This is just for an open differential gear set (ring and pinion, spider gears, bearings). High risk of failure without the right tools and expertise.
Professional Rebuild
This includes labor, specialized tools, and proper setup. When done correctly, this has a >95% success rate. This is usually the route I recommend if the housing is good.
Complete Axle Swap
This means replacing the entire rear axle assembly with a remanufactured unit. It’s often faster, and has a ~99% success rate. This is often the best choice for high-mileage trucks or SUVs, especially if the housing is damaged.
Here’s the rule I’ve used with customers for years: if the repair cost approaches 40% of the vehicle’s current market value, you need to strongly consider the complete remanufactured axle swap. It’s faster, more reliable, and often cheaper in the long run—especially on older, high-mileage vehicles. Paying $2,000 to fix a vehicle that’s only worth $3,000? That’s tough math, and I’ll tell you straight up if it’s not worth it.
How to Keep This From Happening Again
Prevention starts with basic maintenance. Your differential relies on clean, high-quality gear oil to survive. Always use the OEM-specified fluid—usually GL-5 75W-90, or 75W-140 for heavy-duty applications like towing. And don’t skimp on the change interval. Old, contaminated oil loses its film strength, which means metal-on-metal contact and accelerated wear in those critical gears and bearings.
My Maintenance Tip
During routine maintenance—like when you’re rotating your tires—take five seconds to do that spin test I talked about. It’s a quick check that can save you from a nasty roadside breakdown. Also, try to avoid sudden, high-torque launches, especially if one wheel is on a low-traction surface. That’s a great way to shock the spider gears. If you’re modifying your vehicle for more power or heavy use, seriously consider upgrading to a stronger unit like those from Dana Spicer or AAM. They’re built to take a beating.