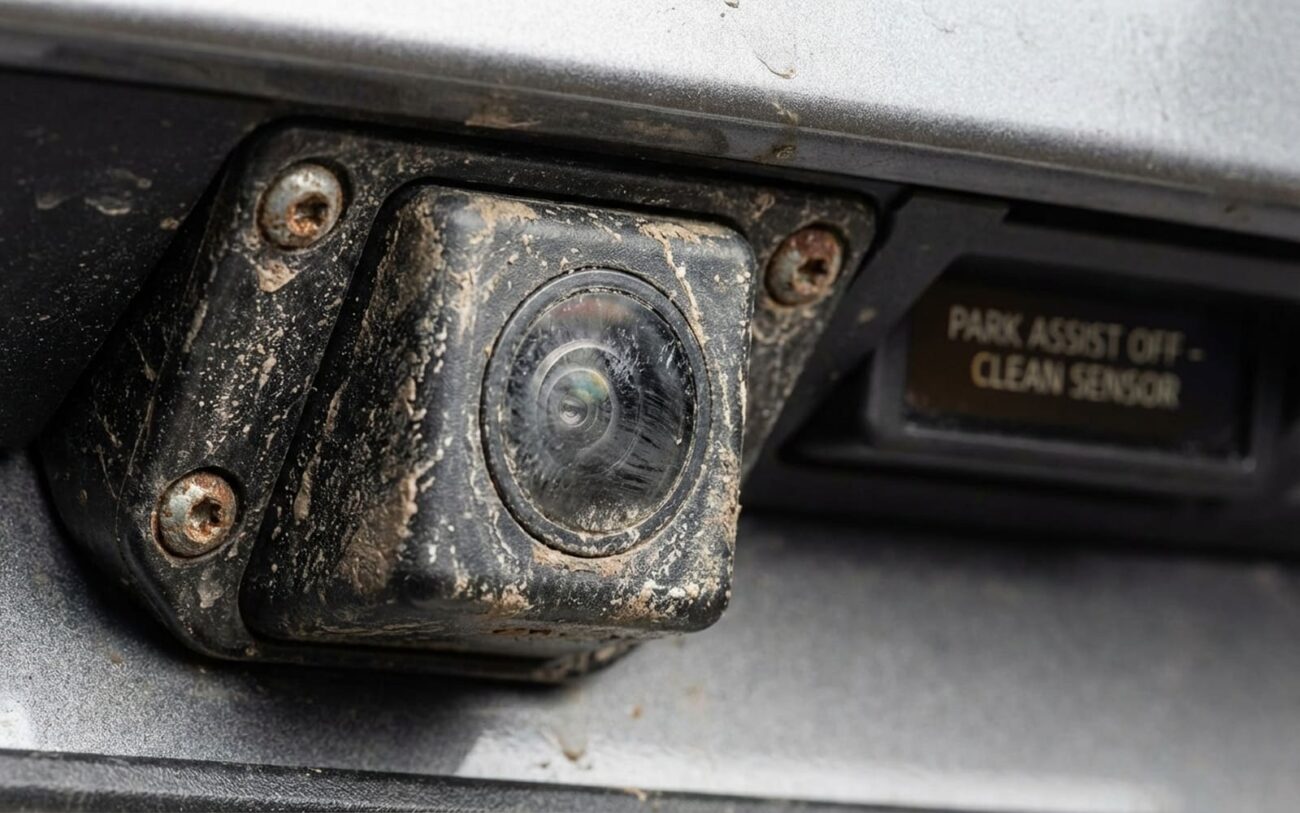
When your automatic parking system throws a fit, most people panic—like the whole ADAS brain just fried. I’ve been turning wrenches for over two decades, and let me tell you: nine times out of ten, it’s not a computer, not a wiring harness, not some six-hundred-dollar control module. It’s the damn camera lens. And no, it’s not “broken.” It’s dirty. Or worse—someone used Windex on it.
What the Warning Lights Actually Mean
That message on your dash—“Park Assist Unavailable,” “Camera View Obstructed,” or “Automatic Parking Disabled”—isn’t always a death sentence. I see these daily in the shop. And before anyone touches a scan tool, I walk around the car. You’d be shocked how many times I find a mud-splattered lens or a smear of tree sap glowing under a flashlight.
The system doesn’t “guess.” It sees. And when the image is compromised, it shuts down. That’s not a flaw—it’s safety logic doing its job. But here’s the kicker: the car doesn’t know if the problem is dirt or a dead sensor. It just knows the input is bad. So it throws a code. Common ones? “Camera Signal Implausible” or “Image Processing Fault.” Sounds serious, right? But I’ve cleared those codes after a five-minute lens wipe and watched the system come back to life.
Here’s a red flag: if the car starts parking and cuts out halfway, check the backup camera feed immediately. If it’s hazy, streaked, or has a bright white halo around lights at night—especially after rain—that’s your culprit. Light scatter from a grimy or damaged lens tricks the software into thinking there’s motion or obstruction.
How I Diagnose It—Step by Step
First thing I do: eyes on the lens. I grab a bright LED flashlight—something with at least 500 lumens. I’m looking for road film, water spots, wax buildup, or that sticky brown residue from tree sap. It’s often invisible in daylight but glows under direct light. If I see anything, I clean it. Simple.
But if the lens looks clean and the problem persists? Then I go deeper.
I plug in my professional scan tool—Snap-on or Autel, depending on the brand. I pull the codes, but more importantly, I monitor live data. Can I see the camera signal strength? Is voltage stable at 12V? Is the image clarity flag green or red? If the signal is dropping in and out, that’s not the lens. That’s electrical. Could be a corroded connector (common in salt-belt states), rodent damage, or a failing camera module.
And here’s a trick I use: if the image is blurry but the lens is clean, I remove the camera—assuming it’s serviceable—and inspect the inside with a borescope. Any fog? Droplets? That means the seal failed. Moisture got in. No amount of wiping fixes that. You’re replacing the whole unit.
| Symptom | Likely in Named Component (Camera Lens) | Common External Mimics | Definitive Test to Confirm Source |
|---|---|---|---|
| APS Fault Code for Obstructed View e.g., C1611 |
Physical contamination (dirt, road film, wax) on the external lens surface. | Internal camera condensation, camera sensor failure, or faulty image processing module. |
Clean the external lens with OEM-approved automotive glass cleaner and a microfiber cloth. Clear DTCs and retest APS function. Immediate restoration of operation confirms lens contamination. |
| Blurry Rear Camera Image on Display | Opaque contamination (mud, sap) on lens. | Damaged camera housing seal allowing internal fogging, or degraded image sensor. |
Perform a visual inspection under bright light for surface debris. Use a borescope to inspect interior of camera housing for moisture (if camera is removable). A clean, dry external lens with a persistently blurry image indicates an internal failure. |
| Intermittent APS Aborts in Specific Conditions (e.g., rain, dawn/dusk) | Thin, uniform film (road grime, water spots) causing light scatter. | Low signal-to-noise ratio from a failing sensor in low-light conditions, or voltage drop in the camera power circuit. |
Monitor camera live feed signal via scan tool while spraying water on the lens. A degraded but stable signal points to surface contamination. A fluctuating or absent signal indicates an electrical fault. |
What Actually Fails on the Lens (And What Doesn’t)
Let’s be precise: the lens is just the outer glass. It doesn’t “die.” It gets contaminated, damaged, or chemically ruined. I break it down into three buckets.
Contamination—mud, salt, brake dust, sap. It blocks light. The system sees shadows or glare and assumes obstruction. This is the #1 cause. Especially in winter. I see it weekly on Subarus and Fords up north.
Coating degradation—OEMs apply hydrophobic or anti-reflective coatings. They work great—until you clean it with Windex, Rain-X, or some all-in-one detailer. Ammonia eats that coating. Once it’s gone, the lens fogs easier, glares worse, and no amount of wiping brings it back. I’ve had customers ruin a $700 camera by using the same rag they use on the windshield.
Physical damage—scratches. Usually from wiping a dirty lens with a dry paper towel or a rough cloth. Those micro-scratches scatter light like a prism. You’ll see halos at night. And no, toothpaste won’t fix it. That’s a myth. Once it’s scratched, it’s done.
Here’s the key: internal condensation or a flickering image with a clean lens? That’s not the lens. That’s the housing or the sensor.
We’re talking strictly about the outer surface. But manufacturers know this is a pain point. Toyota, for example, has TSBs addressing lens film buildup on their Intelligent Park Assist systems. It’s not a fluke. It’s a design reality.
How I Fix It—Based on What’s Wrong
Light contamination—dust, fingerprints, road film: DIY-FEASIBLE
Bonded gunk—sap, tar, dried mud: DIY-FEASIBLE WITH CAUTION
Permanent damage—scratches, etching, hazing: NON-REPAIRABLE → REPLACE
Did It Work? Here’s How I Know
Cleaning the lens isn’t the fix. The fix is confirming the system works.
After cleaning: the image must be sharp, no haze, no glare. And the parking assist must complete a full cycle—detect a space, steer in, stop. No mid-process aborts.
After replacement: same thing, but I also drive it for 10–15 minutes and scan again. Some systems log a code if the camera signal is weak or unstable. And I check the on-screen parking lines. If they don’t match the real world, something’s off—maybe the camera isn’t seated right. Full ADAS calibration? Usually not needed unless it’s a front camera or the system requires it. But always check the service manual.
Cost vs. Value—When to Walk Away
| Repair Type | DIY Cost | Shop Cost | Success Rate | Secondary Risk if Failed |
|---|---|---|---|---|
| Lens Cleaning | <$10 (cleaner, cloths) | $50–$100 (0.5hr labor) | 95% for contamination-only issues | None if proper materials used. |
| Camera Assembly Replacement | $300–$800 (part) + DIY labor | $500–$1200 (part & 1–2hr labor) | 99% if diagnosis is correct | Incorrect diagnosis wastes cost. Risk of damaging trim, wiring, or misalignment during install. |
Here’s my rule: if the repair costs more than 10% of the car’s value, ask if it’s worth it. On a $6,000 sedan, an $800 camera is hard to justify. Clean the lens, disable the feature, and use the backup camera manually. It’s not lazy—it’s smart. Automatic parking is a convenience. A clear view when reversing? That’s safety.
How I Keep It From Coming Back
I treat the lens like my windshield. Wash it regularly. When I rinse the car, I hit the camera with a direct stream—front and back. But never sideways. That can force water into the seal.
Twice a year, I apply a light mist of ceramic spray—plastic-safe. It beads water and keeps grime from sticking. Reapply every few months. And never, ever use household glass cleaners. They cloud it over time.
Monitoring Tip
Check the lens once a month. Shift into reverse—does the image look clean? Test the parking assist every few weeks in an empty lot. Catching a thin film early means a wipe fixes it. Letting it build up? That’s when the system faults and you start tearing things apart. A clear lens isn’t just about tech—it’s about trust. If the car can’t see, it won’t act. And neither should you.
