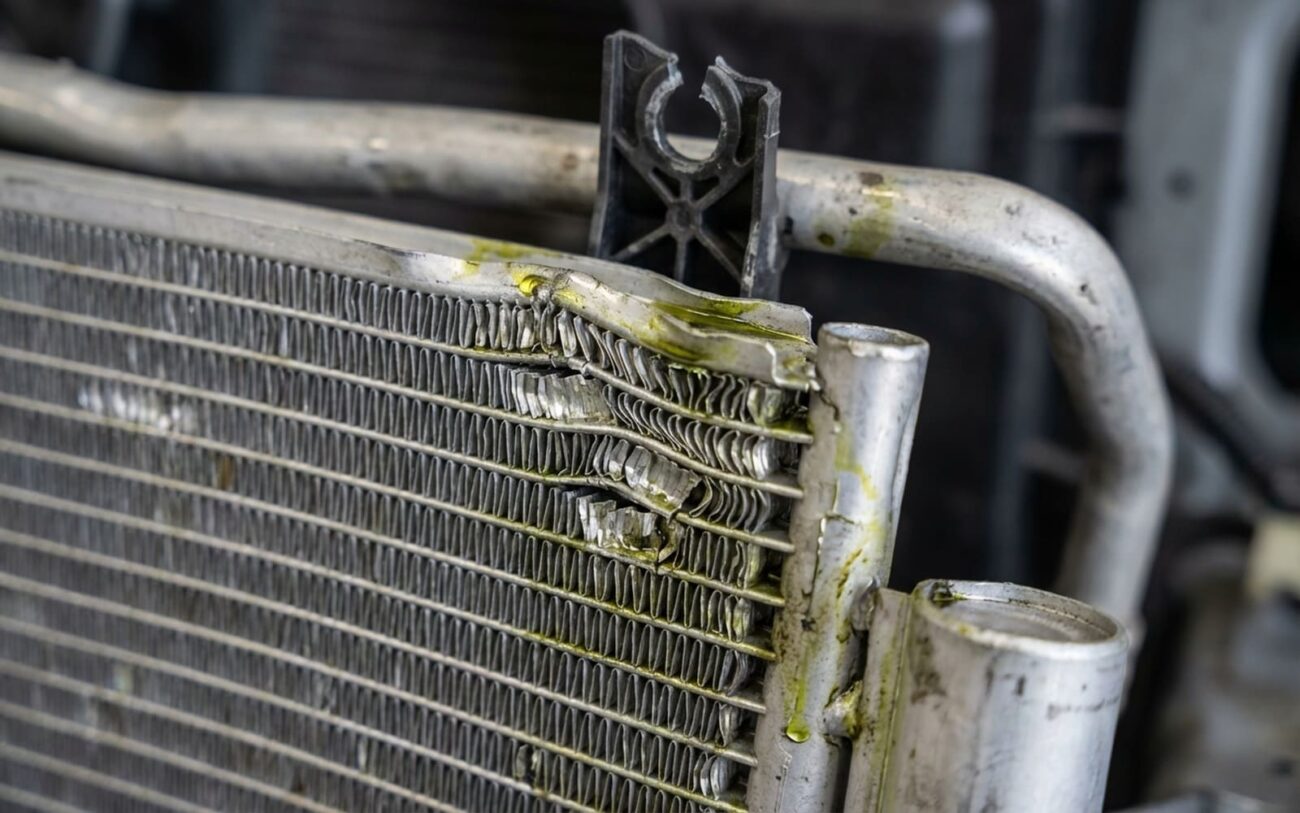
Alright, let’s talk about one of the most frustrating things I see in the shop: your air conditioning quits cold after what seemed like a minor fender-bender. You know the drill—a little bump in the parking lot, maybe a low-speed tap, and you drive away thinking everything’s fine. Then you hit the A/C button, and all you get is warm air, or worse, nothing at all. Sound familiar? It’s a classic, and nine times out of ten, the culprit is the A/C condenser.
Why a Small Bump Can Kill Your A/C
The condenser is basically a small radiator for your car’s refrigerant, sitting right up front, usually ahead of the main engine radiator. Its job is to shed heat from the high-pressure refrigerant gas, turning it back into a liquid so the cooling cycle can continue. Problem is, it’s made of thin aluminum tubing and delicate fins—it’s designed for heat exchange, not impact resistance.
Because of its prime location, it’s often the first thing to take a hit in any frontal impact. Even a minor tap can bend the fins, crack a tube, or stress a seam. Once that happens, you’ve got a leak, and your refrigerant—along with the lubricating oil it carries—starts escaping. When enough of it’s gone, the system can’t build pressure, and your compressor shuts down. No pressure, no cooling. It’s that simple.
I’ve seen it countless times: a broken bumper reinforcement, a displaced headlight assembly, or even just the shockwave from the impact itself can cause enough damage. Sometimes it’s a direct puncture, other times it’s a hairline crack in a brazed joint or a plastic end tank that was already a bit brittle. And don’t forget the mounting brackets—those little metal tabs can snap off, letting the condenser vibrate itself to death down the road. For example, on some of the older FCA (Jeep, Ram) models, those mounting points were notorious for cracking after even minor front-end jostles. It’s just physics, really; stress concentrates at those weak points.
Recognizing the Signs & Why You Can’t Ignore Them
The most obvious symptom is, of course, no cold air. You crank the A/C, and it’s just blowing ambient or even warm air. But there’s more to it, and some of it can be dangerous for your wallet.
- Compressor Clutch Won’t Engage: Pop the hood and have someone turn the A/C on. Listen for a distinct “click” from the compressor, followed by it spinning. If you don’t hear that click, it’s a big clue. Modern vehicles have a low-pressure safety switch that cuts power to the compressor when refrigerant levels drop too low. This is a good thing—it prevents the compressor from running dry.
- The Hidden Danger: Refrigerant isn’t just for cooling; it also carries special oil (PAG or POE) throughout the system to lubricate the compressor. If you have a big leak, both refrigerant and oil escape. Keep trying to run the A/C, even for short bursts, and you risk running that compressor without lubrication. I’ve seen compressors seize up in minutes, turning a condenser replacement into a full system overhaul—compressor, accumulator, orifice tube, and a complete flush. That’s how a $500 repair quickly escalates to $2,000 or more.
- Hissing Sound: Right after the collision, you might have heard a brief hiss from the front of the car. That’s the sound of pressurized refrigerant making its escape. If you heard that, your system is likely empty now.
- Visible Oil Stains: Take a good look at the condenser itself, right behind the bumper. Shine a flashlight through the grille. If you see dark, greasy residue on the fins or the end tanks, especially near any impact damage, that’s usually refrigerant oil. It’s a tell-tale sign of a leak.
While a non-engaging clutch could point to electrical issues—a bad relay, a wiring fault, or even a PCM problem—after any front impact, a physical refrigerant leak is always my top suspect.
Diagnosing the Leak: Don’t Just Guess
Just because your A/C quit after a front-end hit doesn’t automatically mean the condenser is toast. Hoses, O-rings, the receiver-drier, or even the evaporator core inside the dash can leak too. You need a systematic approach to pinpoint the problem and avoid throwing parts at it. Here’s how I confirm it in my shop:
| Symptom | What It Suggests | Could Also Be | How I Confirm It |
|---|---|---|---|
| Compressor clutch won’t engage | A major leak has dropped system pressure below the low-pressure switch threshold (typically 20–30 PSI), disabling the clutch. | Faulty low-pressure switch, damaged clutch coil, wiring break, blown fuse, or control module issue. |
I connect a manifold gauge set. If the static pressure reads 0 PSI or close to atmospheric pressure, you’ve got a major leak. To find it, I recover any remaining refrigerant, then pressurize the system with dry nitrogen to about 150–200 PSI. Then I listen for hissing, use soapy water, or my electronic leak detector (ELD). If I find the leak at the condenser core or a tank seam, that’s the problem.
|
| Visible refrigerant oil stain | Dark, greasy residue on the condenser fins or end tanks, especially near impact damage. | Leak from a hose connection, Schrader valve, receiver-drier, or mounting bracket area. |
First, I clean the area thoroughly. Then I pressurize with nitrogen. An ultrasonic leak detector can help, or I might inject UV dye, then evacuate and recharge the system. After running the A/C for a bit, I scan with a UV light. If the leak glows from the aluminum core or a brazed seam—not a fitting I can tighten—then the condenser itself is compromised.
|
A quick note here: I’ve seen plenty of misdiagnoses where a leak near the condenser isn’t actually the condenser. It could be a leaking Schrader valve core, a worn O-ring at a hose connection, or even a failing receiver-drier. Always test the entire system under pressure before you condemn the condenser. You don’t want to replace a big part only to find the real leak was a cheap O-ring.
Your Repair Options: There’s Only One Good One
When it comes to A/C repairs after a collision, I’ll be blunt: there are no perfect shortcuts. What you do next depends on the damage, but I’m going to tell you what actually works long-term.
Option 1: Temporary Sealant Temporary
Some folks consider using an A/C sealant for a small pinhole leak. Here’s how it’s supposed to work: you recover all refrigerant, clean the leak site, apply an epoxy-based sealant, evacuate the system deeply, then recharge. Sounds simple, right?
But here’s the reality, and I rarely recommend this—especially after a crash. Sealants can clog the orifice tube or expansion valve, which are critical for metering refrigerant flow. They also contaminate the entire system, making future repairs a nightmare and usually voiding your compressor warranty. In my 25 years, sealants have a very low success rate on impact-damaged condensers because those cracks are often under stress and just keep growing. Frankly, I’ve seen more compressors ruined by sealant blockages than saved by these “temporary fixes.” Avoid it if you can.
Option 2: Full Condenser Replacement Non-Repairable → Replace
For any significant damage—a cracked tank, a split seam, or a broken mounting point—the only reliable solution is a full replacement. Period. You’ll need:
- A new condenser (OEM or a good quality aftermarket part).
- A new receiver-drier or accumulator. This isn’t optional. That desiccant bag inside absorbs moisture, and once it’s exposed to air, it’s ruined. An old drier will release moisture and acids into your new system, killing it prematurely.
- New O-rings for all fittings, lubricated with the correct PAG or POE oil.
- The proper amount of refrigerant and oil for your vehicle.
- The right tools: a manifold gauge set, a vacuum pump, and a refrigerant recovery machine.
A few critical notes from my experience:
- Torque specifications are crucial. Those aluminum fittings are easy to overtighten and strip. For a common M10 fitting, you’re usually looking at 12–15 ft-lbs—always check your service manual.
- Don’t forget to add the correct amount of oil to the new condenser. Most require about 1 oz of PAG 46 or equivalent, depending on the system’s total capacity.
- Perform a deep system evacuation for at least 30 minutes. You need to get below 500 microns to remove all air and moisture. This step is absolutely critical for the longevity of your system.
And one last thing: condensers don’t fail from “internal wear.” If it’s leaking, it’s because of physical damage—impact, corrosion, or metal fatigue. There’s no such thing as an “internal defect” in a condenser that just suddenly starts leaking for no reason.
Making Sure the Repair Actually Worked
Never assume a repair is good just because the A/C is blowing cold. You need to validate it properly. If you went with a full condenser replacement, here’s what I do:
- Perform a static pressure test with nitrogen (around 150 PSI for 30 minutes) to confirm there are no leaks in your new connections.
- Use an electronic leak detector (ELD) to scan every fitting, seam, and surface of the new condenser and all connections you touched.
- Check system performance with a manifold gauge set. Under normal operating conditions, your low-side pressure should be in the 25–40 PSI range, and the high-side typically 200–275 PSI.
- Compare the vent temperature to ambient temperature and humidity. Your manufacturer’s specs will give you the exact target, but generally, you want a significant drop. A professional A/C performance analyzer gives the most accurate results.
If you’re doing this work yourself, make sure your OBD2 scanner is working. Some vehicles report A/C pressure data via the PCM, which can be a helpful way to verify system function without always needing the gauges.
Weighing the Cost and the Risk
At this point, it’s not just about turning wrenches—it’s about making a smart financial decision. Here’s a realistic breakdown of what you’re facing:
| Repair Type | DIY Cost (Parts) | Shop Cost (Est. Labor + Parts) | Success Rate | Secondary Risk if Failed |
|---|---|---|---|---|
| Temporary Sealant | $50 – $100 (sealant, refrigerant, dye) | $200 – $400 (labor-intensive, requires full recovery and evacuation) | Less than 30% for impact-related leaks | High. Risk of orifice tube blockage, compressor failure, and full system contamination requiring flush and more parts. |
| Condenser Replacement | $150 – $600 (condenser, receiver-drier, O-rings, oil, refrigerant) | $800 – $2,000 (labor varies by vehicle; some require radiator or fan removal) | Over 95% when done correctly with proper evacuation and drier replacement | Low, but risks include under/overcharging, improper torque on fittings, or moisture ingress from inadequate evacuation. |
Also, think about your vehicle’s value. I usually tell customers: if the cost of A/C and related front-end repairs starts to exceed 40% of the car’s private-party market value, it might not make financial sense to fix. Putting a $1,500 repair into a $3,000 car is a tough pill to swallow, unless you’re planning to keep it for a long time or it has sentimental value.
How to Prevent This and Catch Problems Early
Prevention starts with awareness. That condenser is fragile, so treat it that way. After any front-end work—even a simple radiator replacement—double-check that all condenser mounting bolts and brackets are secure. Loose mounting leads to vibration, and vibration eventually causes fatigue cracks in lines or tanks.
After any minor impact, even just a parking lot scrape, give that condenser a visual inspection. Grab a flashlight and shine it through the grille. Look for:
-
Bent or crushed fins
-
Oil stains (that dark, greasy residue)
-
Cracks in plastic tanks or mounting ears
If you’re using a collision repair shop, ask them to perform an A/C pressure test and an electronic leak check before you take the vehicle home. It’s a small step that can save you a big headache down the road. And remember: coolant leaks and A/C issues often happen together after front-end damage. If you’re dealing with overheating, check for related issues like radiator fan failure or even overheating with normal coolant levels.
In my 25 years, I’ve seen too many drivers ignore a small leak until it kills the compressor. Catch it early. Fix it right. Your A/C system—and your wallet—will definitely thank you.
