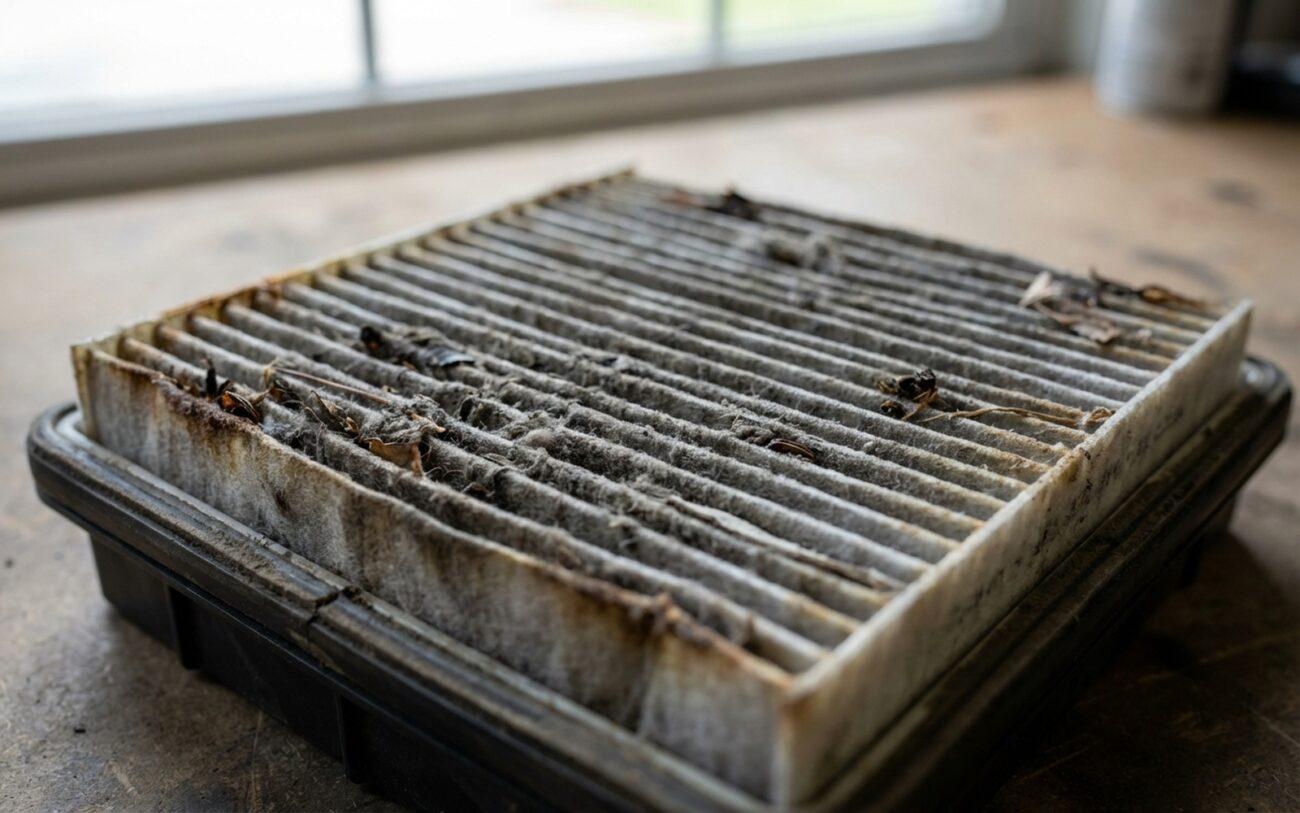
After 25 years turning wrenches, I’ve seen just about everything that can go wrong with a car’s HVAC system. And more often than not, when folks complain about weak air or a funky smell, the first place I look isn’t some fancy sensor or a blown fuse. It’s the humble cabin air filter. It’s a simple part, sure, but when it goes bad, it can make your ride miserable and even lead to bigger, more expensive problems down the road. Let me walk you through what I look for, how I diagnose it, and what you can do about it.
What You’ll Notice & How I Check It
The signs of a failing cabin air filter aren’t always a sudden thing. They creep up on you, slowly, until one day you realize your car’s air conditioning just isn’t what it used to be. Here’s what I typically see in the shop:
Weak Airflow from the Vents
This is the big one, the most common complaint. You crank the fan up to full blast, expecting a hurricane, and you get a gentle breeze. It’s not like a blower motor suddenly dying; it’s a steady decline. The filter media—that paper or synthetic stuff—just gets choked with dirt, pollen, leaves, you name it. It’s like trying to breathe through a really thick, wet paper towel. The blower motor is still spinning its heart out, but it can’t pull enough air through that clogged filter. I’ve pulled filters out that were so packed, they looked like a solid block of charcoal. Owners thought their whole HVAC system was shot, only to find a $25 filter was the culprit.
How I confirm it: This is my go-to test. I’ll pull the cabin air filter out—it’s usually behind the glove box, sometimes under the cowl. Then, with the filter out, I’ll run the blower on max speed. If the airflow suddenly feels like a jet engine and the blower motor sounds much louder (because it’s no longer fighting that restriction), then congratulations, you found your problem. If the airflow is still weak, even with the filter out, then we’ve got a deeper issue, like a failing blower motor, a collapsed duct, or something blocking the evaporator core itself.
Nasty Smells When the Fan Kicks On
Ever turn on your A/C and get a whiff of something musty, sour, or like old gym socks? That’s a classic sign. It often fades after a minute or two, which is a good clue. This smell usually comes from organic material—pollen, dust, leaf bits—trapped in the filter. Add a little moisture, which is common in the HVAC system, and you’ve got a perfect breeding ground for mold and bacteria. It’s not just unpleasant; it’s literally blowing spores into your face.
How I confirm it: First, I inspect the removed filter. If it’s visibly dirty and smells like a compost pile, that’s a strong indicator. But here’s the catch: that same smell can come from mold growing directly on the evaporator core, which is downstream from the filter. If the filter looks relatively clean but the smell persists, I’ll grab my borescope. I can usually snake it through the filter housing opening to get a look at the evaporator core. If it’s coated in black mold, then you’re looking at an evaporator cleaning, not just a filter replacement.
The Blower Motor Sounds Like It’s Struggling
A clogged filter makes the blower motor work harder. You might hear a higher-pitched whine, a strained hum, or just a generally louder fan noise than normal. It’s literally trying to pull air through a brick wall. Over time, that constant strain can overheat and kill the blower motor resistor or, in newer cars, the control module. I’ve seen this too many times: a $25 filter ignored, leading to a $200+ repair for a resistor or a $500+ job for a new motor and module. It’s a preventable failure.
How I confirm it: Just like with weak airflow, I’ll remove the filter and run the fan. If that strained noise disappears or significantly lessens, the filter was the culprit. If you still hear grinding, rumbling, or scraping, then the blower motor itself is likely on its way out, or something—like a leaf or a rodent nest—is caught in the fan impeller.
What a Cabin Filter Doesn’t Cause (Myth vs. Reality)
Let’s be clear: a cabin air filter is a passive component. It sits there and filters air. It does not move, it does not leak, and it does not rattle. If you’re seeing these issues, look elsewhere:
-
Water leaks into the footwell: That’s almost always a clogged HVAC drain tube, a failed seal at the firewall, or a damaged cowl seal. The filter has nothing to do with it.
-
Mechanical rattles behind the glove box: This is usually a loose cover, a broken clip on the housing, or an improperly seated filter that’s flopping around. The filter itself won’t rattle.
Getting It Fixed: My Approach
Replacing a cabin air filter is one of the easiest DIY jobs on most modern cars. Seriously, if you can open your glove box, you can probably do this. It usually takes 10-20 minutes and you won’t need anything more than a flashlight and maybe a trim tool to drop the glove box. Some cars (like some older Hondas or certain Ford trucks) hide them under the cowl near the windshield, which can be a bit more fiddly, especially if it’s packed with leaves. Always check your owner’s manual for the exact location and procedure.
The Critical Step Everyone Skips: Airflow Direction
This is huge, and I see it messed up all the time. Every cabin air filter has an arrow printed on its frame. That arrow indicates the direction of airflow. It must point into the HVAC case, towards the blower motor. If you install it backward, you’re not just reducing efficiency; you’re encouraging debris to shed off the media and get blown into your ductwork and onto the evaporator. It defeats the whole purpose of the filter. Don’t skip this step.
Beyond Just the Filter: Cleaning the System
When you pull out that old, nasty filter, take a good look at the housing. Is it full of leaves, mud, or even rodent nests? Clean it out! A shop vacuum works wonders for loose debris. If you’re dealing with persistent odors or visible mold, you’ll need to go a step further. I recommend an EPA-registered HVAC evaporator cleaner. Non-foaming formulas are usually safer around electronics. You’ll spray it into the intake side of the evaporator core (often accessible through the filter housing), let it dwell, and then wipe down any accessible areas with a microfiber cloth. This step is key to preventing those musty smells from coming right back, even with a new filter.
Confirming the Repair
Once that new filter is in and everything’s buttoned up, it’s time to test. Turn the fan through all its speed settings. You should feel a clear, progressive increase in airflow. On the highest setting, the air should feel forceful—you should almost struggle to hold your hand in front of the vent. That’s how it’s supposed to be. If it still feels weak, recheck your installation, then start looking for those deeper issues we talked about, like a failing blower motor.
For odors, a new filter should eliminate a musty smell immediately. If that foul odor returns within a few drives, especially when the A/C is on, then you’ve got contamination on the evaporator core or within the HVAC housing. A consumer-grade HVAC deodorizing kit might help, but for stubborn cases, professional fogging or chemical cleaning might be needed.
For most drivers, the “seat-of-the-pants” test—strong, clean airflow with no smell—is all the confirmation you need. But in the shop, if I’m really chasing down an airflow issue, I might use an anemometer to measure the actual cubic feet per minute (CFM) coming out of the vents and compare it to factory specs or a known-good vehicle. That’s usually overkill for a routine filter change, though.
Smart Choices: Cost, Risk & Prevention
Look, replacing your cabin air filter is one of the best bangs for your buck in vehicle maintenance. It’s cheap, it’s easy, and it prevents more expensive problems. A standard particulate filter will run you about $15-$40 if you do it yourself. A shop might charge $50-$120 for parts and labor, which, honestly, is still a good deal considering the comfort and protection it provides.
If you opt for an activated charcoal filter, which does a better job of absorbing odors, expect to pay a bit more—say, $25-$60 DIY, or $70-$150 at a shop. Just remember, charcoal filters don’t last longer; they just filter differently. Replace them on the same schedule as a standard filter.
The biggest risk of not replacing your filter is that snowball effect: weak airflow leading to a strained blower motor, which then burns out the resistor or motor itself. That’s when your $25 maintenance item turns into a $200-$500 repair. I see it weekly, especially on older vehicles that haven’t seen much love.
Always check your vehicle’s maintenance schedule in the owner’s manual. It’s your bible for preventative care.
Cost-Saving Tip
If you’re not a DIYer, an independent specialist shop often offers cabin air filter replacement and HVAC cleaning services at lower costs than the dealership—sometimes 30-50% less. Just make sure they’re a reputable shop with good reviews. This isn’t rocket science, but you still want someone who knows what they’re doing.
Prevention Is Key
To Keep Your Air Clean & Flowing
-
Don’t wait for symptoms. Follow your owner’s manual’s severe service interval—that’s usually every 12,000 to 15,000 miles or once a year. If you live in a dusty area, a high-pollen zone, or heavy city traffic, you might even consider doing it every six months. A filter doesn’t care about engine hours; it cares about how much crud it’s seen. For most folks, an annual replacement is cheap insurance.
-
Inspect it regularly. Pull that filter out every six months or so. Hold it up to a bright light. If you can’t see light passing through the media, it’s time for a new one. It’s a quick check that tells you a lot.
-
Dry out your system. In humid climates, try running the fan on low (without A/C) for the last few minutes of your drive. This helps dry out the evaporator core and the filter, which significantly reduces the chance of mold and bacteria growing. It’s a small habit, but it makes a big difference in air quality.
Keeping your cabin air filter in good shape is one of the simplest, most effective ways to maintain comfort, efficiency, and healthy air inside your vehicle. It’s a small task that pays off big time.
