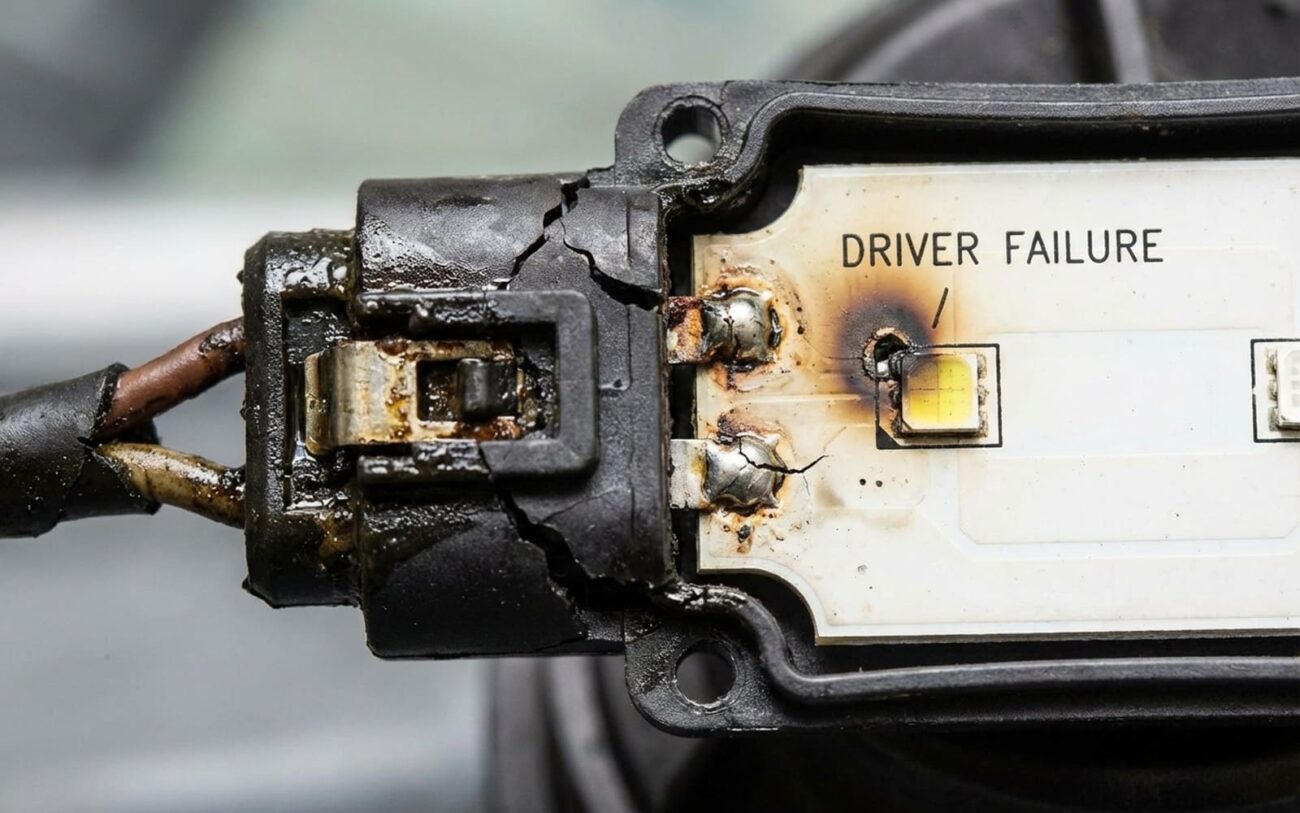
Let’s cut through the noise: if your LED headlights are dimming, flickering, or cutting out, it’s not “just one of those things.” I’ve torn down hundreds of these units—on BMWs, Acuras, Fords, you name it—and what I’ve found is this: LED failure isn’t like halogen. There’s no dramatic pop. It’s a slow death, and by the time you notice, the damage is already done. But here’s the good news: if you diagnose it right, you might save yourself $1,200.
What’s Actually Failing — And Why It’s Not the Bulb
First, let’s kill a myth: there’s no “bulb” to replace in most modern LED headlights. The light source is a chip mounted on a metal-core board, sealed inside the housing. When people say “my LED burned out,” what they really mean is the system stopped working—and that could be the chip, the driver, or even something upstream.
I’ve seen techs replace entire assemblies because they assumed the LED was dead, only to find the driver wasn’t getting power. Don’t be that guy.
The real culprits? Two things: heat and cheap electrolytic capacitors. I’ll break it down.
Symptom-Based Diagnosis: Start Here
Don’t guess. Test. I’ve built this flow based on what actually fails—and how often.
| Symptom | Most Likely Cause | What It Could Be Mimicking | How I Test It |
|---|---|---|---|
| Gradual dimming over months | LED lumen depreciation from overheating | Fogged lens, degraded UV coating, poor ground |
Clean the lens, then measure output with a lux meter at 10 feet. If it’s below 70% of spec (or 20% dimmer than the other side), the chip is degrading. Thermal imaging shows hotspots—anything over 15°C above adjacent emitters is a red flag. |
| No light, no warning | Driver failure (usually capacitor or MOSFET) | Blown fuse, broken wire, BCM not sending signal |
Check for 12V and ground at the driver input. If present, disconnect the LED board and test with a multimeter in diode mode. Open circuit = dead LED. Continuity = driver is the problem. |
| Flickering or pulsing at idle | Failing driver output stage or thermal shutdown | Alternator ripple, loose ground, CANBUS glitch |
Oscilloscope on the driver output. Clean DC? Driver’s good. Ripple or PWM instability? Driver’s failing. Also check alternator output—anything over 50mV ripple can confuse sensitive drivers. |
And before you go tearing anything apart—check the basics. I had a 2018 Audi A4 come in last month, owner convinced both LEDs were dead. Turned out the ground at the fender was corroded. Cleaned it, torqued to 8 Nm, and both lights came back. Saved him $1,800.
Why They Die: The Real Story
Heat kills. Not instantly—but over time, it murders. The LED junction runs hot, and if the thermal path is blocked (bad paste, clogged heatsink, dust-packed housing), that heat builds up. I’ve pulled units where the thermal paste had turned into a carbonized crust. That’s not repair—that’s a death sentence.
The phosphor layer on top of the blue LED chip degrades with heat. That’s what causes the yellow tint in aging LEDs. Less blue light gets converted, so you get a dim, warm-looking beam. It’s irreversible.
And the solder joints? They crack. Every time you turn the lights on, the board expands. Off, it contracts. After a few thousand cycles, microfractures form. Resistance goes up, heat spikes, and that one emitter burns out. Then the driver sees an open circuit and shuts down—or worse, overdrives the rest.
On the driver side, it’s almost always the electrolytic capacitors. They dry out. I’ve seen it on Toyotas, Hondas, even high-end Mercedes. The driver still powers up, but the output is unstable. Flicker, dimming, or total failure. MOSFETs fail too, especially if the alternator throws a voltage spike (common on older Ford Ecoboosts).
Can You Fix It? Real Talk.
This Is Not a DIY Job (Usually)
Most OEM LED headlights are sealed with butyl tape and UV-cured adhesive. Break that seal, and unless you have a reflow oven and proper sealing tools, you’re inviting moisture in. Condensation kills drivers faster than heat.
That said—some units are serviceable. Older Acuras, certain Toyotas, and some GM trucks have removable driver covers or accessible LED boards. If yours does, great. But you still need to reseal it properly. I use fresh butyl tape and a heat gun set to 120°C—just enough to flow the sealant without warping the housing.
If the driver is external (like on some Fords and Jeeps), replacement is straightforward. Match the specs: constant current (usually 700mA or 1A), input voltage (9–16V typical), and connector pinout. I stick with OEM suppliers—Philips, Osram, or dealer parts. Aftermarket “equivalents” often cut corners on filtering and thermal protection.
And for the love of all that’s holy—stop throwing resistors at the problem. Those “CANBUS fix” resistors don’t restore brightness. They just trick the BCM into thinking a bulb is present. If your OEM LED is dimming, a resistor won’t help. It might even make things worse by loading a failing circuit.
Did You Actually Fix It?
Light turns on? Good. But that doesn’t mean it’s fixed.
If you replaced the whole assembly, aim matters. I’ve seen brand-new headlights blinding oncoming traffic because the beam was 2 degrees off. Use a wall setup: park 25 feet from a flat surface, mark the centerline, and check the cutoff. It should be sharp, level, and match the other side.
If you replaced the driver, test the output. A scope is best—look for clean DC. If you don’t have one, use a lux meter. Compare both sides. More than 10% difference? Something’s wrong.
And after 15 minutes of runtime, scan the LED array with a thermal camera. All emitters should be within 5–10°C of each other. A hotspot means poor thermal paste application or uneven mounting pressure. That emitter will fail first.
Cost vs. Value: When to Walk Away
Let’s be real: a new OEM headlight can cost more than the car is worth. I’ve seen $1,400 assemblies for a $6,000 Camry.
| Repair Type | DIY Part Cost | Shop Cost | Success Rate | Risks |
|---|---|---|---|---|
| OEM assembly replacement | $400–$1500 | $450–$1600 | 100% (if aimed correctly) | None, if done right |
| Driver replacement (serviceable unit) | $50–$200 | $200–$400 | ~80% (if thermal interface is restored) | Moisture ingress, overdriving LEDs, repeat failure |
If the OEM part costs more than 30% of your car’s value, go used. Pull a unit from a low-mileage salvage car—LKQ or similar. Just verify it’s the exact match. Some Acuras, for example, have different projectors for LED vs. halogen trims. Get the wrong one, and you’re starting over.
Keep It From Happening Again
Prevention Tips I Actually Use
-
Wash the lenses every few months. Grime and sap trap heat. I’ve measured 15°C differences between clean and dirty units.
-
Check the engine bay temps. If your cooling system’s struggling, your headlights are baking. Fix the root cause.
-
Do a wall test every six months. Park 25 feet from a wall, mark the beam center, and compare brightness and cutoff. Catches degradation early.
-
Listen for a faint whine when you turn the lights on. That’s failing capacitors. Replace the driver before it dies completely.
Last thing: if you’re replacing thermal paste, don’t cheap out. I use Arctic MX-4 or equivalent. A $10 tube can add years to the life of your headlights. And if you’re resealing, don’t skip the butyl tape. It’s not just glue—it’s a moisture barrier.
This isn’t rocket science, but it is precise. Do it right, and you’ll save time, money, and a lot of headaches.
