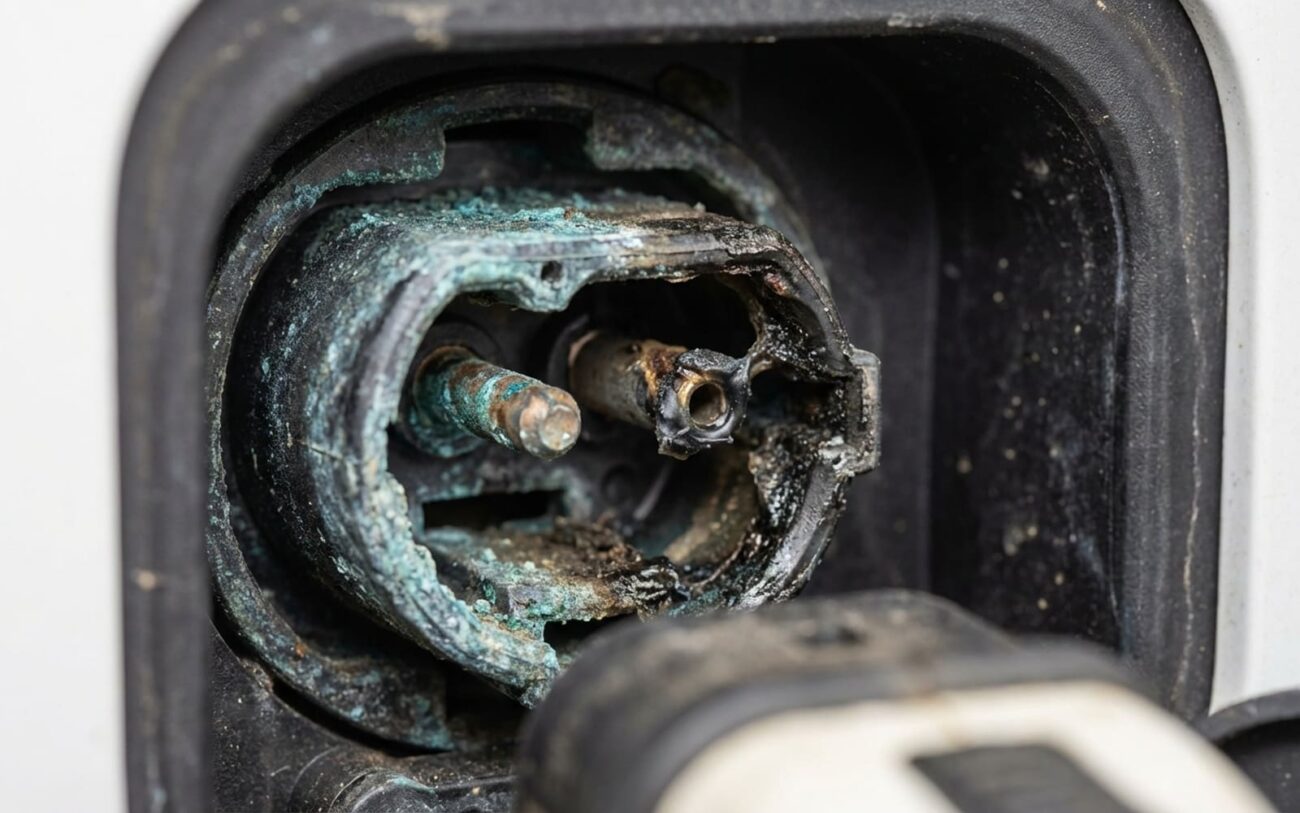
Alright, let’s talk about that blinking charging port light on your EV. After more than two decades wrenching on everything from carbureted classics to the latest electrics, I can tell you this isn’t just a random flicker. It’s your vehicle trying to tell you, loud and clear, “Hey, I’ve got a problem here, and I’m not going to charge until we sort it out.”
Decoding the Blink: Initial Diagnostics
The pattern of that blink is everything. It’s like reading Morse code from your car. I’ve diagnosed hundreds of charging faults, and the first thing I look for is when the blinking starts and what kind of blink it is.
Instant Lockout: The “No Handshake” Scenario
If you plug in the charger and the light starts blinking rapidly, immediately—before you even hear that satisfying “clunk” of the high-voltage contactors engaging—that’s a classic sign the car and the charging station (EVSE) never even completed their initial safety handshake. Power didn’t flow. The system detected a fault right off the bat.
What I typically see here is an internal issue within the charging port assembly itself. We’re talking about a short or an open circuit in the Control Pilot (CP) or Proximity Pilot (PP) lines, a temperature sensor that’s gone bad, or a broken latch switch. While the onboard charger (OBC) or battery management system (BMS) can cause this, the timing—failure at the very moment of connection—strongly points to the port. It’s like trying to shake hands with someone who isn’t there, or whose hand is broken.
Patterned Blinks: The DTC in Light Form
Now, if the light blinks in a specific, repeating pattern—say, three quick flashes, a pause, then repeats—that’s even more telling. Your vehicle is actually outputting a Diagnostic Trouble Code (DTC) right there through the light. These patterned codes are almost always tied to communication errors on those critical CP or PP lines.
These low-voltage signals are the brains of the charging process. They’re what negotiate voltage, current, and readiness between your car and the EVSE. If that signal is broken, distorted, or completely missing at the port, the handshake fails, and the car shuts down charging. I’ve seen this misdiagnosed countless times. Technicians blame the charging station or the OBC, but the real culprit is often corrosion, a bent pin, or some other damage right inside the vehicle’s charging port.
Here’s the key takeaway: a blinking light is a safety feature, not just a nuisance. Trying to force a charge by wiggling the connector, using cheap adapters, or repeatedly plugging and unplugging can do serious harm. You risk damaging the OBC, blowing fuses, or even welding high-voltage relays shut. When you see that blink, stop. Diagnose it. Forcing it can easily turn a $300 repair into a $3,000 headache.
Isolating the Problem: What’s the Real Culprit?
Before you even think about replacing parts, you’ve got to rule out the mimics. A blinking light doesn’t automatically mean the charging port is bad. Plenty of other components can throw the same symptoms. Based on my experience, here’s how I narrow it down in the shop:
| Symptom | Likely Port Component Issue | Common External Mimics | Definitive Test to Confirm |
|---|---|---|---|
| Rapid blink, no charge initiation. | Internal short or open in CP/PP pins, damaged NTC temperature sensor, failed latch micro-switch. | Faulty EVSE (charging station or cord), onboard charger (OBC) failure, high-voltage battery isolation fault. |
First, always test with a known-good EVSE. That rules out the charger itself. Then, I grab the professional scan tool to pull DTCs—look for U-codes related to CP/PP circuits (like U11xx series). Next, a continuity check from the port pins back to the OBC harness connector with a multimeter. Finally, a borescope inspection of the port itself for bent pins, corrosion, or debris. |
| Patterned blink code. | Corrosion on CP/PP terminals, failed pilot resistor network inside the port, water intrusion affecting signal integrity. | EVSE communication fault, BMS CAN bus error, ground fault in the charging circuit. |
This is where an oscilloscope shines. I measure the CP and PP signal waveforms directly at the port terminals with an EVSE connected. If the signal is distorted, missing, or just plain doesn’t meet the SAE J1772 standard at the port, then the problem is definitely internal to the port. If the signal looks perfect at the port but is absent or corrupted further down the line, then I start looking at the wiring harness or the OBC. |
Why Charging Ports Fail: The Root Causes I See
When I talk about the “charging port assembly,” I’m talking about that physical unit mounted in your fender or quarter panel—the socket where the EVSE plugs in. It’s not the cable, the OBC, or the battery. This thing is more complex than it looks, and it’s got several common failure points.
Manufacturing & Material Defects
Yeah, it happens. I’ve seen plastic housings with microscopic voids that, over time, act like tiny sponges, wicking moisture right into the internals. That leads to corrosion on the signal pins, even if the outside of the port looks pristine. Some early production runs had CP or PP pins that were just slightly out of tolerance. That causes intermittent contact, higher resistance, and eventually, heat degradation. It’s a slow killer, but I’ve seen it play out many times.
Thermal Stress
This is a big one. Any resistance in the connection—a loose terminal, minor corrosion, or just poor initial contact—generates heat during charging. And we’re talking about a lot of current here. That heat can warp plastic retainers, melt solder joints on internal resistors, or even deform the metal pins themselves. Once the alignment is off, every subsequent charge makes it worse. I’ve pulled ports where the CP pin was visibly bent and discolored from repeated thermal cycling, completely breaking the communication link.
Corrosion: The Silent Killer
Especially if you live in a coastal area or a place with high humidity, galvanic corrosion is probably the most common root cause. You’ve got dissimilar metals in that port—copper pins, steel housings, sometimes aluminum. Add moisture, and you’ve got a battery. This eats away at the terminals, creating high resistance. The integrated NTC (Negative Temperature Coefficient) sensor, which is there to monitor heat, is particularly vulnerable. If it corrodes, it sends false “overheating” signals, and the BMS immediately shuts down charging to protect the system. Smart, but frustrating when it’s a false alarm.
Physical Damage
This is pretty straightforward. Forcing a misaligned EVSE connector, or even just a worn-out one, can break the latch micro-switch or bend a pin. Road debris, sand, or even tiny metal shavings can get packed into the port, causing shorts or increasing resistance. And speaking of physical damage, there are known service bulletins for certain model years that address chronic charging faults due to inadequate sealing around the CP pin, allowing condensation to create high-resistance faults. While I can’t rattle off specific TSB numbers here, these are documented issues on various EV platforms.
Just to be clear, because I see this confusion a lot: a failed pilot signal circuit inside the OBC is not a charging port failure. A damaged high-voltage cable between the port and the battery pack is also not a port issue. Those are separate, albeit related, failures that can present with similar symptoms. You’ve got to pinpoint the exact component.
Getting It Fixed: Repair Strategies
Listen up: working on the charging port, even if you’re not directly touching the high-voltage lines, involves serious safety risks. Any service or replacement requires strict adherence to the manufacturer’s high-voltage disable procedures. If you’re not trained and equipped, do not attempt this yourself.
Terminal Cleaning & Service Professional Only
Full Port Assembly Replacement Non-Repairable
Contact Cleaner Application Temporary / Last-Resort
The Real Test: Post-Repair Validation
You’re not done just because the light stopped blinking. Validation is absolutely critical. Skipping this step is how you end up with repeat comebacks.
After Cleaning or Minor Service
If you’ve just cleaned terminals or done a minor service, use a professional scan tool to clear any stored DTCs. Then, here’s the trick: monitor the CP and PP circuit resistance in real time during a charging session. The values should be stable and within 10% of spec—typically 220–380 ohms for PP and 1000 ohms ±10% for CP. The real test, in my book? No fault codes return after three full charging cycles. A single clean charge isn’t enough; intermittent faults love to hide.
After Port Replacement
When you’ve replaced the entire port, validation is even more involved. Perform a full communication handshake test using a known-good EVSE or, ideally, an EVSE simulator. Watch that charging port light—it should go solid and stay solid. Then, verify the actual charge rate (via the dash display or, better yet, a scan tool) matches the expected output from the charger, within 5%. This requires an OEM-level or J2534-compliant scan tool to read live OBC and BMS data. A simple multimeter won’t catch communication protocol errors or subtle signal degradation, and those are the ones that will bite you later.
The Bottom Line: Cost, Risk, and Common Sense
Let’s talk real numbers and real choices. Here’s what you can generally expect for these repairs:
| Repair Type | DIY Cost | Shop Cost | Success Rate | Secondary Risk if Failed |
|---|---|---|---|---|
| Terminal Cleaning/Service | $50 (materials). Not recommended for DIY due to HV risk. | $150 – $300 | ~80% for minor, isolated corrosion. | Unresolved internal corrosion leads to recurring high resistance, overheating, and potential port failure during fast charging. |
| Full Port Assembly Replacement | $400–$800 (part only). Not recommended for DIY due to HV risk. | $900 – $2,200 (parts & labor) | ~98% if using OEM part and installed correctly. | Improper sealing or torque can lead to water ingress, repeat failure, or high-voltage leakage—a serious safety hazard. |
Now, here’s the hard truth I tell my customers: if the diagnostic labor and repair cost starts to climb above, say, 40% of your car’s current market value, and the vehicle already has other issues—like battery degradation over 20%—you need to weigh that investment carefully. You might be putting a $2,000 fix into a car worth $8,000 that’s already on borrowed time. It’s not just about whether it can be fixed, but whether it makes economic sense. I’ve seen too many owners pour money into aging EVs only to face another major repair a few months down the road.
Keeping Your Port Healthy: Prevention is Key
The best repair is always the one you never need. Most charging port failures I see are preventable with a few smart habits.
If you live in a humid, salty, or corrosive environment (think coastal areas or places with heavy road salt), take five minutes every few months to apply a small amount of dielectric grease to your EVSE connector pins. It creates a moisture barrier and significantly reduces galvanic corrosion at the contact point. And please, always use OEM or certified SAE J1772-compliant charging equipment. Cheap, out-of-spec EVSE units can cause physical damage or send bad signal errors that confuse the BMS, leading to premature port failure.
Make visual inspection part of your routine. Once a month, grab a flashlight and check the port for any debris, white or green corrosion, or moisture. Pay attention to how the connector latches—any change in feel or sound can signal a worn switch or misalignment. And above all, when you see a new blinking pattern on that charge port light, don’t ignore it. That’s your car using its diagnostic mode to tell you something’s wrong. Catching it early can save you from a complete port replacement and a much bigger bill.
For deeper diagnostics, especially if you’re handy with tools and understand EV systems, consider investing in an OBD2 scanner for EV that supports high-voltage system monitoring. It won’t fix the port for you, but it can help you spot communication protocol errors or ground fault detection warnings before they escalate and stop charging altogether. It’s about being proactive, not reactive.
