When Your EV Won’t Charge: Diagnosing a Failed On-Board Charger (OBC)
Alright, let’s talk about one of the most frustrating things an EV owner can run into: you plug in your car, and… nothing. Or maybe it charges so slow you wonder if it’s even doing anything at all. You’re not crazy; this is a common complaint in my shop. More often than not, the culprit is the on-board charger, or OBC.
See, your wall outlet or Level 2 charging station puts out AC power. But your EV’s big battery pack needs DC power. The OBC is the critical piece of hardware that takes that AC, converts it to DC, and makes sure it’s the right voltage and current for your battery. When it goes south, your car simply won’t accept an AC charge. I’ve seen countless times where folks think it’s the charging cable, the wall box, or even the battery itself. That’s a quick way to waste time and money. Let’s walk through how I figure out if an OBC is truly dead, what it means, and what your options are.
First Signs: What I Look For (And What Else It Could Be)
When a customer rolls in with a charging complaint, I start with the obvious. Here are the symptoms that usually point me towards the OBC, but also the other things I rule out immediately.
1. No AC Charge Initiation
This is the big one. You plug in a charger you know works, the charging port light stays dark, and the dash screams “Charging Fault,” “Unable to Charge,” or “Check Charging System.” Sounds like an OBC, right? Well, maybe. But before I condemn a pricey component, I’m checking a few other things. Is the EVSE (charging station) actually working? Is the charging port itself damaged or dirty? Is the 12V auxiliary battery dead? (Yes, a dead 12V can prevent high-voltage systems from enabling.) Are the high-voltage battery contactors clicking on? Could be a CAN bus communication fault between modules, or even a blown pyro fuse in the HV system. I’ve seen all of these mimic an OBC failure.
2. Reduced or Erratic Charge Rate
Your car normally pulls 7.2 kW or 11 kW, but now it’s barely hitting 3 kW, or the power jumps all over the place during a session. This often points to an internal OBC problem, like a failing rectifier or a degraded DC-DC converter. But again, don’t jump to conclusions. I always ask the customer about their home circuit – is it overloaded? Is the grid voltage low? Sometimes the car’s own battery management system (BMS) will limit charging if the battery is near full or if it’s too hot or too cold. That’s the thermal management system doing its job, not a bad OBC.
3. Abnormal Noises
A healthy OBC usually has a soft hum from its cooling fan and transformer. But if you hear something new—a loud buzzing, sharp clicking, arcing sounds, or a high-pitched whine—that’s a red flag. These sounds often mean internal components like capacitors, relays, or transformer windings are failing. My first step here is to grab a mechanic’s stethoscope and pinpoint the exact source. I’ve had plenty of times where the noise was actually coming from the EVSE itself, or even the car’s coolant pump.
My First Checks:
Before I even think about a scan tool, I’m checking the basics:
-
Known-good EVSE: Always try a different charger.
-
12V Battery: A weak or dead 12V can shut down the whole HV system.
-
Charging Port: Look for physical damage, corrosion, or debris.
-
External Fuses: Some OBCs have external high-amp fuses. Check for continuity.
Getting Down to Business: Diagnostic Tools & Tests
Once the basic checks are done, it’s time to pull out the heavy artillery: the factory scan tool. This is where you separate the guesses from the facts. You have to systematically rule out other causes before you condemn the OBC itself.
Here’s how I approach it, and what definitive tests I rely on:
| Symptom | What I Suspect (Beyond OBC) | My Definitive Test to Confirm |
|---|---|---|
| No AC Charge Initiation | Faulty EVSE, damaged charging port, open HV contactor, CAN communication fault, pyro fuse, dead 12V battery. |
1. Scan for DTCs: Look for P0D1F (generic charger fault), manufacturer-specific codes related to charger enable, isolation, or communication. Clear codes and retest. 2. Live Data: Monitor OBC status, HV contactor status, pilot signal, and 12V system voltage. 3. Command On: Use the scan tool to try and command the OBC to start charging. If it doesn’t respond, the internal control board is likely dead. 4. Resistance Check: With HV system de-energized, check resistance across OBC input/output terminals (this requires service manual specs). |
| Reduced/Erratic Charge Rate | EVSE pilot signal error, battery thermal limits, low line voltage, poor grid connection. |
1. Live Data Monitoring: Watch AC input voltage/current and DC output voltage/current from the OBC. If the OBC is taking in, say, 7 kW AC but only putting out 4 kW DC, and the temperature is normal, you’ve got significant internal loss. A loss of more than 20% compared to spec usually means an internal failure. 2. Battery Temp: Check battery pack temperature PIDs. If it’s too hot or too cold, the BMS will limit charging. |
| Abnormal Audible Noise | EVSE relay chatter, coolant pump cavitation, air in cooling system. |
Stethoscope Test: Use a mechanic’s stethoscope to isolate the noise directly to the OBC housing. If it’s coming from inside, and you’re seeing erratic current data, that’s a pretty strong indicator. |
Why These Things Kick the Bucket: Common Internal Failures
Once you’ve done your diagnostics and you’re sure the OBC itself is the problem, it helps to understand what exactly failed inside. These aren’t external issues; these are problems within the sealed unit.
Power Stage Failure
DC Link Capacitor Degradation
Control Board or Firmware Failure
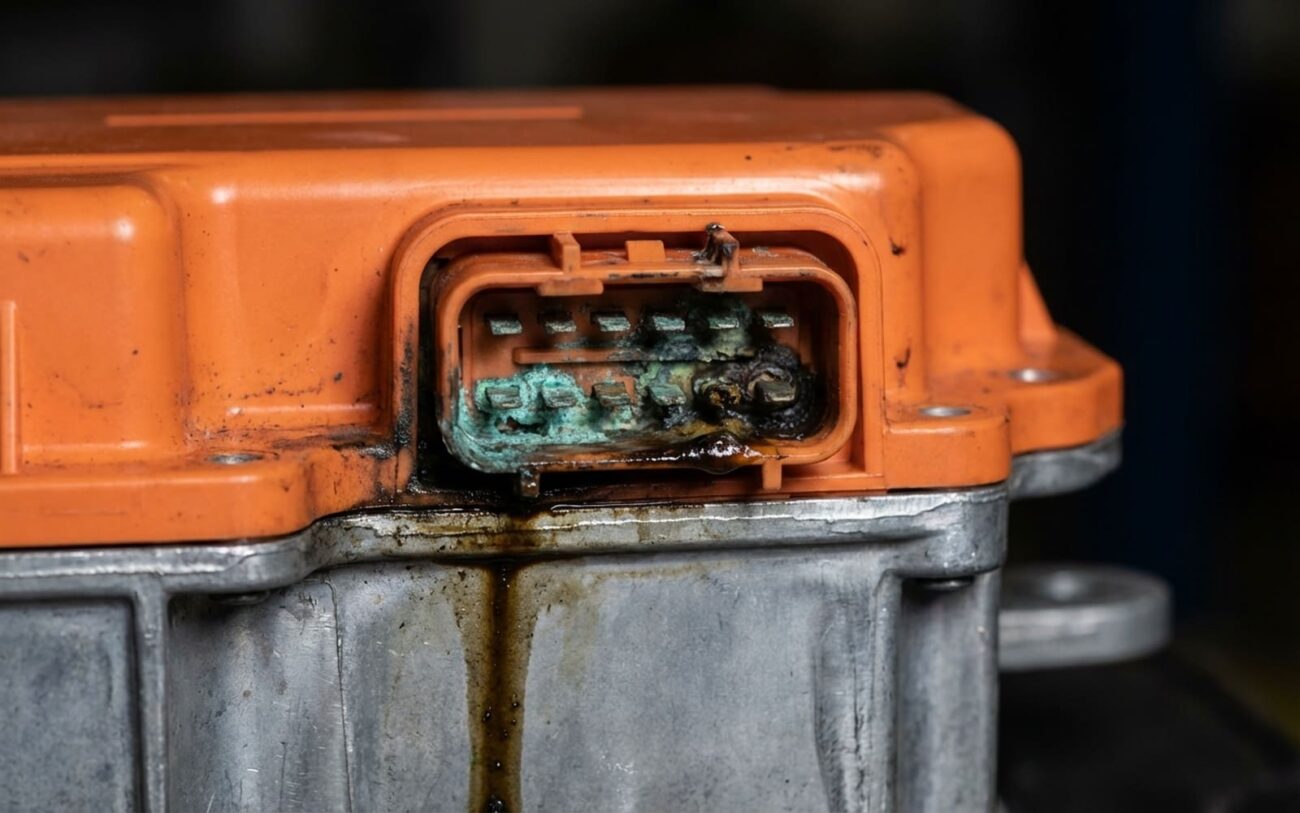
Internal Connector or Relay Failure
The Fix: Replacing or Repairing Your OBC
So, you’ve confirmed the OBC is dead. Now what? Here’s the reality: these units are sealed, integrated, and generally not designed for field repair. While some specialized electronics shops do offer internal repairs, most OEMs (original equipment manufacturers) only support full module replacement. And let me be clear: this is absolutely not a DIY job for the untrained.
Professional Unit Replacement
This is the standard repair path. It starts with properly disabling the high-voltage system—pulling the service plug and waiting the manufacturer-specified time (usually 5–10 minutes) for all capacitors to discharge. If your OBC is liquid-cooled, that coolant loop has to be drained and refilled with the exact OEM-specified fluid after replacement. I’ve seen too many issues arise from reusing old coolant or mixing different types; it leads to galvanic corrosion in the OBC’s cold plate, and then you’ve got new problems.
Once the new or remanufactured unit is physically installed, it needs to be programmed. This is critical. We use a factory-grade scan tool for VIN coding, firmware updates, and then perform high-voltage insulation resistance checks to make sure there’s no leakage to ground. Torque specs are non-negotiable here; for example, M8 HV connectors often require 22 Nm ± 2 Nm, and you need a calibrated, insulated wrench for that. Skipping these steps can lead to communication faults, coolant leaks, or serious safety hazards.
This is Professional Territory Only. Seriously.
Let me be direct: there are no safe workarounds here. Do not attempt to bypass the OBC, jump relays, or force a charge. The risk of a high-voltage arc flash, battery pack damage, or fire is absolutely real. I’ve seen vehicles completely totaled because someone tried to “trick” the system. You can’t limp an EV with a failed OBC—it’s a hard stop. The only DIY involvement I’d ever recommend is inspecting external connectors for visible damage or checking an external fuse with the HV system disabled and proper PPE.
Proof’s in the Pudding: Post-Repair Validation
After all that work and expense, you don’t just plug it in and send it out. You need to validate the repair thoroughly. My success criteria are pretty clear:
-
The vehicle initiates charging within 30 seconds of connecting a known-good EVSE.
-
It achieves and sustains its rated AC charge power (within ±5%) for at least 10 minutes.
-
No relevant DTCs return (e.g., isolation faults, charger disable, communication errors).
To confirm all this, I use a factory scan tool to monitor live data: AC input voltage, DC output current, OBC temperature, and the state of charge progression. I’ll often cross-check this with an external EVSE that displays real-time power output. If the car reports 7.2 kW but the external charger shows 5 kW, you’ve got a discrepancy—that could mean a sensor issue or a calibration problem. Thermal monitoring is also key; a properly functioning OBC shouldn’t overheat during normal charging.
The Bottom Line: Cost, Risk, and Making the Call
Let’s talk numbers. An OBC failure is a major repair. You have to weigh the cost against the vehicle’s overall value and its remaining lifespan. This isn’t a cheap sensor; it’s a core high-voltage component. Here’s a general breakdown of what I see in the shop:
| Repair Type | DIY Cost | Shop Cost (Estimate) | Success Rate | Secondary Risk if Failed |
|---|---|---|---|---|
| OBC Module Replacement (New OEM) | $0 (Not Recommended) | $1,800 – $3,500 | 98% | Incorrect HV torque, coolant mix-up, or failed insulation test can lead to leakage or fire. |
| OBC Module Replacement (Remanufactured) | $0 | $1,200 – $2,500 | 90% | Same risks as new, plus a slightly higher chance of premature re-failure due to reused internal components. |
| Internal Component Repair by Specialist | N/A | $800 – $2,000 | 60–80% | Latent failures in other aged components (capacitors, relays) may cause repeat issues. |
My Expert Rule of Thumb:
Here’s what I tell folks after two decades in the bay: if the OBC replacement cost exceeds 40% of the vehicle’s actual cash value, it’s time to really evaluate the long-term outlook. An older EV with a failed OBC might be nearing the end of its high-voltage component lifespan—next could be the inverter or the battery pack itself. Always factor in warranty status too. Some manufacturers offer extended coverage on OBCs, especially in early-generation EVs like the Nissan Leaf or certain Tesla models. Check your VIN against any available service campaigns.
Keeping Your Charger Healthy: Prevention Tips
You can’t prevent every OBC failure, but you can definitely reduce the risk and catch problems early. Most modern OBCs are liquid-cooled, so maintaining that cooling system is absolutely critical. When you’re servicing coolant, make sure the OBC loop is flushed and refilled with the correct OEM fluid. Using the wrong type (like mixing G48 with G12++) can lead to galvanic corrosion in the cold plate, causing internal leaks or overheating.
For early detection, use your vehicle’s built-in data. Many EVs offer apps that log charge sessions. I tell my customers to track how long it takes to charge from, say, 20% to 80%. If you see a gradual increase in charge time—like from 4 hours to 5.5 hours over several months—that’s a sign of declining OBC efficiency. It means it’s working harder, generating more heat, and losing more energy. That’s your cue to get it scanned. A simple diagnostic check can catch issues before you’re completely stranded.
Finally, avoid constant fast charging on Level 2 if you can. While convenient, frequent high-power AC charging increases thermal stress on the OBC. Spread out those long charges when you have the option, and let the unit cool down between sessions. It’s not just about battery health; it’s about the longevity of the entire charging system.
