You know the drill. You pull up to a DC fast charger, plug in that big CCS connector, and your EV starts its little digital handshake. The display lights up, everything looks good for a second, then… nothing. Or maybe it starts charging, but it’s crawling at Level 2 speeds, or just cuts out completely after 10, 20, maybe 30 seconds. If that sounds familiar, you’re not alone. After 25+ years in this game, including a good chunk with EVs and hybrids, I’ve seen this pattern repeat across pretty much every platform out there, especially in older BMW i3s and other early mass-market EVs.
What a Fast Charging Failure Feels Like (and What It Means)
When your car won’t fast charge, it’s not just an inconvenience; it’s a core system failure. The car and charger are definitely talking—that initial communication confirms the basic ISO 15118 and SAE J1772 handshake happened. They’ve verified each other’s safety and capabilities. But then, something in the vehicle’s high-voltage system, usually the On-Board Charger (OBC) or the Battery Management System (BMS), detects an internal fault and aborts the session.
Often, you’ll hear a sharp click from the front or rear charge port area. That’s the OBC’s high-voltage contactors trying to close, or worse, failing to close properly because of a control or sensing issue. If they don’t close, no high voltage gets through.
Another common scenario is when the car says it’s charging, but the current is way too low—like 20-30 amps on a station capable of 150 kW. You’re barely getting Level 2 speeds, if that. This usually points to a problem with the OBC’s power stage or corrupted communication over the Power Line Communication (PLC) channel between the car and the station. The car might think it’s asking for full power, but the OBC either can’t deliver it or isn’t interpreting the request correctly.
Diagnostic Trouble Codes (DTCs) are absolutely critical here. On a BMW i3, for example, a code like “CDA118” screams “OBC communication board failure.” But here’s the hard truth I’ve learned over the years: repeatedly trying to fast charge a failing system can make it much, much worse. Each aborted session can cause arcing in those OBC contactors, potentially welding them shut or frying the control board entirely. What might have started as a fixable fault can quickly become a guaranteed full replacement.
Diagnosing the Failure: Port, OBC, or Something Else?
When a customer brings in an EV with fast charging issues, my first goal is to figure out if the problem is at the entry point—the CCS port itself—or deeper inside the vehicle with the On-Board Charger. This isn’t guesswork; it’s a structured diagnostic process that requires proper OEM scan tools, a good multimeter, and strict adherence to high-voltage safety protocols. You won’t get anywhere with a phone app or a generic OBD2 reader. You need to access the vehicle’s CAN bus communication, real-time Parameter IDs (PIDs), and be able to command system self-tests.
The Golden Rule: Check AC Charging First
This is the single most valuable diagnostic clue I can give you. If your car charges normally on a Level 2 AC station (typically 7–11 kW), that tells me the OBC’s primary AC/DC conversion and its interface with the battery are mostly intact. If Level 2 works, the failure is almost certainly limited to the DC fast charging path: the CCS port’s DC pins, its dedicated communication lines, or the OBC’s DC power stage. If both AC and DC charging fail, then the OBC is the prime suspect, as it handles both types of power conversion.
Common Symptoms and How I Approach Them
Immediate Session Termination (within 30 seconds)
This is a classic sign of an internal OBC fault. We’re talking high-voltage contactors failing to close, an isolation monitoring fault, or an issue with the DC-DC converter stage. It could be a faulty CCS cable or station, or even a ground fault in the charging circuit, but in my shop, the OBC is usually the culprit.
To confirm: First, try at two or more known-good CCS stations. If it fails consistently, connect an OEM scan tool. Monitor the OBC’s “Ready for Charging” status and its high-voltage isolation resistance. Any drop or failure to go “Ready” points to the car.
Low or No Current Ramp-Up
When the car charges but barely, it often means the OBC’s power stage is degraded, the PLC communication board is acting up, or there’s damage to the DC bus wiring. Sometimes, the BMS might limit power due to cell imbalance, extreme battery temperature, or an already high state of charge (SOC). The station itself could also be limited, but that’s less common if other cars charge fine there.
To confirm: Make sure the battery SOC is between 20–80% and the temperature is in the sweet spot (20–30°C / 68-86°F). Then, with the scan tool, read the OBC-reported “Maximum Available Charging Power.” If the car says it should be taking a lot more than it is, the OBC isn’t delivering.
Contactor Clicking at the Port
That distinct click can be the CCS port’s latch mechanism failing, a proximity sensor issue, or a problem in the OBC’s control circuit for the contactor drive. Don’t overlook simple things: a weak 12V battery can cause all sorts of weird electrical gremlins, or a poor ground connection. Sometimes, it’s even an EVSE (charging station) control pilot issue.
To confirm: Start with a 12V battery load test. Inspect the CCS port pins for any visible damage or corrosion. Then, monitor the “Charging Connector Lock” status with your scan tool. If it’s not consistently showing “locked,” the car won’t initiate high power.
Communication DTCs (e.g., CDA118)
These codes are usually pretty direct. They point to an internal OBC communication board problem or a wiring harness issue between the CCS port and the OBC. Less often, it could be charging station PLC interference or general network noise on the vehicle’s CAN bus, but I always look at the car first.
To confirm: Clear the codes and try an AC Level 2 charge. If AC works, the communication issue is specific to the DC path. Then, perform a continuity test on the CAN and PLC wiring from the port all the way to the OBC. Look for opens, shorts, or high resistance.
Why These Components Give Up the Ghost
These failures aren’t random. They’re the result of design limitations, environmental factors, and simply the stresses of regular use. The on-board charger is one of the hardest-working pieces of electronics in an EV. It’s a sealed, high-density module that converts AC power from your home or DC from a fast charger into precisely regulated battery voltage. It operates under immense thermal stress, especially during repeated fast charging cycles.
My Take on Thermal Cycling:
Think about it: the OBC heats up significantly during charging, then cools down afterward. This constant expansion and contraction can eventually crack solder joints on high-current components. A cracked joint might work sometimes, intermittently, leading to those maddening, sporadic charging failures that are a real pain to diagnose.
In many BMW i3 models, particularly the 94Ah battery variants, the OBC uses a liquid-cooled design. While effective, these units can develop internal micro-leaks or corrosion in the coolant channels. When that happens, you get thermal runaway and board failure—it’s just a matter of time.
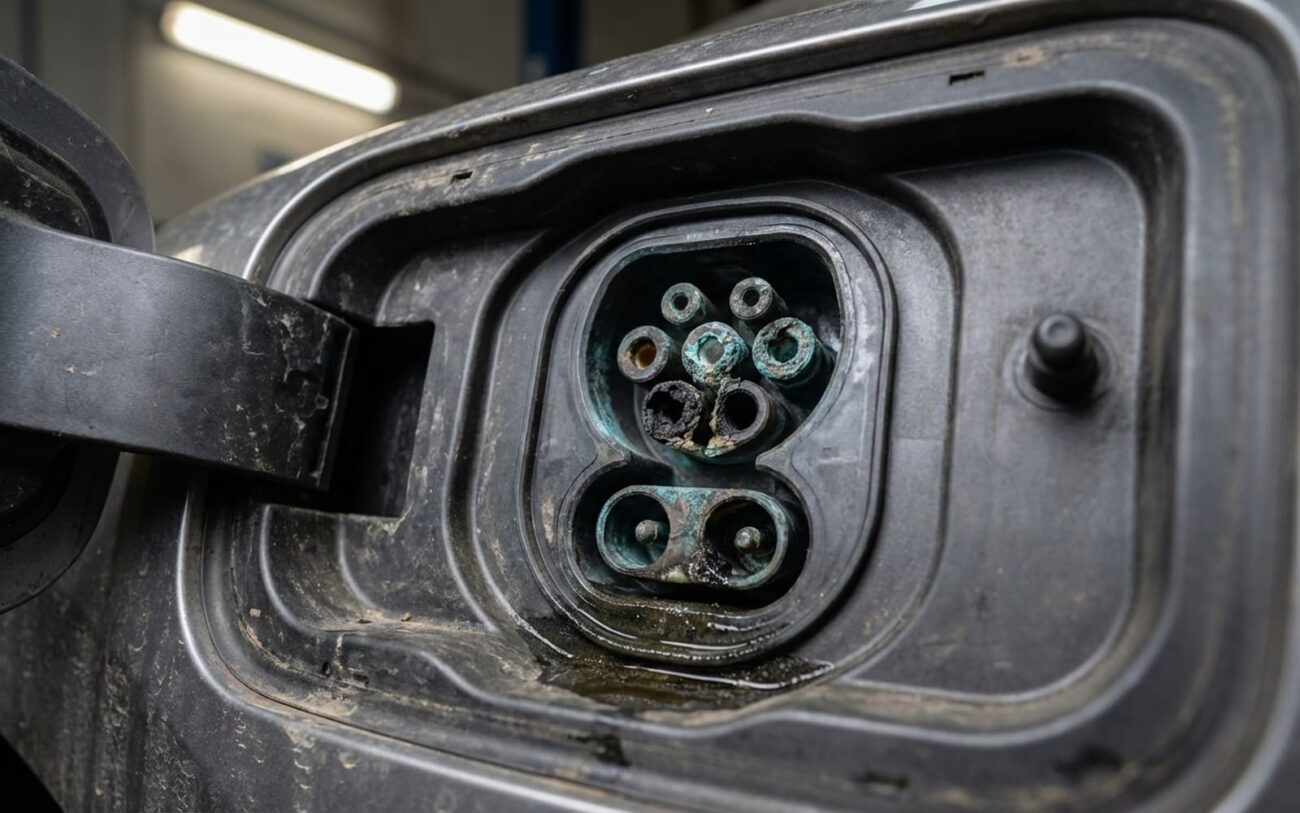
On the CCS port side, the problems are usually more mechanical and environmental. The latch mechanism that holds that heavy CCS connector in place wears out with repeated use. A weak or broken spring can prevent the port from sending a stable “locked” signal to the car, causing it to abort the session. But the real killer is poor contact. If the DC+ and DC– pins are corroded, bent, or contaminated with road grime, they create high resistance at the interface. High resistance means heat—sometimes enough to discolor or even melt the plastic housing around the pins. I’ve seen ports where the pins are literally fused in place from chronic overheating.
Your Repair Options: From Rebuild to Replacement
HIGH VOLTAGE SAFETY IS NON-NEGOTIABLE
Let me be clear: OBC replacement or repair is NOT a DIY job. We’re talking about lethal voltages. High-voltage safety, specialized module coding, and proper thermal management procedures make this strictly professional work. Improper handling can lead to fatal electric shock or a vehicle fire. Do not attempt this without proper training and equipment.
Validating the Repair: Did It Actually Work?
Repair validation is non-negotiable in my shop. A quick plug-in test isn’t enough. For any OBC repair or replacement, you need to perform a full DC fast charging session—at least from 20% to 80% state of charge—while monitoring key parameters with an OEM scan tool. Watch the OBC’s internal temperature, compare the actual charging current to the requested current, and make sure the system maintains stable communication throughout. Any fluctuation, unexpected shutdown, or a DTC popping back up means the repair didn’t fully resolve the issue, and you’re back to square one.
The Cost Reality and Making the Tough Decision
Let’s talk money. These aren’t cheap fixes, and for older EVs, it can sometimes feel like you’re putting good money after bad. Here’s a general idea of what you’re looking at, based on what I see in the field:
| Repair Type | DIY Cost | Shop Cost | Success Rate | Secondary Risk |
|---|---|---|---|---|
| OBC Depot Repair | N/A | $800 – $1,500 | ~85% | May not address all fault modes; risk of repeat failure. |
| OBC Full Replacement | N/A | $2,000 – $3,500+ | ~98% | High upfront cost; coding errors can cause failure. |
| CCS Port Replacement | N/A | $750 – $1,200 | ~99% | Low if OEM procedures are followed. |
For an older EV, especially one with a lower resale value, these costs can be a tough pill to swallow. It becomes a personal decision: how much is reliable fast charging worth to you, and how long do you plan to keep the car?
My Advice for Staying Ahead of the Problem
Charging Port Maintenance Checklist
-
Keep the charging port clean. Use a soft, dry brush or cloth to remove any debris. Never, ever insert anything sharp or metallic into the pins.
-
Periodically inspect the pins for any discoloration (brown or black marks are bad) or green/white corrosion. If you see it, get it checked out.
-
Always press the release button on the connector before you pull it out. Don’t just yank it; that puts unnecessary stress on the latch and pins.
-
If the lock mechanism starts feeling loose, or you hear it clicking multiple times before locking, that’s a warning sign. Address it before it fails completely.
