So, you lifted your truck or put on some wheel spacers, and now you’ve got a new vibration, a shudder, or maybe a clicking noise. Don’t let anyone tell you that’s “normal” for a modified vehicle. It’s not. In my 25+ years turning wrenches, I’ve seen this story play out hundreds of times, and almost every time, it points straight to your CV joints screaming for help.
What You’re Feeling, Hearing, and What It Means
That new vibration through the steering wheel or floorpan, especially when you accelerate? Or a rhythmic shudder when you pull away from a stop? Maybe a clicking noise during tight turns, or you’ve found grease flung all over the backside of your wheels. These aren’t random quirks or just “aftermarket behavior.” They’re warning signs your CV joints are being pushed beyond their design limits.
Diagnosing the Problem: Is It Really the CV Joint?
Not every noise or vibration after a lift or spacers is a CV issue. Other components can mimic these symptoms, and misdiagnosis is common. The key is understanding when and how the symptom occurs. A true CV joint problem is almost always power- and angle-dependent.
Vibration Under Acceleration
This is a classic. You press the gas, and you feel a shudder, often through the floor or steering wheel. It’s usually a rhythmic vibration that gets worse the harder you accelerate. This happens because the CV joint’s operating angle is too steep, causing the internal components to bind and release with each rotation.
Common Mimics: Don’t jump to conclusions. Unbalanced tires can cause vibration, but it’s usually speed-dependent, not acceleration-dependent. Worn tie rods or degraded engine mounts can also cause similar feelings.
Definitive Test: Get under the vehicle (safely, on a lift or jack stands) and use a digital angle finder on the axle shafts. I’m looking for angles greater than 4 degrees on the inner joint or 7 degrees on the outer. If you see those numbers, you’ve confirmed excessive driveline stress.
Clicking or Popping During Tight Turns
This is another dead giveaway. You’re pulling out of a parking spot, making a U-turn, or just turning sharply, and you hear a distinct click-click-click. This is internal wear in the tripod or ball-type joint, usually from high-angle articulation.
Common Mimics: A worn steering rack can make noise, but it’s usually more of a clunk or groan. A dry upper strut mount bearing might squeak or creak.
Definitive Test: Find an empty parking lot. Turn the wheel all the way to one side, then slowly accelerate. Listen for the clicking. Now, try the same turn, but let off the gas and coast through it. If the clicking stops when you’re coasting and only happens under power, that’s your CV joint.
Grease Leakage from the Boot
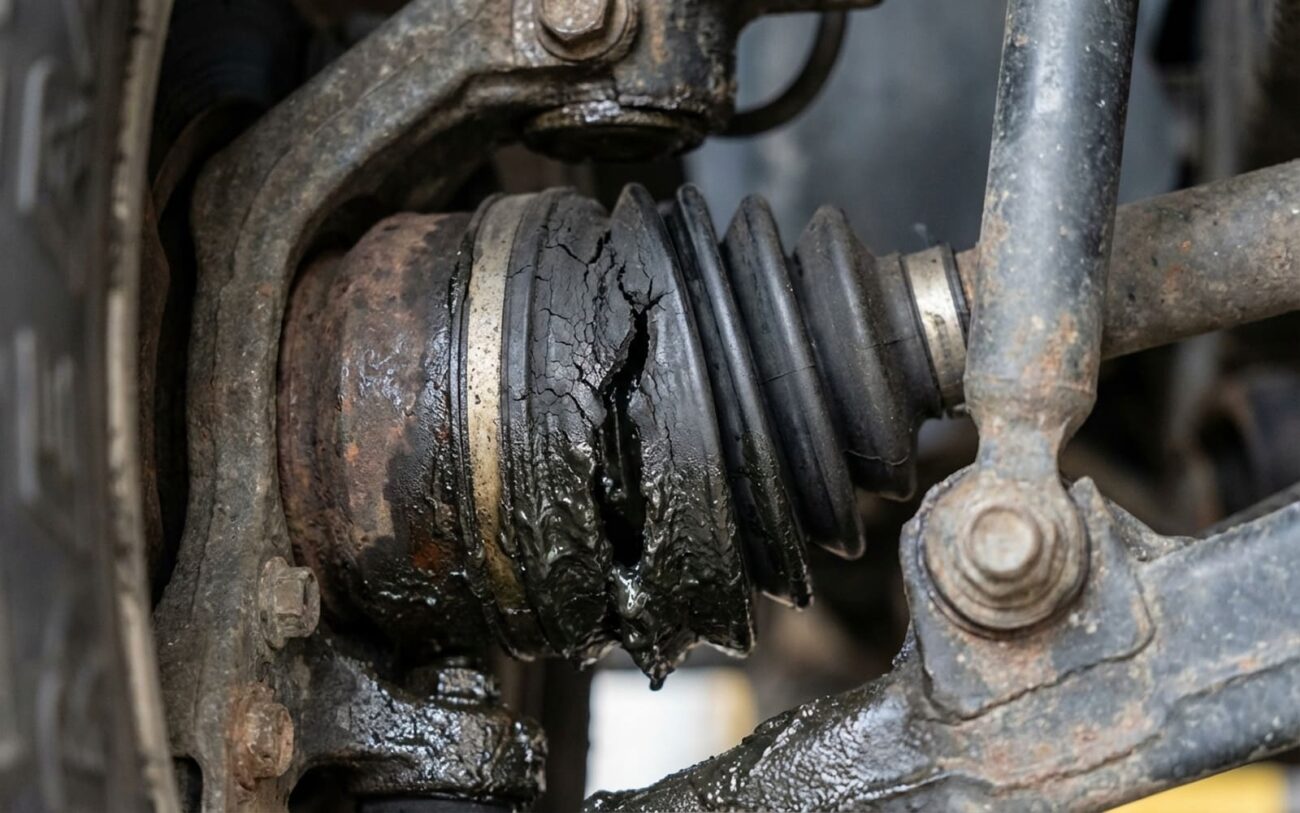
This one’s visual. You’ll see black, greasy goo splattered on the inside of your wheel, on the suspension components, or even on the frame. This means the rubber boot protecting the CV joint has failed.
Common Mimics: Sometimes it’s just a debris puncture, a failed clamp, or impact damage. But with a lift, it’s often chronic over-extension.
Definitive Test: Inspect the boot closely. Fatigue tears from excessive angle usually show up as concentric cracking around the pleats where the boot flexes. A debris cut will be a jagged gash. Once that boot is compromised, dirt and water get in, and the grease gets out. It’s a death sentence for the joint if not addressed quickly.
A note on “clunks”:
If you’re hearing a clunk strictly over bumps, that’s usually not your driveline. That’s more likely a stabilizer bar link or bushing failure, or maybe a worn ball joint. You can read more about diagnosing those here: What Causes a Thud or Clunk When Going Over Bumps?
Why Lifts and Spacers Are CV Joint Killers
The core issue here is driveline geometry. CV joints are precision-engineered to operate within very specific angular ranges. When you add wheel spacers or install a lift kit, you’re fundamentally altering the track width and suspension arm angles. This forces the CV axle into a much steeper operating angle than it was ever designed for.
The Geometry Problem
Look, imagine trying to bend your elbow backwards. It’s not designed for that. A CV joint is similar. It’s built to operate smoothly within a certain range of motion. When you lift a truck or push the wheels out with spacers, you’re forcing that axle to operate at a much steeper angle than the factory ever intended. It’s like trying to make your elbow bend the wrong way—it’s gonna hurt, and eventually, something’s gonna break.
When the axle angle exceeds its design limits, the internal rollers are forced to the extreme edges of their raceways. This causes binding and release with each rotation—that’s the shudder you feel. At the same time, the rubber boot is constantly stretched beyond its elastic limit. The folds fatigue, crack, and eventually rupture. Once that seal is gone, grease escapes, and contaminants like dirt and water get in. That’s when wear accelerates exponentially, and the joint quickly fails.
How to Fix It: Your Options Based on the Damage
Professional Territory
Look, internal CV wear and full axle replacements often require hydraulic presses, specialized pullers, and high-torque tools. DIYers risk damaging expensive transmission input shafts, hub bearings, or even themselves if proper safety and torque specs aren’t followed exactly. This isn’t a job for a basic socket set.
Boot Replacement DIY-FEASIBLE (WITH CAUTION)
Full Axle Assembly PROFESSIONAL-ONLY
Geometry Correction MANDATORY FOR LIFTS
Making Sure the Fix Actually Worked
Validation is part of the repair. After a boot replacement or axle swap, you absolutely must verify that the stress is gone and the symptoms are eliminated. Don’t skip this step.
Post-Repair Road Test (My Procedure)
-
First, find a safe spot and really get on the gas from a dead stop, up to about 30-40 mph. You should feel absolutely zero shudder or vibration through the floor or steering wheel. If you do, something’s still wrong.
-
Next, in an empty lot, perform full-lock figure-eight maneuvers, both clockwise and counter-clockwise. Listen carefully. Silence is the goal. Any clicking or popping means the joint is still bad or you have another issue.
-
After about 50 miles of driving, get back under the vehicle and re-inspect the new boot. Look for any signs of fresh grease seepage or heat stress. Everything should be clean and intact.
-
If you installed geometry correction, re-verify your CV shaft angles with a digital inclinometer. Remember: aim for ≤4° on the inner joint and ≤7° on the outer. If they’re still too steep, you haven’t fixed the root cause.
What This is Going to Cost You
Alright, let’s talk money. These aren’t cheap fixes, especially if you let the problem go too long. Here’s a general idea of what you’re looking at:
| Repair Type | DIY Cost (Parts) | Shop Cost (Total) | Success Rate |
|---|---|---|---|
| Boot Kit Replacement | $40 – $80 | $250 – $400 | 95% |
| Complete Axle Replacement | $150 – $300 | $400 – $700 | 98% |
| Geometry Correction | $300 – $800 | $800 – $1,500 | 90% |
Pro-Active Prevention and Final Thoughts
Look, the best fix is preventing the problem in the first place. Every time you’re under the truck for an oil change or tire rotation, take 30 seconds to inspect those CV boots. Are they cracked? Is there any grease flung around? Catching a torn boot early—before the joint is contaminated—can save you hundreds of dollars and a lot of headaches.
And if you’re running a lift over two inches, don’t even think about skipping a differential drop kit or corrected upper control arms. That’s not an accessory; it’s essential insurance against expensive failures down the road.
