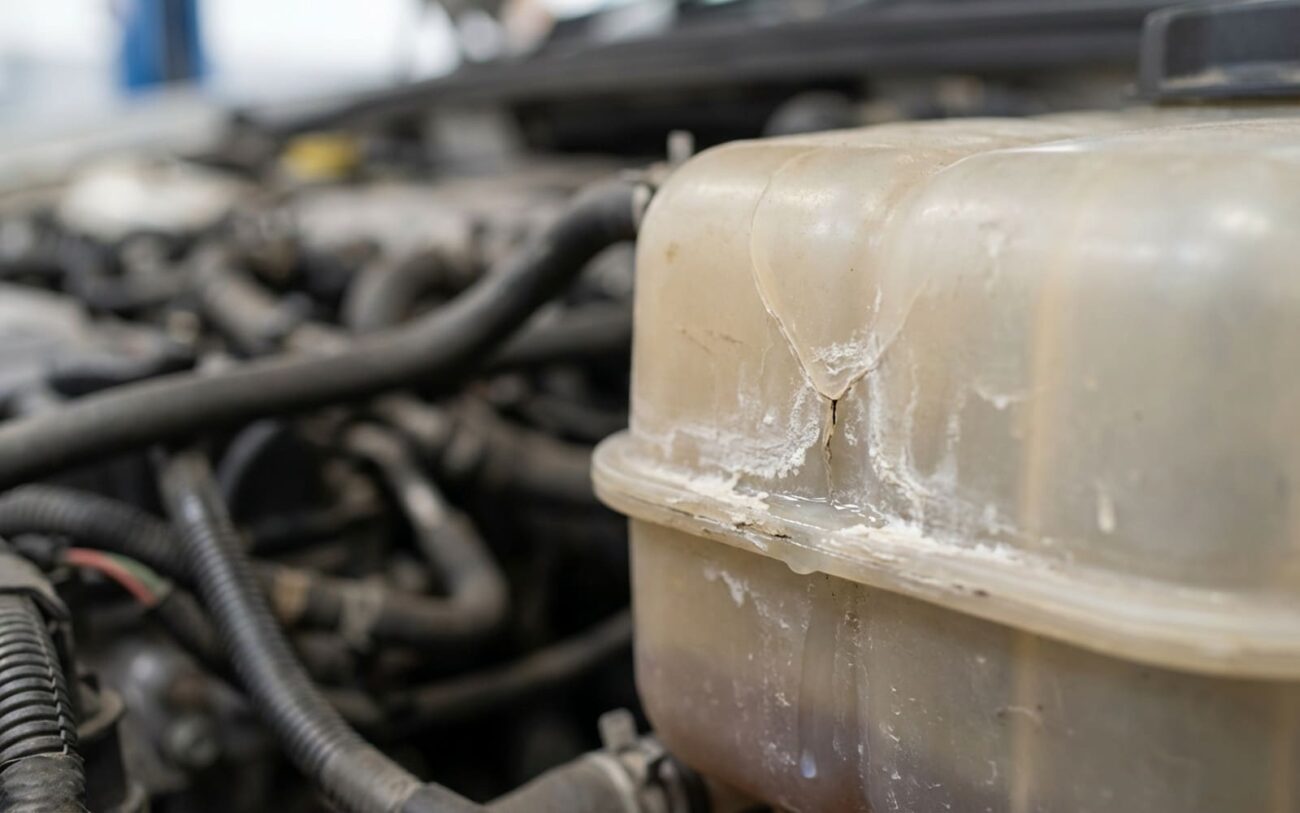
Alright, let’s talk about coolant expansion tanks. In my 25+ years turning wrenches, I’ve seen more of these fail than just about any other plastic component under the hood. They’re often called overflow tanks or reservoirs, but whatever you call ’em, they’re critical. They manage your cooling system’s pressure, handle thermal expansion, and recover coolant. And here’s the kicker: they’re made of plastic. Modern cars, especially those from the early 2000s onward, use thinner, molded polyamide or polyethylene. Daily heat cycles, pressure fluctuations, and time just eat away at that plastic. When it finally gives up the ghost and cracks, the symptoms are usually pretty distinct—if you know what you’re looking for.
What You’ll See, Smell, and Feel When It Fails
The most obvious sign, the one that usually gets folks to call me, is a visible coolant leak. You’ll spot coolant—could be green, orange, pink, blue, depends on what your car takes—dribbling down from the tank itself. I’m talking about a leak from the tank body, not just a loose hose connection or a fitting. Coolant feels a little slippery, and it leaves a tell-tale stain. Grab a flashlight and really get in there. Trace any wetness upwards. If that drip is coming from a molded seam, a mounting bracket, or right near where the pressure cap screws on, you’ve almost certainly got a cracked reservoir.
And while you’re looking, check for what we call “crazing.” That’s that spiderweb pattern of fine cracks you see in the plastic. That’s not just cosmetic, folks. That’s advanced material fatigue, a clear sign the plastic is brittle and a full-blown failure is just around the corner. I’ve seen tanks look perfectly fine on the outside, then you see that crazing and know it’s time to replace it.
Another common symptom is that distinct, sweet antifreeze smell under the hood, or sometimes even inside the cabin, but with no visible puddle on the ground. This usually points to a small crack, often in the upper part of the tank, that’s only leaking vapor. When the engine heats up and the system pressurizes, coolant vaporizes and escapes as steam through those microfractures. It’s a subtle leak, but you’ll smell it. Now, this smell can mimic a heater core leak, but there’s a key difference: a failed heater core usually leaves a damp floorboard and that lingering smell inside the car, even when the heater’s off. A cracked reservoir typically only smells during or shortly after engine operation, and it’s usually strongest under the hood.
Then there’s the chronic low coolant warning light. This is a serious red flag, folks. If you’re topping off the reservoir every few weeks, but you can’t find an external leak anywhere, that coolant is going somewhere. While a cracked expansion tank can slowly vent steam, don’t ever assume that’s the only possibility. Coolant disappearing into the combustion chamber (hello, blown head gasket!) or mixing with your oil is far more dangerous. Either of those scenarios can lead to catastrophic engine damage long before you notice visible symptoms. So, I’ll be blunt: always investigate unexplained coolant loss thoroughly. Don’t just keep refilling and driving, hoping for the best. That’s a recipe for disaster.
How I Confirm the Leak Source
Before you go replacing anything, you absolutely have to confirm the source. I’ve seen too many folks jump to conclusions, replace a tank, and still have a leak because it was actually a hose, a faulty pressure cap, or even a failing water pump. Wasted time, wasted money. Here’s the approach I use to pinpoint the real culprit.
| Symptom | Likely Tank Issue | Common Mimics | My Go-To Test |
|---|---|---|---|
| Visible Coolant Leak | Crack in the tank body itself, especially along molded seams, mounting lugs, or the base of hose nipples. | Leaking radiator hose, damaged clamp, failed pressure cap seal, leaking coolant temperature sensor O-ring. |
First, clean the entire area with degreaser and let it dry completely. Then, use a cooling system pressure tester. Pressurize the system to the cap’s rating (usually 15–20 psi). Watch closely for seepage from the plastic tank body, not just from hose connections or fittings. That’s the key. |
| Coolant Smell Without Visible Leak | Micro-crack in the upper tank, venting steam during heat cycles. | Heater core leak, minor thermostat housing seepage, EGR cooler failure (especially on diesels), coolant dripping onto a hot exhaust manifold. |
I usually add UV dye to the coolant. Run the engine to operating temperature, then use a black light to trace any vapor or condensation paths. Another good trick, especially for tiny leaks, is to perform a smoke test on the pressurized system. That smoke will find even the smallest vapor leaks. |
| Chronic Coolant Loss (No External Leak) | Slow steam leak from a hairline fracture in the reservoir. | Blown head gasket, cracked cylinder head, leaking oil cooler, internal transmission cooler leak (less common, but happens). |
This is where you need to rule out internal engine issues first. Perform a block tester (combustion leak test) to detect hydrocarbons in the coolant. If that’s clear, then pressure test the system when both cold and hot. Monitor your OBD2 temperature readings for any unusual fluctuations. I’ve seen this a lot on BMW, Audi, and VW models from the 2000s–2010s; their plastic expansion tanks are notorious for degradation, especially on GDI and turbocharged variants. |
Why These Tanks Crack: The Real Story
So, you’ve confirmed the diagnosis, but what actually caused the failure? In most cases, it’s pretty simple: material fatigue. That tank undergoes daily stress, year after year. It heats up, it pressurizes, it cools down, it contracts. Over 10 to 15 years, this constant cycle just weakens the plastic, especially at stress points like seams, corners, and mounting bosses. The plastic becomes brittle and eventually, it just cracks. I see this a lot in vehicles used for frequent short trips, where that thermal cycling is even more extreme.
Then there’s chemical incompatibility. This is a big one. Many modern engines require very specific coolants—we’re talking OAT (Organic Acid Technology) or HOAT (Hybrid OAT) formulas. Using generic green ethylene glycol in a system designed for a specialized formula can severely degrade plastic and rubber components over time. It’s like putting the wrong fuel in your tank, but slower. The wrong mix also reduces corrosion protection, leading to internal deposits that mess with heat transfer and pressure stability.
Thermal shock is another common culprit. Pouring cold coolant into a hot, pressurized system can create sudden stress fractures. I’ve seen it happen. Similarly, a stuck thermostat or a failed electric fan can cause rapid pressure spikes, overwhelming an already weakened tank. And don’t forget the pressure cap! If it fails open too early, the system can’t maintain proper pressure, leading to localized boiling. If it sticks closed, pressure builds beyond design limits, putting immense stress on all cooling system components, including that plastic reservoir.
Now, it’s important to distinguish between the tank itself failing and failures of components attached to it. A leak from the pressure cap’s rubber seal isn’t a tank issue—that’s a cap problem. A weep from the coolant level sensor O-ring means the sensor or its seal needs replacement, not the whole tank. Hose connection leaks are usually due to aged rubber or loose clamps. But in my experience, by the time the tank is 12+ years old, these ancillary parts are often worn out too. Replacing them during tank service is just smart preventative maintenance, saves you another trip later.
Repair Options: My Take on Fixing It
Once you’ve confirmed that crack, here are your realistic repair pathways. Your choice really depends on the crack size, its location, your budget, and frankly, how long you plan to keep the vehicle.
Temporary Epoxy Repair Last Resort Only
Replacement of the Expansion Tank Recommended
-
First, let that engine cool down completely—never, ever open a pressurized, hot system.
-
Drain the coolant. You can use the radiator petcock if it has one, or just pull the lower radiator hose. Have a big catch pan ready.
-
Disconnect all the hoses: the upper/lower radiator hoses, the small overflow hose, and unplug the coolant level sensor connector.
-
Unbolt the mounting bracket(s) and carefully remove the old tank.
-
Transfer the pressure cap and level sensor to the new unit. If they look worn or old, now’s the time to replace them too—it’s cheap insurance.
-
Reinstall the new tank and reconnect everything. Use new hose clamps if the old ones look corroded or weak.
Now, refilling is critical. Use only the manufacturer-specified coolant type and a 50/50 mix with distilled water, unless you’re using pre-diluted coolant. Proper bleeding is absolutely essential to avoid air pockets. Most vehicles require elevating the front end, setting the heater to max heat (fan low), and opening a bleed screw (often on the thermostat housing or an upper hose). Fill slowly until bubble-free coolant flows from the bleed point. Close the screw, install the cap, and run the engine with the cap off until the thermostat opens and the fans cycle. Keep an eye on the level and top off as needed once the engine is cold again. Don’t rush this part.
Verifying the Repair: Don’t Skip This Step
Never, ever assume the job is done after you’ve refilled the coolant. You must validate that repair under real-world conditions. I always tell my customers this.
If you went with a temporary epoxy fix: after it’s fully cured, refill the system and pressure test it. It has to hold the rated pressure (say, 15 psi) for at least 20 minutes with no seepage. Then, take the car through a full heat cycle—drive it until the thermostat opens and the fans activate. If it holds, monitor it daily. Any sign of wetness or a dropping level means that patch is failing, and you need to get a new tank in there, pronto.
For a full tank replacement: two tests are essential. First, a cold pressure test. Attach your tester and pressurize it to the cap’s spec. The gauge should hold steady, with less than a 1 psi drop over 20 minutes. If it drops more than that, you’ve still got a leak somewhere. Second, real-world validation. Drive the car for several days, through multiple cold starts and heat cycles. Check the coolant level when the engine is cold. It should stabilize right at the “Cold Full” mark. No overheating, no warning lights, no new smells. If all that checks out, then you’ve got a solid repair.
Cost, Risk, and My Advice on When to Repair
Understanding the financial and mechanical stakes helps guide your decision. Here’s a quick rundown of what I typically see:
| Repair Type | DIY Cost (Parts) | Shop Cost (Est. Labor + Parts) | My Success Rate | Big Risk if It Fails |
|---|---|---|---|---|
| Temporary Epoxy Repair | $15–$25 (epoxy kit) | N/A (I don’t recommend this for professional repair) | Under 50% long-term reliability | Sudden, complete coolant loss leading to immediate engine overheating and potential internal damage. |
| OEM Tank Replacement | $80–$200 (tank, coolant, optional cap/sensor) | $300–$500 (includes labor, disposal, and system check) | Over 95% when done correctly | Improper bleeding can leave air pockets, causing localized overheating. Using the wrong coolant type may accelerate future plastic degradation. |
The economic decision really comes down to the overall condition of your vehicle. If your car has over 200,000 miles and you’re looking at other major services looming—like a timing belt, transmission work, or a suspension overhaul—you need to add up those total projected costs. As a rule of thumb, if repairs start to exceed 40% of the car’s current market value, you’re usually investing heavily in a depreciating asset. However, if the rest of the vehicle is solid and well-maintained, replacing the tank is a smart, cost-effective move that prevents much larger expenses down the road. It’s a relatively cheap fix that protects a very expensive engine.
Preventing Future Failures: My Best Advice
Prevention starts with proper maintenance, always. I can’t stress this enough: always use the coolant type specified in your owner’s manual. Mixing incompatible coolants—like adding conventional green coolant to an OAT system—will absolutely degrade plastic and rubber components, including the reservoir, hoses, and water pump seals. If you’re ever in doubt, flush the system completely and refill it with the correct chemistry.
And here’s a simple one that gets overlooked: replace your pressure cap every 5 years or 60,000 miles, even if it seems fine. A weak cap reduces the boiling point and can cause coolant loss. A cap that sticks closed will increase system pressure beyond design limits, risking a sudden tank rupture. Both scenarios put undue stress on your entire cooling system.
Finally, inspect that tank regularly. Every oil change, take 30 seconds to look at it. Check for discoloration—yellowing or browning indicates heat aging. Feel along seams and mounting points for those fine cracks. Early detection allows you to plan the repair before failure leaves you stranded on the side of the road. And consider an annual cooling system pressure test. It’s a simple, inexpensive procedure that checks the integrity of the entire system—tank, hoses, radiator, and cap. Finding a weak component before it fails is the best protection you can give your engine. It’s far cheaper than a tow, and it might just save your powertrain from a very expensive meltdown.
