Alright, Let’s Talk About That Brake Shake
If you’re reading this, I bet you’ve got that familiar shimmy or pulse coming through the brake pedal, maybe even the steering wheel, every time you try to slow down. After 25-plus years turning wrenches, I can tell you it’s one of the most common complaints I hear in the shop.
Most folks walk in convinced they’ve got “warped rotors.” And yeah, often enough, that’s exactly what it feels like. But here’s the kicker: a lot of what people call “warped” isn’t actually the rotor physically bent out of shape. It’s usually something else entirely, or a specific kind of wear that gets misdiagnosed.
DIAGNOSTIC STATUS
Status: PULSATING
I’ve seen too many customers replace perfectly good rotors because they didn’t get a proper diagnosis. Sometimes it’s just a bit of uneven pad material, a caliper that’s sticking, or even worn-out suspension components. Swapping parts without knowing the root cause? That’s just throwing money away. And worse, ignoring a real brake problem can absolutely lead to longer stopping distances and put you in a dangerous spot.
Playing Detective: What That Shake Is Telling You
The first step in my shop is always to figure out where you feel that vibration. The location is a huge clue. Is it in the pedal, the steering wheel, or the whole car? Each tells a different story.
| Where You Feel It | Most Likely Rotor Issue | Common Mimics (Check These First!) | My Go-To Test |
|---|---|---|---|
| Brake Pedal Pulsation | Lateral runout or Disc Thickness Variation (DTV) | Glazed pads, uneven pad material transfer, contaminated friction surface (oil/grease), worn wheel bearing, sticky caliper slide pins. |
First, clean the rotor and hub surfaces thoroughly with brake cleaner. Then, use a dial indicator to measure lateral runout. I look for anything over 0.005 inches. For DTV, a micrometer is key; anything beyond 0.0005 inches is usually noticeable. |
| Steering Wheel Shimmy | Lateral runout on front rotors (especially) | Front tire imbalance, bent wheel, worn tie rod ends, loose ball joints, worn control arm bushings. |
Measure front rotor runout first, just like for pedal pulsation. If that’s within spec, I’ll move on to checking tire balance and suspension components. A tire out of balance will shake all the time, not just when braking. |
| Body/Seat Vibration | Rear rotor DTV or runout | Driveshaft imbalance (on RWD/AWD vehicles), out-of-round rear tire, worn U-joints, rear wheel bearing play. |
Inspect rear rotors with a dial indicator. If you’ve got a rear-wheel-drive or all-wheel-drive vehicle, don’t forget to check the driveshaft for runout and U-joint condition. Sometimes it’s a combination of issues. |
The Real Story: How Rotors Go Bad (It’s Not Always “Warping”)
The Reality Check
“True rotor ‘warping’—a permanent bend in the metal—is actually pretty rare. Most of the time, that pulsation is caused by uneven pad material buildup or slight variations in the rotor’s thickness. Think of it like a record with a tiny scratch that makes the needle jump.”
For a cast iron rotor to truly warp, you’d need some serious thermal shock. I’m talking about riding the brakes hard down a mountain pass until they’re glowing cherry red, and then immediately splashing through a cold puddle. That kind of extreme temperature change can cause plastic deformation.
More often, what we’re dealing with is Disc Thickness Variation (DTV). This happens when pad material gets deposited unevenly onto the rotor face, usually when the rotor is hot and you hold the brake pedal down at a stoplight. Those high spots create the pulsation you feel. Another common culprit is simply excessive lateral runout – the rotor wobbling slightly as it spins, which can be caused by improper installation or even a rusty hub face.
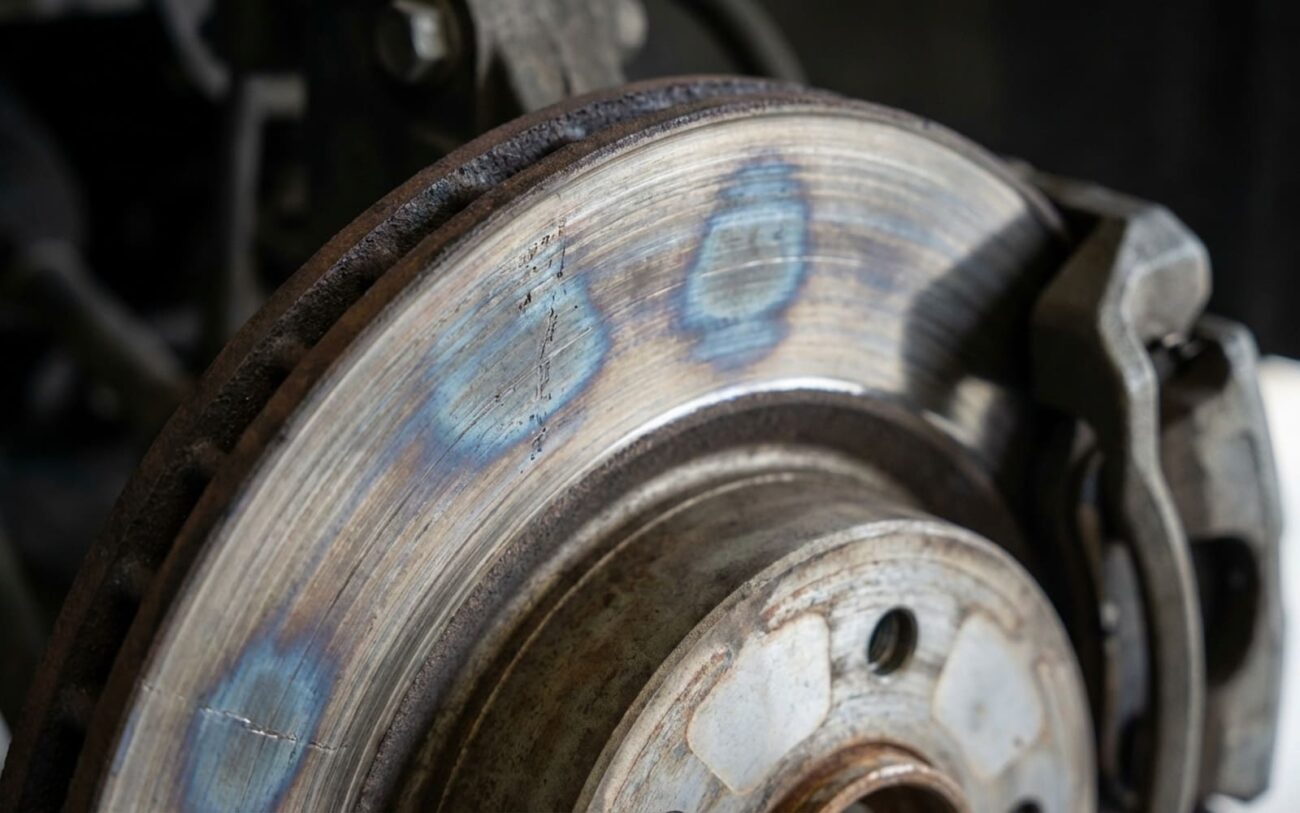
Don’t panic over blue spots:
You might see blue or dark spots on your rotors. Most of the time, this is just cosmetic heat tint from normal braking. As long as the rotor measures within its minimum thickness specification and doesn’t show significant DTV or runout, it’s usually fine. What you do need to watch for is “thermal checking”—small, hairline cracks. These are only a concern if they extend to the outer edge of the rotor or bridge between the cooling vanes. If you see that, it’s time for replacement, no questions asked.
Your Fix Depends on What We Find
Safety First, Always
Machining rotors is a precision job that requires the right equipment and knowledge. If a rotor has developed hardened spots (sometimes called martensite) from extreme heat, or if it has deep cracks, it is NOT REPAIRABLE. Trying to machine these can lead to sudden, catastrophic rotor failure. Don’t risk it.
Machining (Resurfacing) Professional Only
Full Replacement DIY Feasible
Controlled Bed-In Last Resort / Prevention
How I Know the Job’s Done Right
If you’ve machined the rotors, the numbers don’t lie. I always aim for a final lateral runout under 0.002 inches and DTV under 0.0003 inches. If you’ve replaced them, the real test is on the road. The pedal should feel solid and smooth, with absolutely no vibration in the steering wheel or chassis.
Over the next 50 to 100 miles, you should see a consistent, matte-gray transfer layer develop evenly across the entire rotor face. That’s your sign that the pads are bedding in correctly and everything is working as it should. If you still feel a slight pulsation, bring it back in – we missed something.
What’s This Going to Cost You?
| Repair Type | DIY Cost (Parts Only) | Shop Cost (Estimated) | My Success Rate (if done right) | Secondary Risk (if done wrong) |
|---|---|---|---|---|
| Machine Rotors (Pair) | $50–$100 (for machining service) | $100–$200 | ~85% | Pulsation returns quickly if the rotor is too thin after machining, or if the hub wasn’t clean. |
| Replace Rotors (Pair) | $80–$150 (for quality aftermarket) | $300–$500 | ~95% | Most failures here are from poor installation, like not cleaning the hub or improper lug nut torque. |
A quick thought from my side: If you’re looking at repair costs that hit 40% or more of your car’s current value, especially if it’s got over 150,000 miles, it’s time to seriously evaluate if putting more money into it makes economic sense. Sometimes, a new-to-you car is the smarter move.
Keeping That Shake From Coming Back
My Prevention Checklist
-
Use the right pads for your ride: Don’t cheap out on brake pads, especially if you’re driving a heavy SUV or truck. Hard, cheap pads will overheat rotors quickly. Match the pad compound to your vehicle’s weight and your driving style.
-
Engine braking is your friend: When you’re heading down a long, steep hill, shift into a lower gear. Let the engine help slow you down. This takes a lot of stress off your brakes and prevents them from overheating.
-
Torque wrench isn’t optional: Seriously, this is huge. Always tighten lug nuts in a star pattern to the factory specification using a calibrated torque wrench. Impact guns are for removal, not final tightening. Uneven torque is a primary cause of rotor distortion.
-
Regular visual inspection: Every time you rotate your tires, take a good look at those rotors. Check for deep scoring, heavy rust, or a pronounced wear lip on the edge. Catching these things early can save you bigger headaches later.
