That Noise From Your Front End? It’s a Warning.
Look, if your car’s front end is making clunks, squeaks, or groans when you hit a bump or turn the wheel, it’s not just complaining. It’s giving you a serious heads-up. More often than not, that noise points straight to a failing ball joint. These aren’t just any old wear items; they’re critical safety components in your suspension. Unlike some parts that can limp along for a while, a bad ball joint is a catastrophic failure waiting to happen. I’ve seen too many vehicles come in on a tow truck after someone decided to take “just one more trip,” only to have a wheel fold right under the fender. It’s ugly, dangerous, and completely avoidable.
So, let’s cut to the chase. I’m going to walk you through exactly what those noises mean, how I pinpoint a bad ball joint in my shop, what your repair options really look like, and what you can do to prevent this mess. Because when it comes to your steering and suspension, guessing isn’t just risky, it’s plain stupid.
What to Listen For, What to Feel, and How I Check It
Ball joint failure usually follows a pretty predictable pattern of symptoms. The trick is catching it early, before it turns into a real problem. Here’s what I look and listen for, and how I confirm it’s the ball joint and not something else.
Excessive Play or a “Floating” Feeling
This is probably the most telling sign. You might notice your steering feels vague, or you get a shimmy through the wheel at highway speeds. Sometimes it feels like the car is “floating” over uneven pavement. That’s the ball joint allowing too much movement.
To check this, I get the front of the vehicle safely lifted, making sure to support the lower control arm – never the ball joint itself or the steering knuckle. With the wheel off the ground, I grab the tire firmly at the 6 and 12 o’clock positions and rock it hard, up and down. Any clunking or movement you feel, especially if you can see a gap opening and closing between the control arm and the steering knuckle, that’s a dead giveaway for a ball joint. Now, wheel bearings or control arm bushings can sometimes mimic this, so I don’t stop there. If I suspect play, I’ll often remove the wheel, then use a pry bar under the control arm, right near the ball joint. I apply upward pressure while watching the joint. Any visible gap or clunk confirms wear. For absolute precision, I’ve got a dial indicator I’ll set up on the lower control arm pointing at the knuckle. If I see more than about 0.050 inches (that’s 1.27 mm) of movement, it’s time for a new joint.
Squeaking or Creaking at Low Speeds
This is another classic one. It’s that dry, metallic groan you hear when you turn the wheel slowly in a parking lot, or when you creep over a driveway curb. It’s the sound of the ball stud grinding in its socket because it’s lost its lubrication – think of an old, ungreased door hinge. Strut mounts or sway bar links can make similar noises, but the location and timing usually help narrow it down. If it’s loudest right near the outer edge of the suspension and only happens when you’re turning the wheel, the ball joint is a strong suspect.
To confirm, I grab my mechanic’s stethoscope (or a long screwdriver, in a pinch) and use it as a listening probe. I have an assistant slowly turn the steering wheel side-to-side while the vehicle is on level ground. The noise will be loudest when the probe is touching the ball joint housing or its dust boot. If that sound follows the joint’s movement, you’ve found your culprit.
Distinct Clunking or Knocking Over Bumps
This is the symptom that usually gets people into the shop – and for good reason. It’s a sharp, metallic “clunk” that you can feel through the floorboard or steering wheel when you hit a pothole or a speed bump. What’s happening is the ball stud is rattling inside its worn-out socket, momentarily losing contact before slamming back into place. The problem is, other parts like tie rod ends, stabilizer links, or even strut mounts can make almost identical sounds. So, you can’t just rely on the noise alone; you need to do some physical testing.
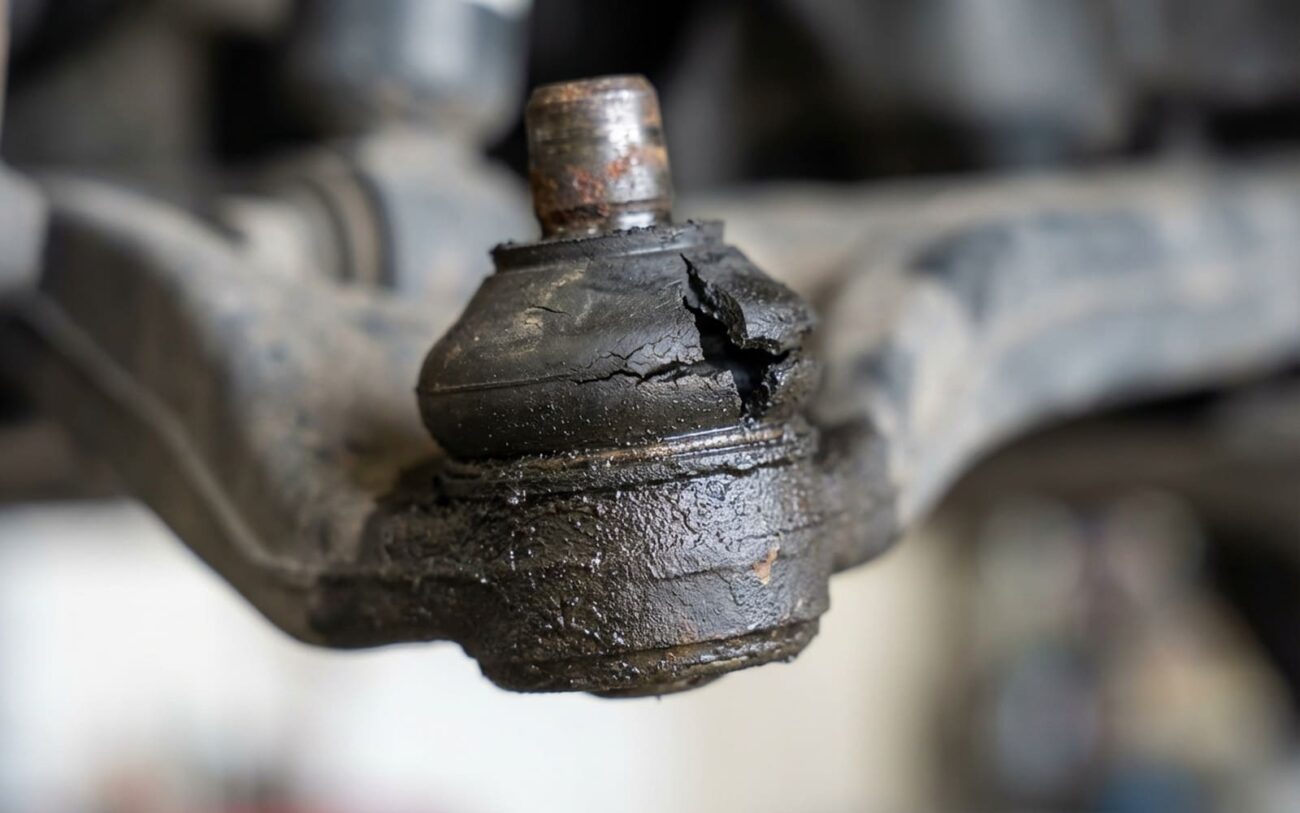
For clunking, I perform what I call a “dry park test.” With the vehicle on the ground and the engine off, I have an assistant rapidly turn the steering wheel left and right, maybe a quarter turn each way. I place my hand firmly on the ball joint housing – if you feel a distinct knock or vibration right there, that joint has excessive play. A visibly damaged or split dust boot just further confirms what I’m feeling.
Abnormal Tire Wear
This usually shows up later in the game. Once there’s enough play in the ball joint, it starts messing with your camber or toe angles. You’ll see cupping, feathering, or uneven wear on the inner or outer edges of the tire tread. Now, alignment issues have a bunch of causes, but if you’ve had alignments done and the tires are still wearing funny, especially after some miles, it often traces back to worn suspension joints like ball joints or control arm bushings.
Why Ball Joints Give Up the Ghost
Understanding why these things fail helps a lot, not just for diagnosis, but for preventing future headaches. It’s rarely just “wear and tear”; there’s usually a sequence of events that leads to the failure.
In my experience, the root cause almost always starts with a failed dust boot, or seal. That rubber or thermoplastic boot is the joint’s first line of defense. It’s designed to keep the grease in and all the nasty road grit and moisture out. Once it cracks, tears, or gets punctured – from age, road debris, or even improper installation – that’s it. Water and dirt get in, the grease washes out or breaks down, and those internal bearing surfaces are left exposed. I see this constantly, especially in areas with road salt or where folks do a lot of driving on rough, unpaved roads.
Once contamination sets in, the wear on the bearing surfaces accelerates like crazy. The ball stud and socket are supposed to pivot smoothly with minimal friction. But without lubrication, they start to wear unevenly, creating slop. That’s the play you feel during inspection. It’s funny, a ball joint can feel perfectly fine one week, and then dangerously loose the next, once that protective grease is completely gone.
In harsh environments, corrosion becomes a huge factor. Rust can seize the joint, making it stiff and noisy, or it can literally eat away at the metal until the stud weakens and fractures. I’ve pulled joints where the stud was almost completely cut through by internal corrosion, and you couldn’t even tell from the outside because the boot looked mostly intact. That’s why a visual inspection isn’t always enough.
Material fatigue or fracture is pretty rare under normal conditions, but it can happen after a hard impact – like slamming into a curb at speed. A damaged joint might hold on for a while, but it’ll fail suddenly under stress. And just a heads-up: some older or high-mileage vehicles, especially certain models with Ecotec or K-series engines, have had issues with premature joint wear due to original equipment manufacturing defects or weaker metallurgy in the control arms. If you’re seeing early failure, it’s worth checking if there are any manufacturer service bulletins (TSBs) out there for your specific vehicle. Your dealer or a good repair database can usually tell you.
Oh, and one more thing I always tell people: a worn control arm bushing is not a ball joint failure, even though they’re often on the same component. They wear independently and need separate inspection. Don’t let a shop tell you they’re the same thing.
Fixing It: Your Options and What I Recommend
How you go about fixing a bad ball joint really depends on your vehicle’s design, the type of joint, and honestly, how far gone the damage is. Not all repairs are created equal, and definitely not all are DIY-friendly.
1. The Press-In Ball Joint
Some vehicles, often older models or certain trucks, use ball joints that are pressed into the control arm. Replacing just the joint is technically possible, but for most DIYers, this is where things get tricky. You’ll need a heavy-duty ball joint press kit (like an OTC or Pacer set) or access to a hydraulic press, and the skill to remove and install it without damaging the control arm’s bore. If that joint isn’t pressed in perfectly straight, it’s going to bind up or fail prematurely. For experienced DIYers, removing the entire control arm and working on it on a bench can make it feasible, but you still need those specialized tools. And always, always use new hardware and torque everything to factory spec. For example, a Honda Civic lower ball joint nut usually needs around 47–53 ft-lbs, plus an additional turn to align the cotter pin. But you absolutely have to confirm with the factory service manual for your specific car.
2. The Bolt-On Control Arm Assembly
This is what I see on most modern passenger cars. The ball joint comes pre-installed as part of a complete control arm assembly. This makes the job much more DIY-friendly, if you have the right tools and safety gear. You just unbolt the old arm and swap in the new one. Good quality aftermarket brands like Moog or Mevotech offer excellent OE+ quality parts. You’ll need jack stands, a breaker bar, a good torque wrench, and a socket set. For instance, a 2016 Toyota Camry lower control arm bolt typically torques to 123 ft-lbs, and the ball joint nut to 83 ft-lbs. Critical point here: you must get a front-end alignment afterward. Disturbing those control arm bolts will absolutely throw off your camber and toe angles, leading to tire wear and poor handling.
3. The Severely Corroded or Seized Joint
When that ball stud is rusted solid into the steering knuckle, this is a job for the pros. Trying to force it out with a hammer or a pickle fork can easily crack the steering knuckle or damage the wheel bearing. In my shop, we sometimes use heat and specialized pullers, but even then, there’s always a risk. A botched removal can quickly turn what should be a couple-hundred-dollar repair into a thousand-dollar headache if you end up needing a new knuckle, wheel bearing, or even an ABS tone ring. Don’t mess with this one unless you know exactly what you’re doing and have the right equipment.
The Job Isn’t Done Until It’s Checked: Post-Repair Validation
Just bolting everything back together isn’t the finish line. You absolutely have to verify that the repair is safe and correct. Here’s what I do every single time.
My Post-Repair Checklist
-
Recheck for Play: I go back and do the exact same pry bar or dial indicator test I used for diagnosis. There should be zero detectable movement, absolutely none. Any clunk or slop means something is still wrong – maybe improper installation, or even a defective new part. Don’t skip this.
-
Torque Verification: Every single fastener I touched has to be torqued to factory spec. The ball joint nut, control arm bolts, tie rod ends – they all affect safety and longevity. I use a calibrated torque wrench and install new cotter pins where required. Loose fasteners can cause joint failure, and over-torquing can damage the threads or the control arm itself.
-
Operational Test Drive: I take the vehicle for a good test drive, specifically on a road with some rough spots or sharp bumps. The clunking and groaning should be completely gone. I’ll also repeat the dry park test: have someone turn the wheel while I feel the joint – it should be solid and silent. And I listen for any new noises that might indicate I disturbed something else, like a strut mount or an ABS sensor wire.
You need a dial indicator, a good torque wrench, and your ears for this. Trust me, skipping these steps is the difference between a proper repair and a ticking time bomb.
What’s This Going to Cost Me? And When to Walk Away
Alright, let’s talk numbers. Here’s what you’re likely looking at, depending on your vehicle and whether you tackle it yourself or take it to a shop.
For a bolt-on control arm assembly, if you’re doing it yourself, parts will probably run you anywhere from $80 to $200 per side. The success rate for a DIYer is pretty high, assuming you have the right tools and torque everything correctly. The main risks? Improper torque can lead to the joint separating (bad news), and skipping the alignment will absolutely chew up your tires and make the car handle terribly. If you take it to a shop, you’re usually looking at $250 – $500 per side, including parts and labor, plus the alignment fee.
For a press-in ball joint, parts plus tool rental might be $40 – $100 per side for a DIYer. But honestly, the success rate for a DIYer is medium at best. There’s a real risk of damaging the control arm if the press isn’t used perfectly. A poorly seated or “cocked” joint will fail quickly, and incorrect installation can damage the steering knuckle or wheel bearing. If a shop does it, expect $200 – $400 per side, again, plus alignment.
Here’s my rule of thumb on when to repair or replace the car: If the total repair cost (for both sides, plus alignment) starts to creep over 40% of your car’s current market value, you really need to think hard about it. Especially if other major systems – like brakes, tires, or other suspension components – are also nearing replacement. Sometimes, it just doesn’t make financial sense to keep throwing money at it. But if the car is otherwise solid and you’re trying to avoid a costly new car payment, then absolutely, the repair is often worth it.
Keeping Your Ball Joints Alive (Prevention & Monitoring)
Prevention really depends on the type of ball joint your vehicle has. You’ve got two main types:
My Advice for Longevity
-
Serviceable Ball Joints (with a grease fitting): Some trucks, SUVs, and older cars still use these. If yours has a grease fitting (we call ’em zerks), you absolutely need to grease it at every oil change. I pump in NLGI #2 lithium-based grease until I see fresh lube just barely appear at the boot seam. This helps purge out any contaminants that might have snuck in. Skipping this step, especially if you drive in dirty or wet conditions, will drastically shorten the life of that joint.
-
Sealed, Non-Serviceable Ball Joints: Most modern passenger cars have these. You can’t grease them, so maintenance is all about monitoring. Make inspecting them part of your routine maintenance – during tire rotations or oil changes. Get down there and look at the dust boot: any cracks, bulges, or grease leaks are huge red flags. Then, perform that 6-and-12 o’clock rock test. If you feel any looseness or hear a clunk, it’s time to dig deeper.
