You’re Not Imagining It — That Beep Means Something’s Wrong
I’ve been turning wrenches for over 25 years, and parking sensor complaints? They’re everywhere now. Not because sensors are failing more — they’re actually better than ever — but because drivers rely on them. And when they glitch, it’s not just annoying, it’s dangerous.
Let’s cut through the noise: if you hear a constant tone the second you shift into reverse, that’s not “working hard” — that’s a fault. The system has flagged a problem. Same deal if it goes silent when you’re backing up to a wall or another car. That’s not “calm” — that’s dead.
On vehicles with a screen display, watch for zones that stay dark, show an “X”, or light up permanently even when nothing’s there. That’s the system telling you exactly which sensor is down — if you know how to read it.
Don’t Replace Anything Yet — Let’s Diagnose Like a Pro
I can’t tell you how many times I’ve pulled a sensor out only to find it’s perfect — the fault was in the wiring or the module. Replacing parts on a hunch burns time and money. I’ve seen shops charge $400 for a “sensor replacement” when the real issue was a $5 fuse.
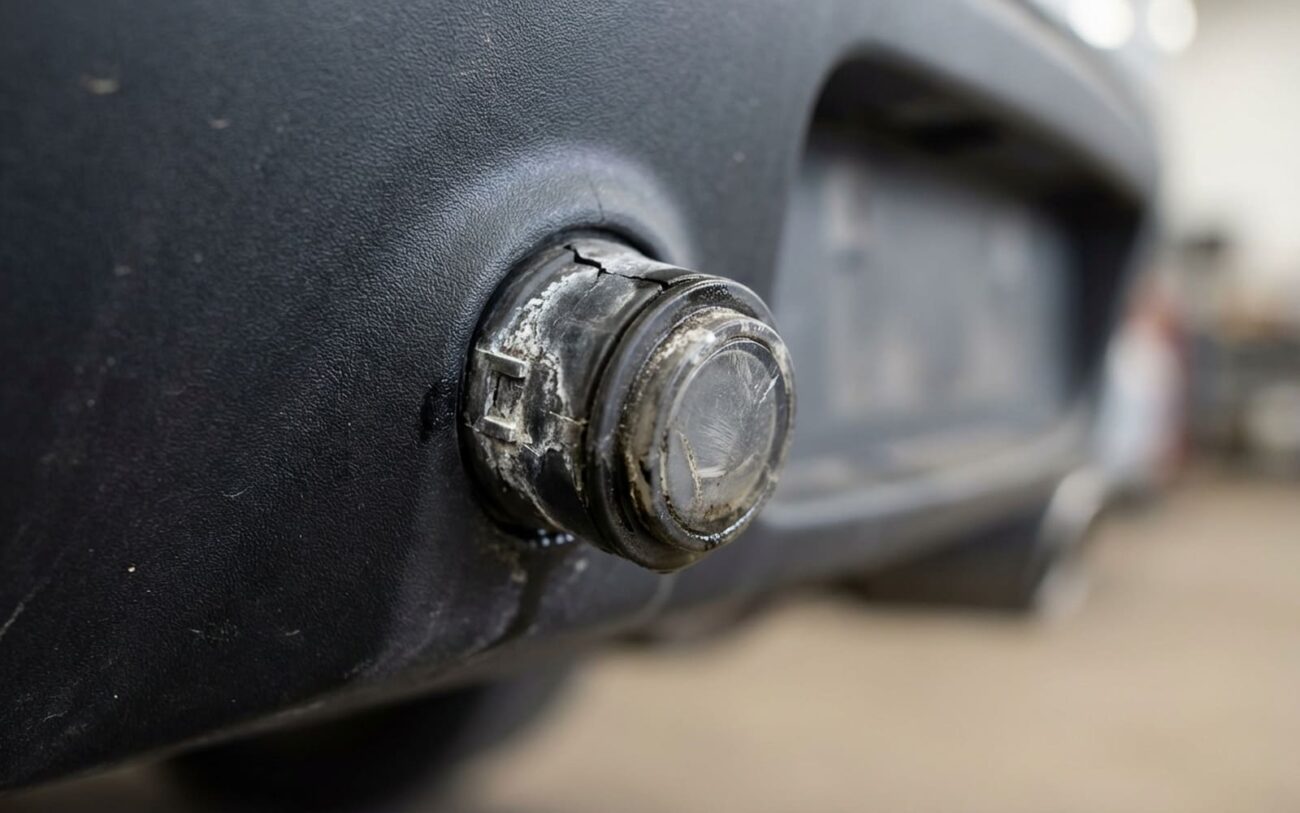
Start simple: walk around the car. Look at each sensor in the bumper. Are they cracked? Cloudy? Scratched from a car wash brush? That plastic dome isn’t just cosmetic — it’s an acoustic lens. If it’s fogged or etched, the signal scatters. I’ve revived more than a few “dead” sensors with a wipe of isopropyl alcohol and a microfiber cloth.
But if the face looks good and the problem persists, it’s time to test.
| Symptom | Likely Cause | What Else Could Fool You | How I Confirm It |
|---|---|---|---|
| Constant beep from one position | Failed transducer or internal circuit | Wiring short, bad ground, module glitch |
Swap test. Move the suspect sensor to another spot. If the beep follows it, the sensor is junk. If the beep stays in the same location, the problem is in the harness or module. |
| No detection from one sensor | Dead piezo element or cracked face | Open wire, corroded connector |
Scan tool check. Pull live data — look for “Open Circuit” or a fixed reading (0 cm or 255 cm). Then, turn the system on and put your ear close. A working sensor ticks faintly. No sound? Either the sensor or its power is dead. |
| Intermittent beeping or dropouts | Cracked solder joint, moisture inside | Loose connector, pinched wire |
Use a scan tool to run an actuator test, then wiggle the harness near the bumper. If the sensor cuts out when you move the wire, the fault is in the connector or wiring — not the sensor. |
| Multiple sensors dead | Extremely rare for all to fail at once | Blown fuse, bad ground, dead control module |
Check power and ground at the module connector with a multimeter. On most vehicles, the park assist fuse is in the underhood box — often labeled “PARK SEN” or “BACKUP.” No power? Trace it back. Bad ground? Clean the mounting point — corrosion kills these systems. |
What Dies Inside That Little Dome?
These sensors aren’t magic — they’re piezoelectric transducers in a plastic housing. When you shift into reverse, the module sends a pulse. The crystal inside vibrates, sending out an ultrasonic wave. Then it listens for the echo. Distance = time between pulse and return.
But they live a rough life. Heat cycles from summer pavement to winter frost crack the internal solder. Vibration from rough roads loosens connections. And moisture? That’s the silent killer.
If the seal between the sensor and bumper fails, water gets in. I’ve pulled units that looked fine from the outside — but inside, the circuit board was green with corrosion. One drop can bridge traces and kill the whole thing.
And don’t underestimate physical damage. I’ve seen sensors knocked out of alignment by a light bump into a curb. It doesn’t take much. Even a misaligned sensor after a bumper repair can “see” the ground and trigger constant alerts — not because it’s broken, but because it’s pointing the wrong way.
On some Audis and Mercedes, the system throws an “Implausible Signal” code in these cases. That’s not an electrical fault — it’s geometry. Calibration fixes it.
Replacing the Sensor — Do It Right the First Time
This Isn’t Rocket Science — But It’s Not Trivial
You don’t need a degree, but you do need patience. One wrong move and you crack the bumper or fry the connector. I’ve seen both.
First: disconnect the negative battery terminal. Always. These sensors run on 12V, but the module is sensitive. A backfeed during removal can fry it.
Access varies. On most sedans, you’ll need to pull the trunk liner or rear bumper cover. SUVs? Often easier — just remove a few underbody clips. Once you’re in, find the connector. Most are quick-release — press the tab, pull it free.
Then push the old sensor out from the front. Some are held by rubber grommets, others by spring clips. Don’t pry — just push straight back. If it’s stuck, work it gently. Forcing it cracks the housing.
New sensor goes in dry — no glue, no sealant. Just align it perfectly flush with the bumper and press until it clicks. If it’s even slightly angled, the beam pattern shifts. You’ll get false alerts or blind spots.
Before you close it up: a dab of dielectric grease on the connector pins. I do this on every single one. Prevents corrosion, keeps moisture out. Five seconds now saves a comeback in six months.
Test It Like You Mean It
Don’t just put it back together and call it good. Test it.
Put the car in reverse. Have someone walk a trash can or cardboard box toward each sensor. Beeping should start around 5–6 feet out and increase in frequency as it gets closer. When the object moves away, the beeping should stop cleanly.
Better yet: use a scan tool. Clear any codes, then watch live data as the object approaches. Each sensor should show a smooth distance change. If one reads “0 cm” or “255 cm” the whole time, it’s not working — or not seated right.
And if your car needs calibration — like some Audis or Mercedes — don’t skip it. The procedure’s usually in the service manual. On a 2018+ A4, for example, you have to run a guided test in the MMI after replacement. No shortcut.
Cost, Risk, and When to Walk Away
| Repair | DIY (Part Only) | Shop (Parts + Labor) | Success Rate | Risks of Getting It Wrong |
|---|---|---|---|---|
| Single Sensor Replacement | $40–$150 (OEM) | $150–$400 | >95% | Misdiagnosis leads to wasted parts; damaged connectors during DIY removal. |
| Full Set (4) Replacement | $160–$600 | $500–$1200 | High | Expensive if root cause is module or wiring; overkill if only one sensor is bad. |
If the control module is suspect, consider a used OEM unit from a reputable salvage yard. Match the part number exactly — and get one with a return policy. I’ve saved customers $800 this way.
Pro Tip: Clean First, Replace Later
Before you order a part, clean the sensor face. I’ve had customers swear their system was dead — turned out to be a layer of wax from a quick detail. Isopropyl alcohol, soft cloth, 30 seconds. Try it. Could save you a whole afternoon.
Keep It Working: Simple Habits That Actually Help
These sensors last years if you treat them right. But abuse them, and they’ll fail fast.
Never blast them with a pressure washer. I’ve seen 3,000 PSI water pop sensors right out of their grommets. And those wheel cleaners? Acidic, abrasive — they eat the plastic lens. Spray the wheel, not the bumper.
And for the love of all that’s holy — don’t cover them with bumper stickers. I’ve diagnosed more than one “failed sensor” that was just blocked by a logo.
Finally: pay attention. If the beeping starts later than it used to, or hesitates, that’s early warning. Don’t wait for total failure. Clean it. Test it. Fix it. Because when you’re in a tight spot and that sensor doesn’t warn you about the pole three inches from your quarter panel — that’s when it matters.
