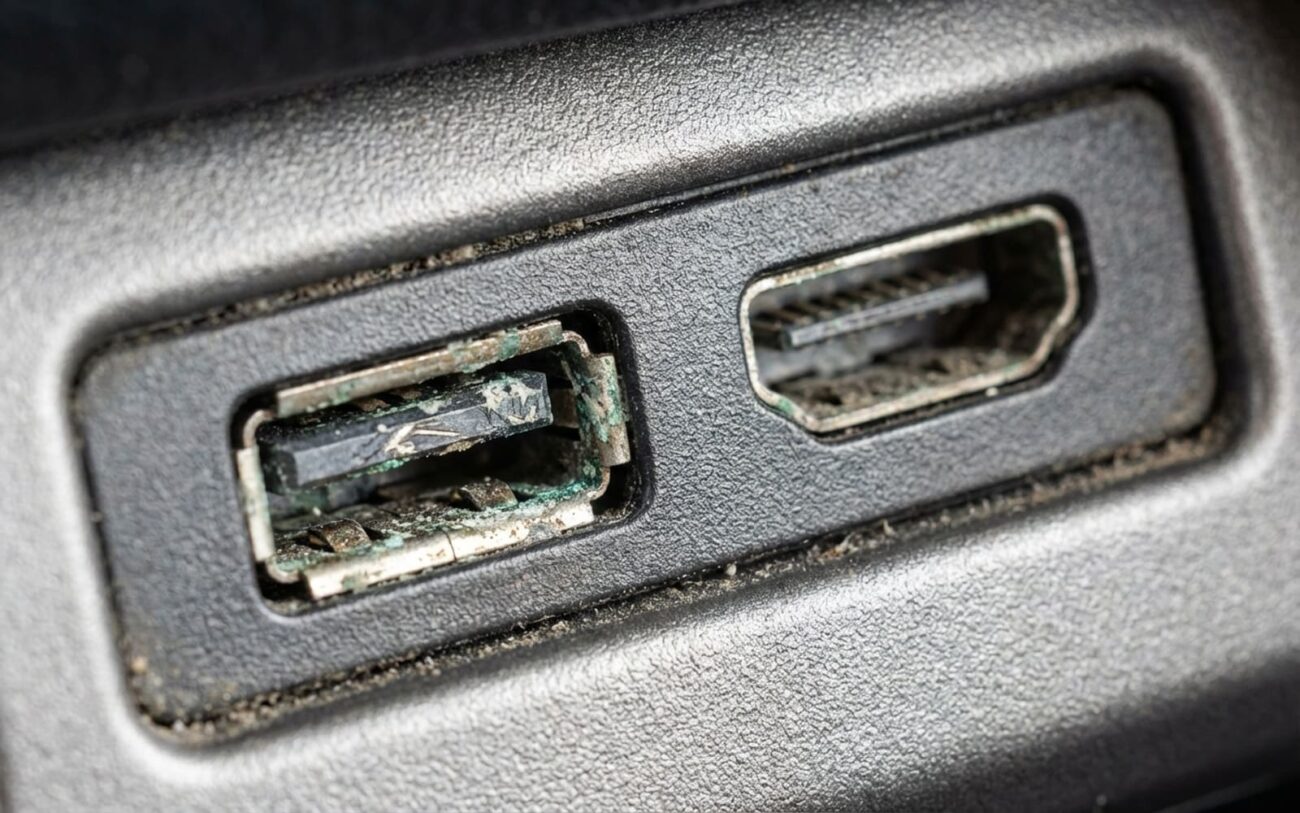
USB and HDMI ports in modern vehicles fail all the time—especially in high-use models like the Honda CR-V, Toyota RAV4, and Tesla Model 3. I see it weekly. The symptoms seem simple: your phone won’t connect, the screen flickers, or the device charges for five seconds and quits. But here’s the truth—most people jump to conclusions. They assume the port’s dead, buy a new one, only to find out the real problem was a blown fuse or a software glitch. That’s wasted time and money. Let me walk you through how I diagnose and fix this—step by step—like we’re working on it together in my bay.
Symptoms That Matter (And What They Actually Mean)
Intermittent connection is the #1 sign. You plug in, it connects, then drops. Reconnects. Drops again. That loop of chimes? That’s not “glitchy software”—that’s a physical fault. But before you tear into the dash, rule out the easy stuff.
Test your cable and phone in another car. If they work fine elsewhere, the issue is isolated to the vehicle. And don’t just test with one cable—use a known-good one, preferably OEM or MFi-certified. I keep a few in my tool chest for exactly this reason.
Now go hands-on. Plug it in. Does it feel loose? Can you wiggle it and kill the connection? That’s not “just a loose fit”—that’s worn contacts or a cracked housing. On high-mileage vehicles, especially those with heavy phone charging use, the spring tension in the port degrades. Gold plating wears off, copper oxidizes, resistance goes up. It’s physics, not magic.
Grab a flashlight—better yet, a borescope if you’ve got one. Look inside. Shiny metal? Good. White crust? That’s corrosion, usually from humidity or a spilled drink. Green gunk? Worse—galvanic corrosion from dissimilar metals reacting. Black spots? Oxidation. And pocket lint? Don’t laugh. It packs down over time, insulates the pins, and kills both power and data. I’ve pulled out solid plugs of it from ports that looked clean on the surface.
How I Diagnose: Step-by-Step, No Guessing
Diagnosis isn’t about symptoms—it’s about proof. A port that won’t charge could be the port, a fuse, a wiring issue, or a frozen infotainment system. You don’t know until you test.
| Symptom | Likely in Port Assembly | Common External Mimics | Definitive Test to Confirm Source |
|---|---|---|---|
| Intermittent Connection | Worn or contaminated contacts; cracked solder joints on the port’s circuit board. | Faulty cable; infotainment software glitch; main Media Control Unit (MCU) freeze. |
Use a known-good cable and device in another vehicle. If the fault follows the car, perform the Port Jiggle Test: with the cable inserted, gently apply lateral pressure. If the connection cycles on and off, the port or its board is faulty. Confirm with a visual inspection using a flashlight or borescope. |
| No Connection or No Power | Severe corrosion; broken power pins; internal port damage. | Blown accessory fuse; damaged wiring harness; MCU power supply failure. |
Check the fuse labeled “ACC” or “Accessory” in your owner’s manual. If it’s intact, use a digital multimeter to test for +5V DC between the port’s power pin and ground. No voltage with a good fuse means the fault is upstream—likely in the wiring or MCU. If voltage is present but the device won’t charge, the port is the problem. |
| Physical Looseness | Deformed housing; broken latch mechanism; cracked mounting tabs. | Using a worn or low-quality cable plug. |
Test with multiple high-quality cables. If none seat with a firm click or secure retention, the port housing is worn or damaged. This is especially common on frequently used ports. |
| Visible Corrosion | Chemical or galvanic corrosion on port contacts. | Spilled liquid damage affecting the circuit board underneath. |
Inspect closely. Corrosion limited to the port pins points to a localized issue. If you see green residue on the circuit board traces behind the port, the damage extends beyond the port and may require full board or unit replacement. |
Don’t forget software.
A frozen infotainment system can mimic a hardware failure—no USB detection, unresponsive touchscreen, random reboots. If other systems are glitching, try a soft reset first. We cover how to force-reboot these units in How to Spot ADAS Software Freeze-Ups. It’s saved me from tearing into a dash more than once.
Why Ports Fail: The Real Causes (Not Just “It Broke”)
It’s not random. Every failure has a mechanism.
Contact wear is the most common. Every time you plug in, the spring contacts scrape. Microscopic gold plating wears off. Once it’s gone, the copper underneath oxidizes. Resistance goes up, conductivity drops, and the spring loses tension. On a daily driver, this happens faster than you think—especially on the driver’s side port.
Contact corrosion comes from moisture, salt, or sugary spills. I’ve pulled apart ports with soda residue baked in from summer heat. It conducts just enough to cause voltage drops but not enough to charge. In coastal areas, galvanic corrosion between copper and steel components eats away at the contacts over time.
Housing fatigue happens when people yank cables out at an angle or leave heavy phones dangling. The plastic deforms, the latch breaks, the mounting tabs crack. I’ve seen ports where the entire housing was loose inside the console—just wobbling around.
Solder joint failure is the silent killer. The port is soldered to a daughterboard or the main infotainment board. Every wiggle stresses those tiny joints. Over time, they develop micro-cracks. Vibration opens and closes them—intermittent faults that drive you nuts. On Tesla Model 3s, they moved the USB-C to a separate daughterboard specifically because this was so common. Smart design.
How I Fix It: Tiered Repair Strategy
Not every fix requires a full teardown. Here’s how I prioritize:
1. Cleaning and Decontamination — If it’s lint or light corrosion, this is step one. Kill the power—disconnect the battery if you’re paranoid (I do on hybrids). Use a plastic spudger or wooden toothpick to dig out lint. Never metal. You scratch the contacts, you’re done. For corrosion, foam-tipped swab with 90%+ isopropyl alcohol. Gently scrub, blow dry with compressed air. No cotton swabs—they shed. And skip generic contact cleaners unless they’re non-residue. Some leave behind conductive films that make it worse.
2. Modular Port Replacement — Many modern cars use a daughterboard. The USB port isn’t soldered to the main unit—it plugs in. That’s good news. The repair is simple. The challenge? Getting to it. You’ll need a trim kit, Torx drivers (T10 or T15 usually), and patience. Console clips break easy. Follow a model-specific guide. When reassembling, torque bolts to 15 Nm ± 2 Nm. Overtighten, and you crack the mount.
Board-Level Port Replacement: Not for DIY
If the port is soldered directly to the main board, walk away unless you’ve got micro-soldering experience. You need a fine-tip iron, flux, solder wick, and the exact replacement. One slip and you lift a trace or pad. Now it’s not a $50 fix—it’s a $1,500 head unit replacement. I’ve seen techs spend hours replacing a port, only for the MCU to not recognize it because of a damaged ground plane. This one’s for specialists with rework stations.
3. Temporary Shim Fix — Last resort. If the port’s slightly loose but still works, you can try a thin plastic shim—like a sliver from a credit card—inserted alongside the cable. But be honest: it’s a band-aid. It can stress the housing more. Never use metal. Foil or a paperclip can short adjacent pins and fry the board. This is stopgap, not repair.
Validation: Don’t Call It Fixed Until It’s Proven
Plugging in a phone isn’t enough. You need proof.
Electrical validation: Use a multimeter. Check for +5V DC on the power pin. Should read 4.75V to 5.25V. Outside that? Power delivery issue still exists.
Data transfer validation: Plug in a USB drive. Copy a 1GB+ file. Should transfer without stalls or disconnects. If it fails, you’ve got a data line issue—probably a bad solder joint.
Physical validation: Cable should click in. No wobble. Do the jiggle test again. If it drops, you didn’t fix it.
Tools: multimeter, USB data tester or high-quality flash drive, stopwatch. That’s your full validation suite.
Cost vs. Risk: When to Fix vs. When to Walk Away
| Repair Type | DIY Cost (Parts) | Shop Cost (Est.) | Success Rate (Typical) | Secondary Risk if Failed |
|---|---|---|---|---|
| Cleaning/Decontamination | < $10 (alcohol, swabs, air can) | $50 – $100 | High (if contamination is the only issue) |
Low. Risk of spreading residue or damaging contacts with improper tools. |
| Modular Port Replacement | $30 – $150 (replacement module) | $200 – $500 (labor-intensive disassembly) | Very High (if done correctly) |
Damage to console trim clips or mounting hardware during removal. |
| Board-Level Port Replacement | $20 – $80 (port only) | $300 – $700+ | Moderate to High (highly skill-dependent) |
Permanent damage to the MCU or infotainment board; potential need for full unit replacement. |
| Entire Head Unit Replacement | $500 – $2000+ (OEM or aftermarket unit) | $1000 – $3000+ (parts and programming) | Very High |
High financial risk if the original diagnosis was incorrect; may require reprogramming or VIN matching. |
Be realistic. If a repair quote exceeds 40% of your car’s value, rethink it. A $600 fix on a
