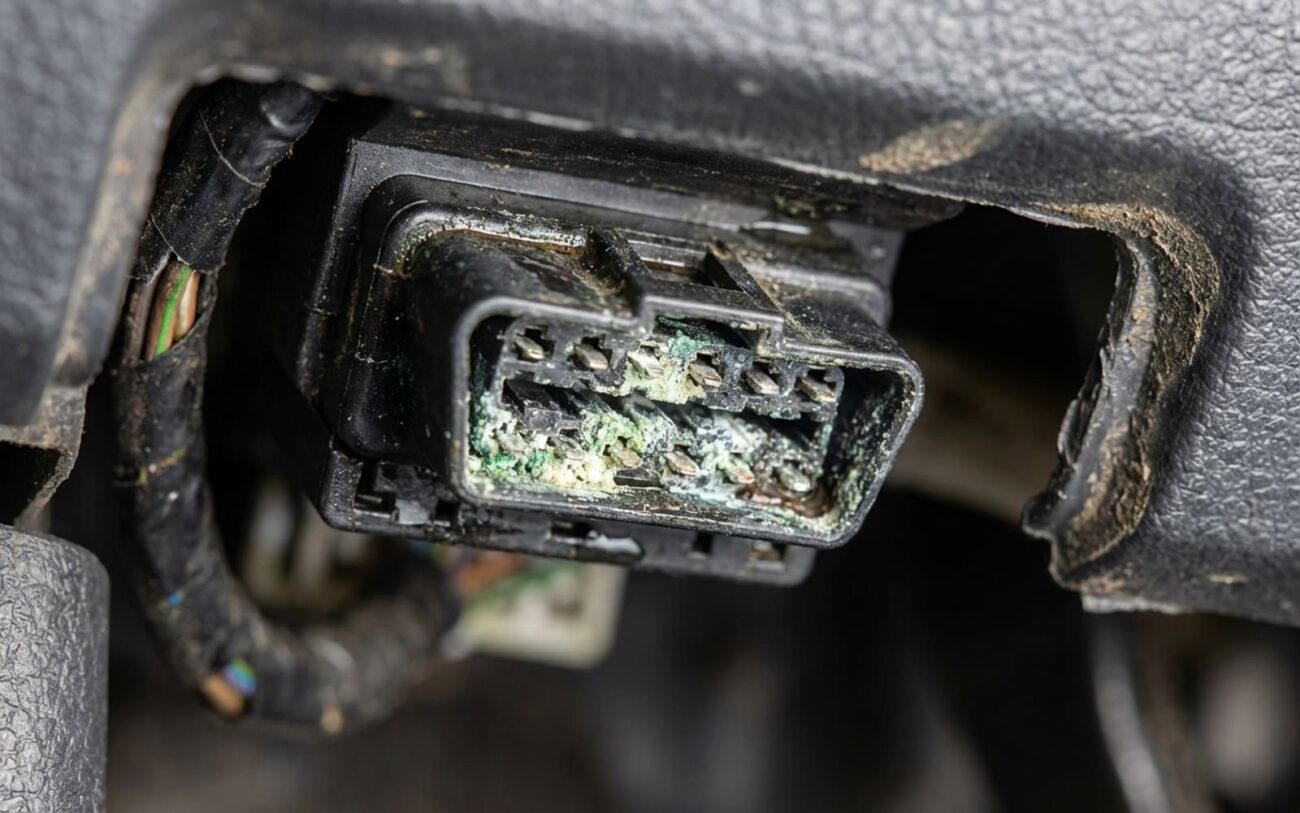
You plug in your scan tool and get nothing. No power. No response. Maybe a “Link Error” or “No Communication” message. Scanner works fine on other vehicles, so it’s not the tool. First thing I check? The OBD2 port — specifically what’s going on inside those little metal terminals.
And before you roll your eyes and say “Yeah, I looked, it looked fine,” let me stop you. Looks can lie. I’ve pulled connectors apart on trucks that seemed clean and found greenish film coating pin 6 (that’s CAN High, by the way). Moisture gets in there from rain, car washes, even high-humidity climates. Over time, corrosion builds up — not always visible without a flashlight and a dental mirror.
What You’re Really Dealing With
This isn’t about dirt. It’s about electrical continuity. The OBD2 port — officially the Data Link Connector (DLC) — is your gateway to every module: ECM, TCM, ABS, body control, the works. But it’s also one of the most exposed connectors on the vehicle. Mounted under the dash, often near floor level, it catches every splash, every drop of condensation.
Corrosion doesn’t have to be crusty and green to cause problems. Thin oxidation on the terminals increases resistance. On a CAN bus system running at 500 kbps, even a few ohms of extra resistance can distort signal rise times enough to kill communication. That’s why you’ll sometimes get a scanner that powers up but shows garbage data — O2 sensors pegging, random circuit open codes popping up only when the tool is connected. That’s not a bad sensor. That’s a bad connection at the DLC messing with the signal.
And yes, forcing a scan tool into a tight or corroded port makes it worse. I’ve seen DIYers bend terminals trying to jam in a connector, then wonder why they’ve got intermittent issues afterward. If it doesn’t slide in smoothly, stop. Clean it first.
Don’t Assume It’s the Port — Prove It
I’ve torn apart more than one dash only to find the problem wasn’t the DLC — it was a blown fuse or a chafed wire behind the glove box. So before you start removing trim panels, do this:
Check power and ground at the DLC. Pins 16 and 4. Pin 16 should have battery voltage — key on or off. If it doesn’t, trace back to the fuse. Usually fuse #9 or #13 in the cabin panel (varies by make), but check the diagram. I’ve seen these fuses blown from aftermarket trackers, dash cams, or someone plugging in a cheap USB adapter that shorted.
Pin 4 is chassis ground. Test resistance from pin 4 to a known good ground — like the bolt holding the hood release. Should be less than 0.5 ohms. More than that? You’ve got a bad ground circuit. Could be a loose bolt, corroded splice, or even a failed ground strap near the firewall.
Now, if power and ground are good but you still have no comms, move to the CAN bus lines. That’s pin 6 (CAN High) and pin 14 (CAN Low). With the key on, you should see about 2.7V on pin 6 and 2.3V on pin 14 — measured against ground. Not 0, not 5, but right around there. If both are sitting at 2.5V, that’s a sign one side of the bus is down. If one is at 0 and the other at 5, you’ve got a short or a module offline.
And here’s a trick I use: unplug the scanner, turn the key off, then measure resistance between pin 6 and 14. Should be about 60 ohms — that’s the combined termination resistors in the ECM and instrument cluster. If it’s open, one resistor failed. If it’s 120 ohms, one side is disconnected. If it’s near 0? You’ve got a short between CAN High and Low. That’ll kill comms fast.
Cleaning and Repair — Do It Right
If the terminals are corroded, don’t grab steel wool or a wire brush. You’ll leave conductive debris behind. Use a plastic dental pick to remove gunk, then hit it with electronic contact cleaner — not WD-40, not brake cleaner. CRC QD Electronic Cleaner works. Spray it in, use a clean toothbrush (dedicated to shop use, please), and let it dry.
For light oxidation, I use a pink eraser. Sounds weird, but it works. Gently rub each terminal. It removes oxidation without damaging plating. Then retest.
If a terminal is backed out — not making contact — you’ll need to remove the connector and push it back in. These aren’t serviceable, so be careful. Use a pin extractor tool, not a paperclip. I’ve ruined more than one DLC trying to improvise.
And if the housing is cracked or water’s been pooling inside? Replace it. New OEM ones are $30–$50. Not worth risking a harness meltdown over a $50 part.
Bottom line: when your scanner won’t talk, don’t just blame the tool. Start at the port, test like you mean it, and don’t skip the basics. Most of these issues are simple — but only if you catch them before they cascade.
