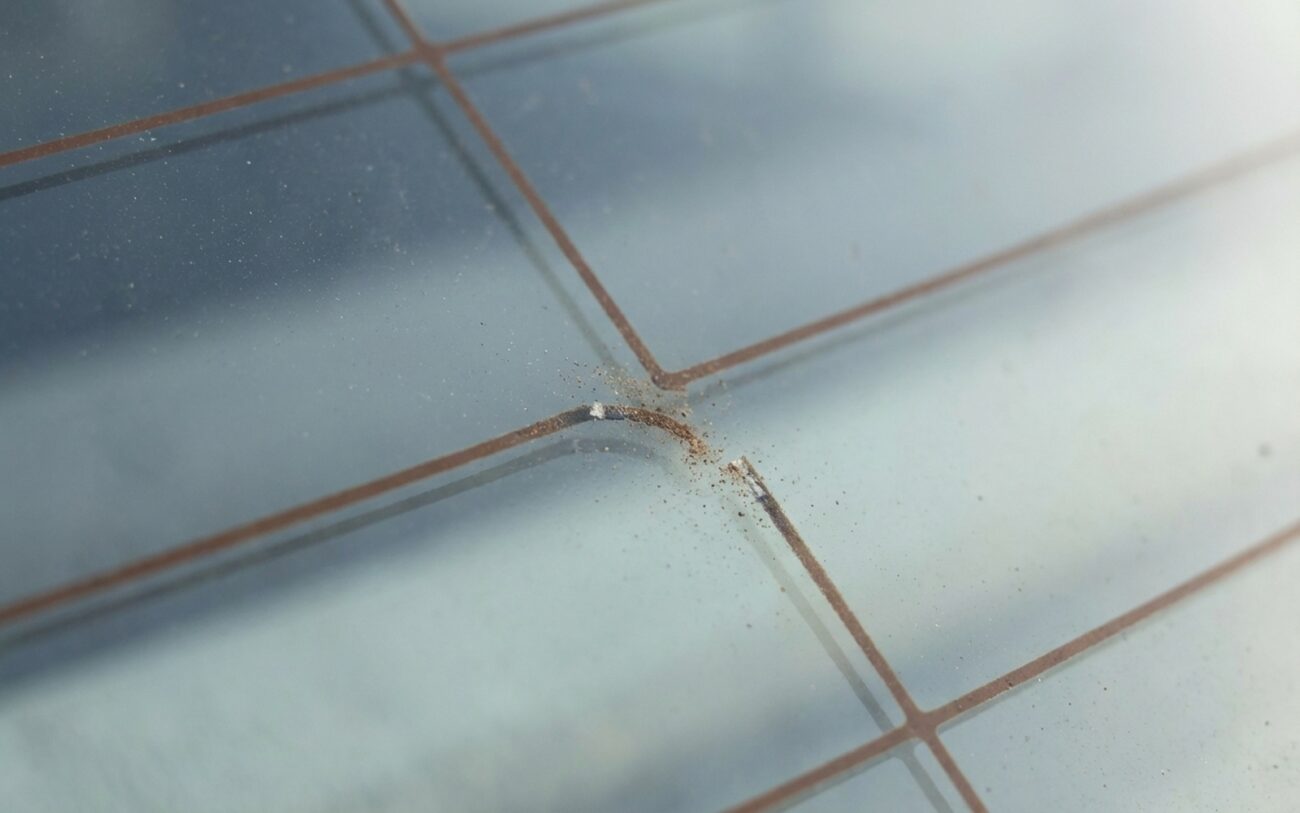
Rear window defrosters fail all the time—especially in winter. But here’s what most people get wrong: they assume the whole grid is shot when 9 times out of 10, it’s just one broken line or a $5 fuse. I’ve been fixing these for over two decades, and I can tell you—most “dead” defrosters aren’t dead at all. They’re just starved for power or have a tiny break you can fix with a $30 kit. Let me walk you through how I diagnose and repair these in the shop, step by step.
Step 1: What’s Actually Broken?
First thing I do? Turn the defroster on and watch. Not guess. Not pull codes. Just watch.
If one horizontal band stays frosty after 10–15 minutes while the rest clears? That’s a break in a single grid line. The heat can’t jump the gap. Simple.
If the whole window stays cold—no warming, no tint of orange glow—then the problem isn’t the grid. It’s upstream. Fuse, relay, switch, or wiring. The grid could be perfect and still do nothing without power.
And no—your car won’t throw a light for a broken line. The system doesn’t monitor continuity. You’ve got to find it yourself.
| Symptom | What It Means | Root Cause |
|---|---|---|
| Single frost band won’t clear | One silver line is interrupted | Physical break in conductive paste (usually from scraping or impact) |
| No heat anywhere | Grid isn’t getting power | Fuse, relay, switch, wiring fault—or thermal fuse trip |
| Visible scratch or dark spot on line | Material is compromised | Ice scraper damage or chemical degradation (ammonia cleaners eat the bond) |
Step 2: Test Before You Touch
Before you even think about repairing the glass, you need to know: is power getting to the grid?
I grab my digital multimeter (DMM). Set it to DC volts. Turn the ignition on, hit the defroster button. Then I probe the metal tabs on the edge of the glass—those thick vertical bars where the wires connect.
You should see 12V (or close to it) on at least one tab. If you do, power’s getting through. The fault is in the grid.
If not? Backtrack. Check the fuse first—usually in the dash or underhood box. On Fords, it’s often fuse #17 or #35; on GMs, look for “REAR WSHLD HT” or similar. Then test the relay. Swap it with a known-good one (like the horn relay) if you’re not sure.
And don’t forget the thermal fuse. It’s a little guy wired in series, usually near the driver’s side C-pillar. It opens if the grid overheats. Once it blows, it’s done—no reset. I’ve seen more than a few shops miss this.
| Symptom | Grid Fault Likely? | What Else Could Fool You | Definitive Test |
|---|---|---|---|
| No heat anywhere | Only if multiple lines are broken | Blown fuse, dead relay, broken wire, thermal fuse | Test for 12V at grid tab. No power? Trace back to source. |
| One frost band won’t clear | Yes—single line break | Dirt, adhesive residue, or temporary insulation blocking heat | Set DMM to Ω. Check continuity along the line. Infinite resistance? Break confirmed. |
| Uneven heating—some lines slow | Yes—high-resistance spot | Rare. Usually means grid degradation. | Compare resistance of slow line vs. adjacent good one. >15% higher? It’s failing. |
Step 3: Why Did It Fail?
If the grid’s the problem, now ask: why?
On 2010–2016 Honda Accords? I see this weekly—people using metal ice scrapers, sawing across the lines. One good scrape and you’ve cut through the silver paste. Gone.
On GM trucks? Cargo in the back hits the inside of the glass. A duffel bag, a toolbox—doesn’t take much. You get a crack in the grid from impact.
And don’t use ammonia-based cleaners. They eat the bond between the conductive material and the glass. Over time, the lines flake off. I’ve tested this—after six months of Windex, resistance goes up 30%.
Thermal cycling matters too. Heat it, cool it, repeat for five years—the paste fatigues. Especially if it was applied thin at the factory. Some Hyundai models from 2012–2015 had this issue. The bus bars just crack from stress.
And yes—aftermarket tint can kill your grid. I’ve pulled down trim on half a dozen Kia Souls where the installer used conductive adhesive that corroded the tabs. Moisture got in, and the whole thing failed in two winters.
Step 4: Can You Fix It? (Spoiler: Sometimes)
Single break in the middle of a line DIY-FEASIBLE
You can fix this. Buy a rear defroster repair kit (Permatex, DORMAN—both work). It’s got conductive silver epoxy, sandpaper, alcohol wipes, and a fine applicator.
Prep is everything: clean the area with 90% isopropyl alcohol. Lightly sand the break with 600-grit to expose fresh material. Mask off the sides. Then apply a thin, continuous bead of epoxy across the gap.
Let it cure 24 hours. No shortcuts. I’ve seen people turn it on after 4 hours—epoxy isn’t conductive yet. It fails. Wait. It’s not that hard.
Break at bus bar or power tab PROFESSIONAL-ONLY / DIFFICULT DIY
This is a tough one. The bus bars carry more current. If the tab is lifting or corroded, the repair won’t last. I’ve tried—epoxy peels off in three months.
And if the tab is detached? The glass seal’s probably compromised. Moisture gets in, corrosion spreads. At that point, replacement is smarter.
Multiple breaks or damaged bus bar NON-REPAIRABLE → REPLACE
Don’t waste time. If you’ve got two or more breaks, or the vertical bus bar is cracked, the grid’s done. Patching one line won’t fix the rest that are weakened.
And on modern cars? Rear glass isn’t just glass. It’s got antennas, camera mounts, rain sensors. You need the right OEM part. Pull the VIN and cross-reference—don’t guess.
Temporary fixes to avoid TEMPORARY / LAST-RESORT
I’ve seen guys use conductive paint pens, graphite paste, even aluminum tape. Bad idea.
These create high-resistance joints. They heat up locally, stress the glass, and can cause thermal cracks. At worst? Fire risk from arcing. (Yes, really.)
Stick to proper conductive epoxy—or replace the glass. There’s no magic fix.
Step 5: Validate the Fix
After repair? Turn it on and watch.
The repaired line should heat evenly. No cold spots. If it doesn’t, check your epoxy bead—was it continuous? Did it cure fully?
And do a continuity check with the DMM. You should see resistance within 10% of adjacent lines. If it’s way higher, the joint’s weak.
Cost vs. Longevity: Make the Smart Call
| Repair Type | DIY Cost | Shop Cost | Success Rate | Risks |
|---|---|---|---|---|
| Single line repair | $20–$40 | $100–$200 | ~85% (if clean break, good prep) | Epoxy spill can short adjacent lines; premature use kills adhesion |
| Bus bar repair | N/A | $150–$300 | ~50% (often fails in 6–12 months) | Can damage tabs further, making replacement more expensive |
| Full glass replacement | N/A | $500–$1,500 | 100% (with OEM or quality aftermarket) | Improper install causes leaks, trim damage, or ADAS misalignment |
My rule? If a repair quote is over 30% of the replacement cost, skip it. Pay once, get it done right.
On an old Corolla? DIY the epoxy fix. Makes sense.
On a new Subaru with a rear camera and lane tracking? Don’t risk it. Replacement ensures calibration and seal integrity. And yes—the camera needs recalibration. (I’ve written about that here.)
Prevention: Don’t Wait for Winter
Use a plastic scraper. Scrape with the lines, not across them.
Inside the car? Clean with ammonia-free glass cleaner and a microfiber cloth. No paper towels—they scratch.
Every fall, inspect the grid. Look for fine scratches, dull spots, lifting lines. Catch a break early, fix it with epoxy. Wait until January? You’re driving blind in a snowstorm.
And once a year, do a quick continuity check with your DMM. Especially if the defroster feels slower. A small break can arc and take out two more lines overnight.
