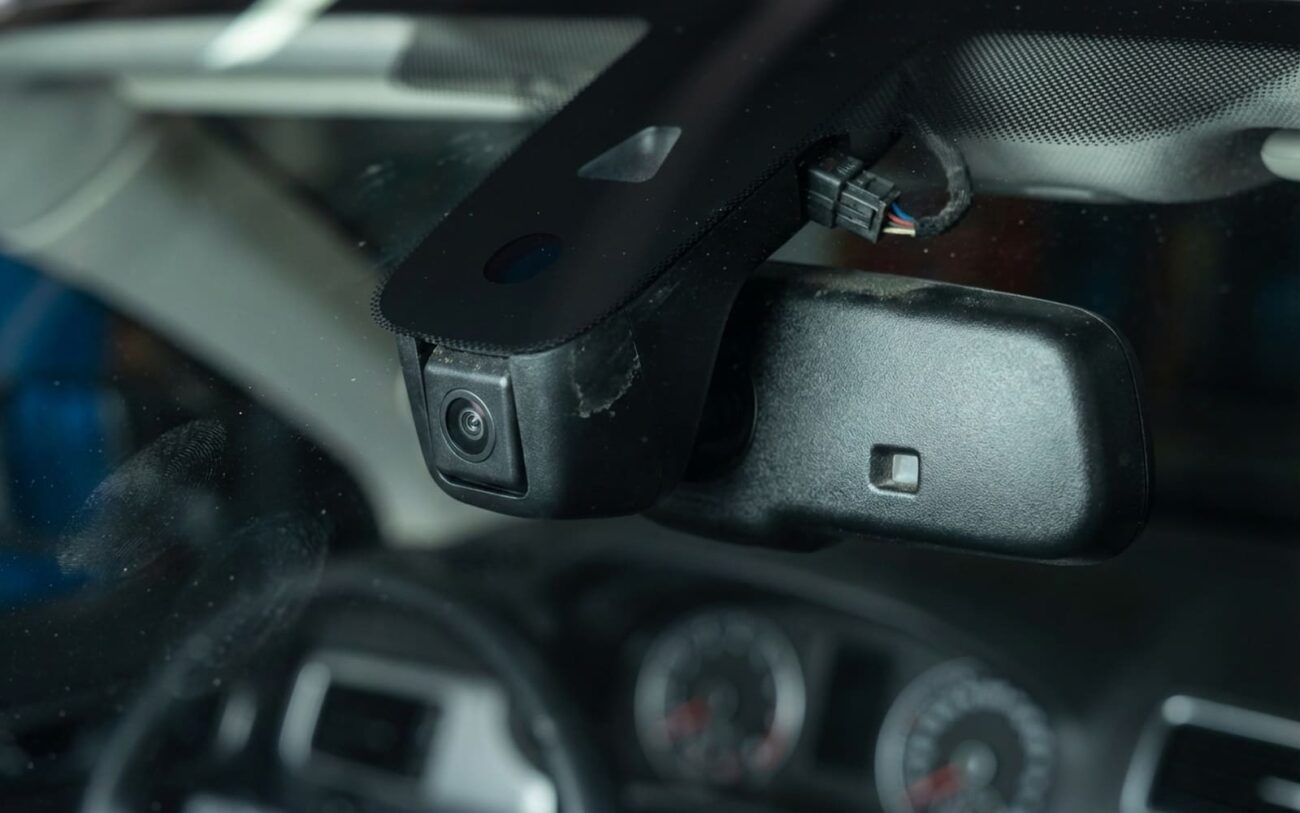
Alright, let’s talk about that dreaded “ACC Unavailable” message you’re seeing right after a windshield replacement. If you’ve got warnings like “Front Sensor Blocked” or “Safety System Off” popping up, and it all started right after new glass went in, trust me, that’s no coincidence. I’ve been turning wrenches for over 25 years, and this is a classic. It almost always points back to that windshield work.
What’s Going On: The Camera and the Glass
See, most modern cars, especially anything with Adaptive Cruise Control (ACC), Lane Keeping Assist (LKA), or Forward Collision Warning (FCW), rely on a camera. This isn’t just any camera; it’s a high-precision piece of equipment, usually mounted right behind your rearview mirror, directly to the windshield. That camera is the eyes of your car’s Advanced Driver-Assistance Systems (ADAS).
When your car rolled off the assembly line, that camera was precisely aligned—we’re talking microscopic tolerances—to the road and the vehicle’s geometry. Its mounting depends on the exact flatness and optical clarity of a specific zone on that windshield. When someone replaces the glass, even a tiny shift in the camera’s angle, or its distance from the new glass, can throw everything off. The system knows this, detects the misalignment, and shuts itself down. It’s a safety feature, really, preventing it from doing something dangerous, like failing to brake when it should.
And it’s not just ACC. You might notice your lane departure warnings stop working, automatic high beams don’t switch off properly, or your pre-collision system feels dead. These aren’t separate problems. They’re all tied to that same camera or, in some cases, a radar unit. When that main sensor is out of whack, the whole ADAS suite goes offline. You’ll still have regular cruise control, usually, but you lose the smart stuff: no automatic speed adjustment, no emergency braking, no gentle steering correction. The car’s safe to drive, but you’re missing a big chunk of the safety tech it was designed with. I see this misdiagnosed a lot; folks assume a sensor failed, when really, it just needs to be told where it is again.
My Diagnostic Approach: Calibration or Something More?
The warning lights often look the same whether it’s a simple alignment issue or a broken wire. That’s why you can’t just guess. Most of the time, after a windshield replacement, it’s a lost calibration. But I’ve seen plenty of other problems that mimic that exact symptom. Here’s how I break it down:
First thing I do: I hook up a factory-level scan tool. We’re talking Toyota Techstream, Honda HDS, or a really capable aftermarket system. I’ll attempt a static calibration. If it goes through and reports “Calibration Complete,” then great! It was just out of alignment, and we’re done. That’s the best-case scenario.
But what if it fails? If the scan tool gives me codes like “Angle Out of Range,” “Calibration Failed,” or “Target Not Recognized,” that tells me something mechanical is wrong. It means the camera can’t calibrate because its physical position is too far off, or it can’t see what it needs to see. If the tool can’t even communicate with the camera module, then we’ve got an electrical issue to chase down.
So, if calibration fails or there’s no communication, I move to a visual and electrical inspection:
- Check the Camera Connector: I pull the trim around the camera housing and inspect the electrical connector. Sometimes, it’s just not fully snapped in, or a pin got bent during reinstallation. I’ve seen techs forget to plug it back in more times than I can count. If there’s no communication, I’ll grab my multimeter and check for power, ground, and CAN bus signals right at the connector, using the wiring diagram for that specific vehicle.
- Inspect the Camera Bracket: Is the bracket itself bent? Was it reinstalled improperly? Even a slightly warped bracket can throw the camera off enough to prevent calibration.
- Look at the Windshield: This is a big one. Was the correct windshield installed? Not all glass is created equal. Some aftermarket windshields lack the proper camera mounting pad, or they have optical distortions in the camera’s field of view. If it’s the wrong glass, no amount of calibration will ever work.
- Obstruction on the Lens: This sounds simple, but I’ve seen it. Sometimes, adhesive can squeeze up onto the camera lens during installation, or there’s a fingerprint, dirt, or even a piece of tape left behind. Grab a flashlight and carefully inspect the lens. It takes two minutes and can save hours of head-scratching.
Each of these “mimics” requires a different fix. You can’t calibrate a camera that’s not getting power, or one that’s looking through a blurry spot on the glass. You’ve got to fix the underlying physical or electrical problem first.
Getting It Fixed: No Shortcuts Here
Let me be clear: there are no reliable DIY fixes for this. Despite what you might see on YouTube, you can’t just “reset” it with an OBDII scanner or by disconnecting the battery. This is a Professional Only job, requiring specialized tools and training.
Scenario 1: It’s Just Calibration
If the camera is physically fine and properly mounted, but just needs alignment, then a recalibration is the answer. This involves:
- Factory-Level Scan Tool: Essential for communicating with the ADAS module.
- Calibration Targets: Manufacturer-approved target boards or stands. These are specific to make and model, and they have to be placed at precise distances and angles from the vehicle.
- Level Surface: The vehicle must be on a perfectly level floor. We’re talking dead level.
- Vehicle Prep: Correct ride height, proper tire pressure, sometimes even a full fuel tank. All these tiny details affect the vehicle’s stance, which impacts calibration.
There are two main types: Static Calibration, which is done in the shop with targets, and Dynamic Calibration, which involves driving the vehicle on a well-marked road under specific conditions. After a windshield replacement, static calibration is usually the method we use.
Scenario 2: Bent Bracket or Physical Damage
If the camera bracket is bent or was improperly reinstalled, you’ve got to fix that mechanical issue first. This means getting an OEM replacement bracket, carefully removing interior trim, and installing it correctly. Pay attention to torque specs here; these small bolts are sensitive. Typically, they’re around 8–12 N·m (7–9 lb-ft). Overtightening can warp the bracket or even damage the windshield’s mounting surface. Once the bracket is solid, a full recalibration is still mandatory. Skipping that step is just wasting time.
Scenario 3: Incorrect Windshield
If the wrong windshield was installed—one without the proper camera mounting pad, or with optical distortions—the only real solution is another Professional Only Windshield Replacement. The new glass absolutely has to be OEM or OEM-equivalent, specifically rated for ADAS compatibility. It needs to be installed with the correct urethane adhesive and primer to ensure a stable, vibration-free mount. And yes, after that, recalibration is non-negotiable.
Now, I’ve seen some drivers go into their vehicle settings and manually disable ACC, LKA, and FCW. This will usually clear the warning lights. But understand this: it’s not a fix. It’s just turning off those safety features permanently until you get it properly calibrated. You’re giving up a significant safety net the car was designed to provide. I’d only ever consider this if the repair is truly cost-prohibitive, and even then, I’d make sure the owner fully understands the trade-offs.
Post-Repair Validation: Don’t Just Clear the Codes
Simply clearing the warning light isn’t enough. You need to confirm that the system actually works correctly. A successful repair means your scan tool reports “Calibration Complete” or “Successful,” all ADAS-related Diagnostic Trouble Codes (DTCs) are cleared, and you see the active ACC and lane-keeping icons on your instrument cluster. But the real test? That’s on the road.
I always do a validation drive. I’ll take the car out and verify that ACC maintains a set distance from a vehicle ahead, adjusts speed smoothly, and resumes properly. Lane keeping should provide gentle, natural steering input to keep the car centered—it shouldn’t be overcorrecting or disengaging unexpectedly. FCW should give timely alerts when approaching a slower vehicle or obstacle. If I get any false warnings or delayed responses, that tells me the calibration wasn’t fully successful, or there’s still an underlying issue.
You need both the scan tool confirmation and the real-world drive. The tool tells you the ECU thinks it’s good; the drive tells you if it actually is good. If it fails the road test, it’s back to diagnostics: check for new codes, re-inspect the camera mount, and verify the windshield and bracket are correct before attempting calibration again.
The Bottom Line: Cost, Risk, and What to Ask
Let’s talk practicalities. While the repair is straightforward for a trained tech, the tools and expertise aren’t something most owners have lying around. The DIY cost is mostly theoretical; nobody’s buying $5,000 worth of scan tools and targets for one job.
| Repair Type | Typical Shop Cost | Success Rate (when done right) | What Happens if it Fails? |
|---|---|---|---|
| ADAS Camera Recalibration Only | $150 – $500 | Near 100% | You’ll pay for it again, or it points to a deeper mechanical issue. |
| Bracket Replacement + Recalibration | $300 – $700 | ~95% | Incorrect bracket fit or torque means recurring calibration failure. |
| Windshield Re-replacement + Recalibration | $800 – $2000 | ~98% | Improper adhesive can lead to leaks, wind noise, or even the windshield coming out in an accident. |
Dealerships and specialized mobile calibration services usually handle this. Some independent shops now offer static calibration with third-party systems, which can save you a few bucks. But always confirm they use OEM procedures and have experience with your vehicle’s make and model. Don’t just go with the cheapest option.
There’s also an economic threshold. If the total repair cost starts creeping up to, say, 30% of your car’s value, and you don’t really rely on ACC or those other safety features, permanently deactivating them might seem appealing. But here’s my advice: ADAS functionality affects resale value. Buyers expect these systems to work, especially on newer models. Disabling them can absolutely reduce appeal. More importantly, you’re giving up real safety benefits. I’d only ever deactivate if the repair is truly cost-prohibitive—and even then, document that decision clearly.
Before You Leave the Shop: Prevention and a Quick Check
The best outcome is avoiding this headache entirely. When you’re scheduling a windshield replacement, don’t just pick the cheapest shop. Ask them, specifically: “Do you perform ADAS recalibration for my make and model? Do you have the factory-level tools and targets?” A good provider will know the answer and confirm the new glass is OEM-compliant with the correct camera mounting zone and frit pattern. If they hem and haw, find another shop.
After the installation, check the system immediately. Before you even drive off the lot, turn the car on and look at the instrument cluster. Are the ACC and lane-keeping icons active? If they’re grayed out or missing, the calibration wasn’t done—or it failed. In a safe, empty parking lot, you can even do a quick functional check: drive slowly toward a stationary object, like a traffic cone or a cardboard box (with someone outside the vehicle, just in case). Your FCW should trigger an audible alert and a visual warning. No response? Something’s definitely wrong.
This early check catches gross failures—like a disconnected camera or a totally missed calibration—before you’re miles down the highway relying on non-functional safety systems. It takes five minutes and can save you a major hassle. Remember: a new windshield isn’t truly “complete” until the ADAS systems are verified. Calibration isn’t an add-on; it’s part of the repair. Treat it that way.
