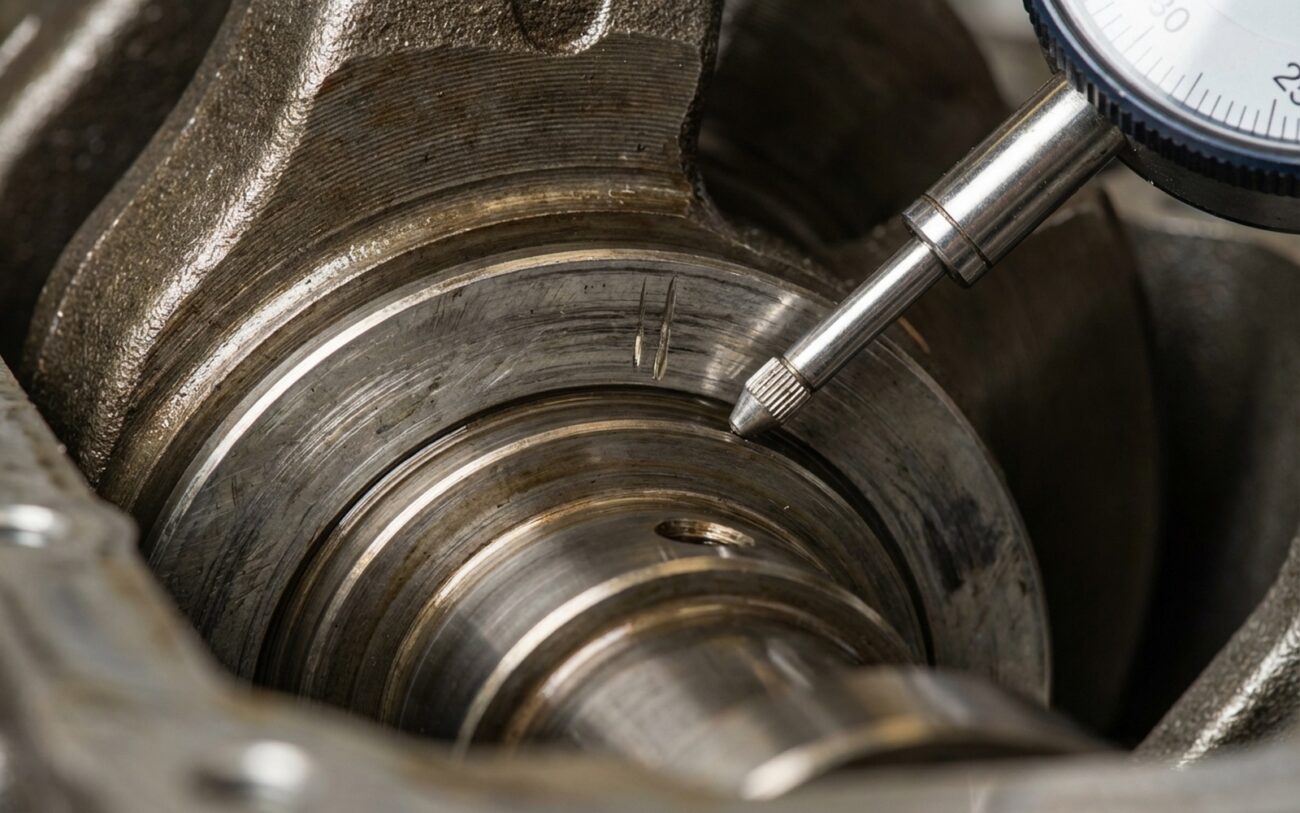
If you’re hearing a deep, rhythmic clunk or thud from the front of your engine, especially one that pulses with the RPMs, listen up. That’s usually excessive crankshaft end play, and it’s not a minor issue. We’re not talking about a ticking lifter or some loose heat shield rattle here. This is a solid, mechanical impact, and I’ve found it’s loudest when you snap the throttle open or suddenly let off. What’s happening is your crankshaft is moving axially – that’s front to back – beyond its design limits, slamming into the thrust surfaces inside the engine block.
The root of that noise is a worn thrust bearing. This bearing’s job is to keep the crankshaft from shifting around during acceleration and deceleration. When it wears out, the crankshaft “walks,” creating that telltale knock. Unlike a worn rod bearing, which usually gives you a rhythmic knock under constant load, crankshaft end play noise is most noticeable during those rapid throttle transitions.
Now, if you’ve got an automatic transmission, you might also feel a harsh shudder or clunk when you shift between Drive and Reverse. That’s the torque converter pushing against a crankshaft that’s already loose. The hydraulic engagement forces the crank forward, and without proper thrust support, it moves too far, sending a jolt right through the driveline. For manual transmission drivers, I often hear reports of a wandering clutch engagement point—the clutch pedal feels inconsistent, and shifting gets notchy. That’s because the axial movement of the crankshaft actually alters the position of the flywheel and clutch disc, changing the pressure plate’s contact point every single time you push the pedal.
Is It Really Crank Walk? My Go-To Test.
Before you even think about tearing into anything, you need to confirm this isn’t just a ghost in the machine. This is the definitive test for diagnosing crankshaft walk, and the good news is you can usually do it without pulling the engine. We’re looking to measure axial movement – how far that crankshaft can travel forward and backward – using a dial indicator. You’ll need a magnetic base dial indicator (most tool rental places have them) and a sturdy pry bar.
Here’s the approach I use in my shop:
-
Locate the Crank Snout: Find the front of the crankshaft. It’s usually visible right behind the harmonic balancer or at the crank pulley.
-
Mount the Dial Indicator: Secure the magnetic base to a solid, clean part of the engine block. Position the plunger so it contacts the center of the crank snout. Make sure it’s as perpendicular as possible to the crank’s axis – a crooked angle will give you a false reading, and we don’t want that.
-
Zero It Out: Once it’s firmly in place and contacting the crank, carefully zero the dial indicator.
-
Move the Crank Rearward: If you have an automatic, insert your pry bar between a flexplate tooth and the engine block. For a manual, go between the flywheel and the bellhousing. Gently lever the crankshaft all the way to the rear until it stops. Release the pry bar slowly.
-
Move the Crank Forward: Now, push the crank forward with the pry bar until it stops against the front thrust surface.
-
Read the Difference: The total difference between the two extreme readings on your dial indicator is your crankshaft end play.
Now, compare that reading to the factory specification for your specific engine. Specs vary, but most engines I work on fall between 0.003 and 0.011 inches (0.076–0.279 mm). Anything over 0.015 inches (0.38 mm) is generally considered excessive and needs immediate attention. Some high-performance or older engines might have slightly tighter tolerances, so always, always check your OEM service manual. Don’t guess.
This method is reliable, and it’s what we use in professional shops every day. It’s far more accurate than just prying and trying to ‘feel’ the movement, which is subjective and frankly, unreliable. The dial indicator gives you a hard number – no guesswork, no arguments.
Ruling Out the Impostors: Other Noises That Fool You.
I’ve seen a lot of guys, even experienced ones, misdiagnose crankshaft walk. It’s easy to do because some of the symptoms – especially those driveline clunks and weird clutch or transmission behavior – can mimic other, less severe problems. The trick is to figure out if the movement is truly internal (the crankshaft) or external (like mounts or clutch components). That’s why measuring end play is non-negotiable; it’s the only way to know for sure. But let’s talk about some of the common look-alikes:
-
Front-of-engine clunk on throttle change: This is the classic crank walk symptom. But I’ve also seen this from a loose or cracked flexplate (on automatics), a failed harmonic balancer, or even severe piston slap. If your end play is good, then you start looking at those external components. You can often visually inspect a flexplate through an inspection cover, for example.
-
Transmission shift shudder (automatic): If you’re feeling a shudder when shifting, especially between Drive and Reverse, it screams crankshaft end play to me. But if the end play checks out, then you’re looking at things like failed engine or transmission mounts (easy to check with a pry bar), a worn torque converter, low transmission fluid, or even an internal transmission issue. Always check end play first.
-
Wandering clutch engagement (manual): This is another big one for crank walk. That inconsistent clutch pedal feel is a dead giveaway that something’s moving that shouldn’t be. However, if your end play is within factory specs, then the issue is 100% in the clutch assembly itself or the hydraulic system – think worn clutch disc, failing pressure plate, air in the hydraulics, or a worn pilot bearing.
Expert Insight:
My advice? Don’t jump to transmission or clutch repairs until you’ve confirmed that crankshaft end play is within spec. I’ve seen too many customers pay for expensive transmission work only to find out the engine was the real problem all along.
Why This Happens: The Real Culprits.
So, why does this happen? Excessive crankshaft end play almost always boils down to a thrust bearing failure. This isn’t usually like a cracked block from overheating; it’s typically a wear-related issue, or sometimes, an assembly problem from the factory.
The most common cause I see is just plain old wear and tear over time, often accelerated by poor oil maintenance. Think about it: contaminated oil, sludge, or even coolant in the oil acts like a grinding paste. It slowly but surely erodes that soft babbitt layer on the thrust bearing. Once that protective layer wears through, you get metal-to-metal contact, and things go south real fast.
I’ve also run into engines that had known issues with their thrust surface machining from the factory. If the block’s thrust faces weren’t machined perfectly square or parallel to begin with, the bearing doesn’t seat right. That causes uneven loading and premature wear. We’ve seen service bulletins for certain model years and engine families where this was a recurring problem, especially in high-torque applications where the forces are even greater.
For you manual transmission drivers, your driving habits can play a big role here. “Riding the clutch” – that’s keeping your foot on the pedal while stopped, even lightly – applies constant pressure to the crankshaft thrust face. Over time, that generates heat and wear, especially if the engine is under any kind of load. I’ve actually seen engines with only 80,000 miles that needed thrust bearings replaced almost solely because of this habit. It’s a killer.
And one more thing: a failing rear main seal can sometimes be a secondary effect. While a leaky seal doesn’t cause end play, excessive crankshaft movement will absolutely destroy a good seal in a hurry. So, if you’re dealing with both symptoms, check that end play first – it might just be the root cause of your oil leak, too.
Fixing It: What to Expect and What It Takes.
Major Internal Work Required
Alright, you’ve confirmed it: you’ve got crankshaft walk. Now, what’s it going to take to fix it? This is major internal engine work, no two ways about it. The repair path depends entirely on what we find once we get inside. Here’s how it typically breaks down, from the best-case scenario to the absolute worst. On many front-wheel-drive platforms, you can do some of this in-vehicle with specialized support tools, but it’s still a big job.
Thrust Bearing Replacement In-Vehicle Possible
Key points:
-
New Bolts: Always use new torque-to-yield (TTY) main cap bolts. These are designed to stretch and are not reusable. Don’t try to save a few bucks here – it’s not worth it.
-
Sealant: Apply sealant exactly as specified by the manufacturer to prevent oil leaks. You don’t want to do this twice.
-
Clearance Check: While you’re in there, check the main bearing clearance using Plastigage or a micrometer. It’s good practice.
-
Torque Sequence: Follow the OEM torque sequence and angle specifications exactly. This isn’t a job for ‘good-n-tight.’
Crankshaft Repair / Full Rebuild
Engine Block Replacement
Did It Work? Verifying the Repair.
You’ve done the work, everything’s bolted back up. Don’t just assume the job is done. You must verify the repair using the exact same dial indicator test you used for diagnosis. Measure that end play again – cold, with the engine not running. That reading absolutely has to fall within factory specs. If it’s still high, something’s wrong: maybe the bearing wasn’t seated properly, the cap wasn’t torqued correctly, or there’s still some unexpected movement somewhere else. Don’t skip this step.
After you’ve confirmed the measurement, run the engine through several heat cycles. Drive it until it’s fully warmed up, let it cool completely, then repeat that process a few times. This allows all the components to expand and settle into their new positions. For extra confidence, I’ll often recheck the end play once the engine is hot, and then again when it’s cold. It should remain consistent.
The clunk, the shudder, the clutch issues – all of it should be completely gone. If it’s not, you need to go back and recheck your work. A properly executed repair, with the end play set to OEM specifications, should last the life of the engine, assuming you keep up with your oil changes and correct any bad driving habits that might have contributed to the problem in the first place.
The Bottom Line: Cost vs. Value.
Let’s talk money, because that’s usually the next question. Repair costs for crankshaft walk vary wildly depending on how bad the damage is and whether you’re tackling this yourself or taking it to a shop. Here’s a rough breakdown based on what I see:
| Repair Type | DIY Cost (Parts) | Shop Cost (Est.) | Success Rate | Secondary Risk |
|---|---|---|---|---|
| Thrust bearing replacement | $50–$200 | $800–$2,000 | 95% | If root cause isn’t addressed, premature failure is likely. |
| Crankshaft repair/replacement | $500–$1,500 | $2,500–$4,500 | 90% | Incorrect installation can cause spun bearing or oil leaks. |
| Engine block machining/replacement | $3,000+ | $5,000–$8,000+ | 85–95% | Machining may not be feasible; replacement is costly. |
You really have to weigh these costs against your vehicle’s current value. As a general rule I tell my customers, if the repair bill is going to exceed half the car’s market value, especially if there are other aging components (like a tired transmission or worn-out suspension), it’s often smarter to consider a good used engine or even a different vehicle entirely. Spending $6,000 to fix a $4,000 car rarely makes financial sense – unless it’s a rare model you love, or it has significant sentimental value. Be honest with yourself about what makes sense for your wallet.
Keeping It From Happening Again: My Advice.
Once you’ve gone through all that trouble, the last thing you want is for crankshaft walk to happen again. Prevention really comes down to two main things: your oil and your driving habits.
-
Change your oil on schedule. And I mean on schedule, using the correct viscosity and quality grade specified by the manufacturer. Dirty oil is the number one enemy of bearings. Those contaminants act like sandpaper, accelerating wear faster than anything else.
-
Inspect your oil condition regularly. Don’t just wait for the light. Pull the dipstick. If you see sludge, milky residue (which could mean coolant), or any metal flakes, you need to investigate that immediately. Coolant in oil or fuel dilution can destroy bearings incredibly fast.
-
Manual transmission drivers, listen up: Keep your foot off that clutch pedal when you’re not actively shifting. Resting your foot on it, even lightly, applies constant pressure to the thrust bearing. That generates unnecessary heat and wear over time, and it’s a habit I’ve seen kill more thrust bearings than almost anything else.
-
Listen to your engine. There isn’t a warning light on your dash for crankshaft end play. Your ears and your feel for how the driveline is behaving are your best diagnostic tools. Pay attention to new noises or changes in how the car drives.
While there’s no routine check for end play on most modern engines, being proactive with your maintenance and staying attentive to any changes in your vehicle’s behavior can absolutely save you from a costly breakdown down the road. Trust me, an ounce of prevention is worth a pound of cure when it comes to internal engine issues.
