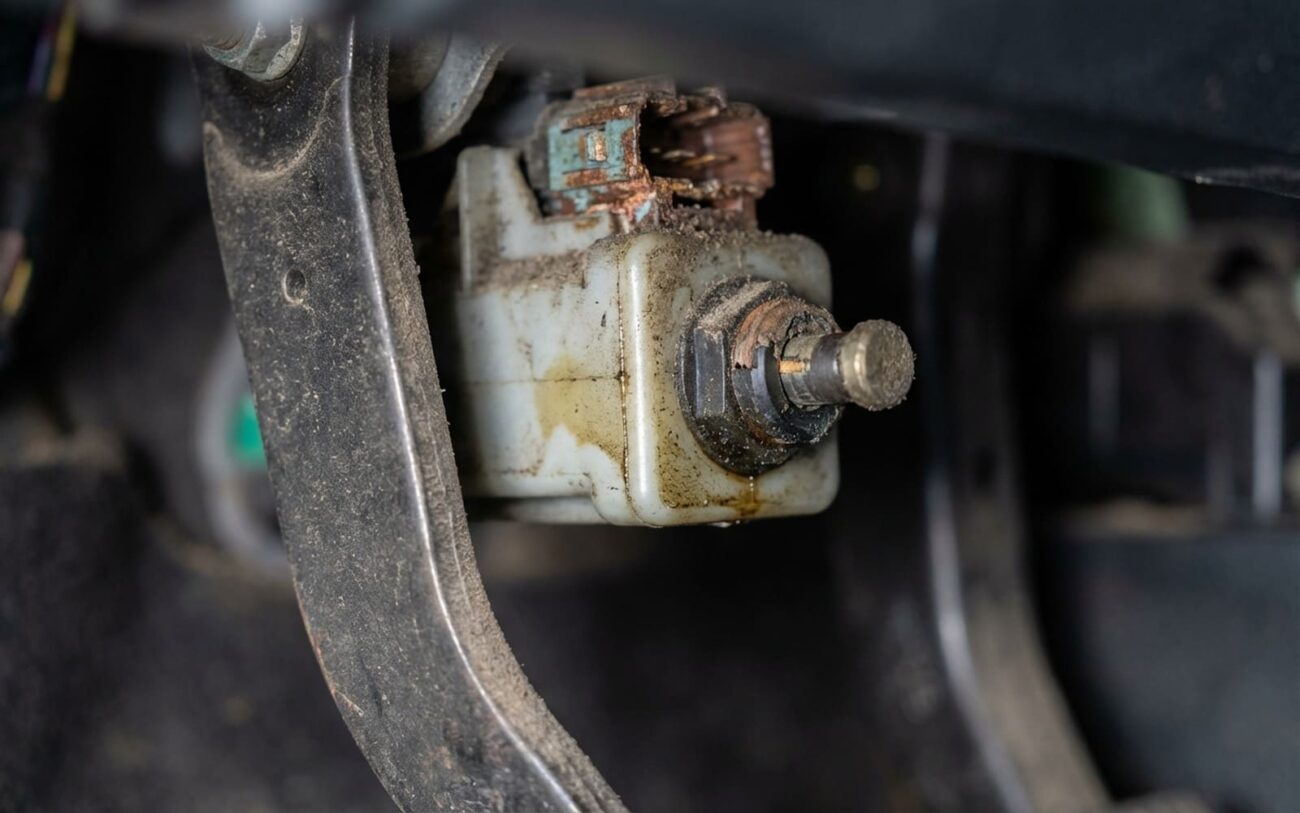
Alright, let’s talk about that annoying cruise control problem. You’re cruising along, barely touch the brake, and poof, it’s off. Or maybe your brake lights are acting weird, staying on or not coming on when they should. Based on my 25+ years in the shop, nine times out of ten, we’re looking at the brake pedal position switch. It’s a small, inexpensive part, but it can cause a real headache – and a major safety issue if you ignore it.
What’s Going On: The Brake Switch Explained
This little switch, sometimes called a brake light switch or stop lamp switch, lives right on your brake pedal support bracket. It’s got a plunger that makes contact with the pedal arm. Its main job is simple: tell your brake lights to come on when you hit the pedal. But it’s also critical for your cruise control. Any time the switch detects you’re applying the brakes, it sends a signal to the cruise control module to shut down immediately. That’s a non-negotiable safety feature.
Now, when this switch starts acting up, it’s usually one of two things: it’s either out of adjustment or the internal components are worn out. The plunger might not fully extend when you release the pedal, leaving the internal contacts in a “barely off” state. Think of it like a light switch that’s almost, but not quite, fully off. Even a slight bump, road vibration, or just your foot resting near the pedal can cause it to momentarily close. That sends a false “brake applied” signal to the cruise control, and it disengages.
It’s not always a complete failure, mind you. Often, it’s just enough contact fluctuation to trick the system. And here’s a quick field check I always tell folks: if your cruise suddenly cuts out, glance in your rearview mirror. Are your brake lights actually on? If not, that’s a strong indicator the problem is with the switch’s cruise disengage circuit. Many of these switches have separate sets of contacts—one for the brake lights, another for cruise. So, your brake lights can work perfectly, but the cruise-side contacts might be more sensitive or worn, causing the issue. On the flip side, if cruise won’t engage at all, the switch might be stuck in the “brake applied” position—mechanically jammed or electrically shorted—making the car think you’re always braking.
How I Pinpoint the Problem: Diagnosis
Before you start throwing parts at it, you absolutely need to confirm the root cause. I’ve seen too many techs replace cruise stalks or even modules when a simple $30 switch was the culprit. Misdiagnosis just wastes your money and my time. Here’s a systematic approach I use to isolate the fault.
| Symptom | Most Likely: Brake Pedal Switch | Other Possibilities (Mimics) | My Go-To Test to Confirm |
|---|---|---|---|
| Cruise disengages with a light pedal touch, or even just resting your foot near it. Brake lights may or may not be working correctly. | The switch is out of adjustment, the internal contacts are worn, the return spring is weak, or the housing is cracked. It’s “barely off.” | A short to ground in the cruise disengage wire (I often find chafing near the pedal bracket), damaged wiring insulation, or an intermittent fault inside the cruise control module itself. |
Get a good scan tool and monitor the “Brake Pedal Position Switch” live data. Gently press the pedal, just barely. If that parameter changes state before your brake lights illuminate or before you feel any physical brake engagement, your switch is definitely out of adjustment or failing. I always back this up by measuring voltage or continuity at the switch connector with a multimeter, following the manufacturer’s specific wiring diagrams.
|
| Cruise control won’t set or engage at all. | The switch is stuck in the “brake applied” position (either mechanically jammed or electrically shorted), so the system never sees a “brake released” signal. | A blown cruise control fuse, a faulty vehicle speed sensor (VSS), a defective control stalk on the steering column, a failed cruise actuator (more common on older cable-throttle systems), or a wiring interruption somewhere in the circuit. |
With the ignition on (engine off), check your brake lights. If they’re on without you touching the pedal, that switch is stuck closed. Then, I’d use a multimeter to check the cruise disengage circuit at the cruise module connector. When the pedal is released, you should see battery voltage (an open circuit). If it reads 0V, that circuit is grounded—which points directly to a shorted switch or a wiring fault.
|
A good digital multimeter and a capable scan tool are non-negotiable here. Live data monitoring gives you real-time insight into what that switch is actually doing. Without it, you’re just guessing, and that’s not how we fix cars in my shop. I see this misdiagnosed a lot—guys replacing expensive cruise stalks or modules when a $30 switch and five minutes of proper testing would have solved it.
Why These Switches Fail
The brake light switch is a pretty simple piece of hardware, but it fails in predictable ways. Most issues fall into either mechanical wear or electrical degradation.
On the mechanical side, the internal return spring can just get weak over time, especially in hot engine bay environments. When that happens, the plunger doesn’t fully extend when you take your foot off the pedal, leaving a tiny gap. The plastic plunger tip itself also wears down from constant contact. And I’ve seen plenty of switch housings, particularly on older models, crack or deform from heat exposure near the firewall. Any of these mechanical issues throw off the alignment and cause premature contact.
Electrically, these switches use sliding or snap-action contacts. These contacts can oxidize, corrode, or develop pitting from arcing, especially if the switch cycles frequently. High resistance or intermittent contact creates a flickering signal. The cruise control module sees this as erratic brake input and, for safety, it defaults to disengaging. Some vehicle platforms are definitely more prone to this; I recall specific service bulletins for certain model years where plunger binding or contact wear was a recurring issue right from the factory.
Just to be clear: this problem has nothing to do with your hydraulic brake performance. A spongy pedal, low fluid, or a master cylinder issue won’t cause this switch problem. And it’s also separate from issues with your clock spring, cruise control buttons on the steering wheel, or other steering column wiring. We’re focused solely on the brake pedal position switch and its immediate circuit.
Getting It Fixed: Repair Options
How you fix this depends on the type of switch your vehicle has. They’re not all the same.
Self-Adjusting Switches DIY-FEASIBLE
Fixed Non-Adjustable Switches DIY-FEASIBLE
Integrated Pedal Position Sensors Professional Only
As for temporary fixes: TEMPORARY. On a self-adjusting switch with just a bit of slack, I’ve seen a single thin layer of electrical tape on the pedal contact pad close the gap enough to get by. One layer only. More than that risks jamming the pedal or keeping your brake lights on constantly. This isn’t a repair—it’s just a way to get the car to a shop safely. Never rely on it long-term, and understand the risk.
Don’t Skip This: Post-Repair Validation
You can’t just assume it’s fixed after you install the new part. Always verify both the function and the timing of the switch. This step is crucial.
Start with the basics: have someone stand behind the vehicle while you press and release the brake pedal. Those lights should turn on instantly with the slightest pedal movement and go off immediately when you release it. No delay, no flickering. Then, when you’re on a safe stretch of road, test the cruise control. It should engage reliably, hold your speed, and disengage only when you apply the brake with clear, intentional input.
My best practice? Use a scan tool to monitor “Brake Switch” and “Brake Pedal Position” live data. The signal needs to transition cleanly at the exact moment the brake shoes or pads begin to contact the drums or rotors. There should be absolutely no erratic toggling or “chatter” as you lightly rest your foot on the pedal. If that signal is stable and synchronized, then your repair is solid.
Cost, Risk, and Why You Should Fix It Now
This is usually a low-cost, high-success repair, making it a prime candidate for DIY if you’re comfortable, or a quick trip to the shop.
| Repair Type | DIY Cost (Parts) | Shop Cost (Parts & Labor) | Success Rate | Risk if Not Fixed |
|---|---|---|---|---|
| Adjust existing switch (if adjustable) | $0 | $50–$100 (includes diagnostic time and minor labor) | High, assuming the switch itself is still good and just needs adjustment. | Minimal immediate risk; if it doesn’t work, you move to replacement. |
| Replace standard switch | $15–$50 | $100–$200 | Very High (~95%+ when diagnosed correctly) | Significant safety risk: unreliable brake lights, potential for rear-end collision. |
Even if you’re driving an older, low-value vehicle, this repair is absolutely justified. The cost of a new switch is negligible compared to the liability of driving with unreliable brake lights. Rear-end collisions due to inoperative or delayed brake lights are common, and in the eyes of the law, that’s often your fault. The financial and safety risk far outweighs the repair cost here.
Prevention & Monitoring: Keep It Working
There’s no scheduled replacement interval for your brake light switch, but you can definitely extend its life and catch issues early with some smart habits. Here’s what I recommend:
My Tips for Longevity and Early Detection
-
Always use a quality replacement—OEM or a reputable aftermarket brand. Cheap switches often use inferior plastics and weak springs that just won’t last.
-
When you’re replacing it, take a moment to inspect the mounting area for any cracks or warpage. Make sure the new switch is securely fastened.
-
For early detection, make it a habit to check your brake lights every few months. Back up to a garage door at night and press the pedal, or just ask someone to verify they’re working correctly.
-
Pay close attention to your cruise control behavior. If it starts disengaging too easily, that’s your first warning sign. Address it then, before your brake light performance degrades.
-
Some vehicles with advanced driver aids will log brake switch faults in the body control module. Regular scan tool checks during routine maintenance can catch these issues long before they become noticeable problems.
-
If you happen to own a model known for this issue—like certain Ford F150s or Toyota Camrys that had documented brake switch recalls or Technical Service Bulletins (TSBs)—check your manufacturer service history. It might be worth a proactive replacement if the vehicle has high mileage, even if it’s not acting up yet.
